So far, our login has been a fake one, where we put in "letme" and "in" as our username and password. In this chapter, we're going to build a real authentication system using an addon called Ember Simple Auth.

How tokens work
If you've written web applications in a language like PHP before, you're probably used to having sessions dictate if your user can access things or not (e.g <?php if ($_SESSION['user']): ?>). This is called Cookie-Based Authentication.
Since Ember (and other single-page application frameworks) exists purely on the frontend though, this concept will not really work. This is where tokens come in.
Token-Based Authentication is a more modern approach and relies on the concept that you send a token which identifies you with every request you make to the server.
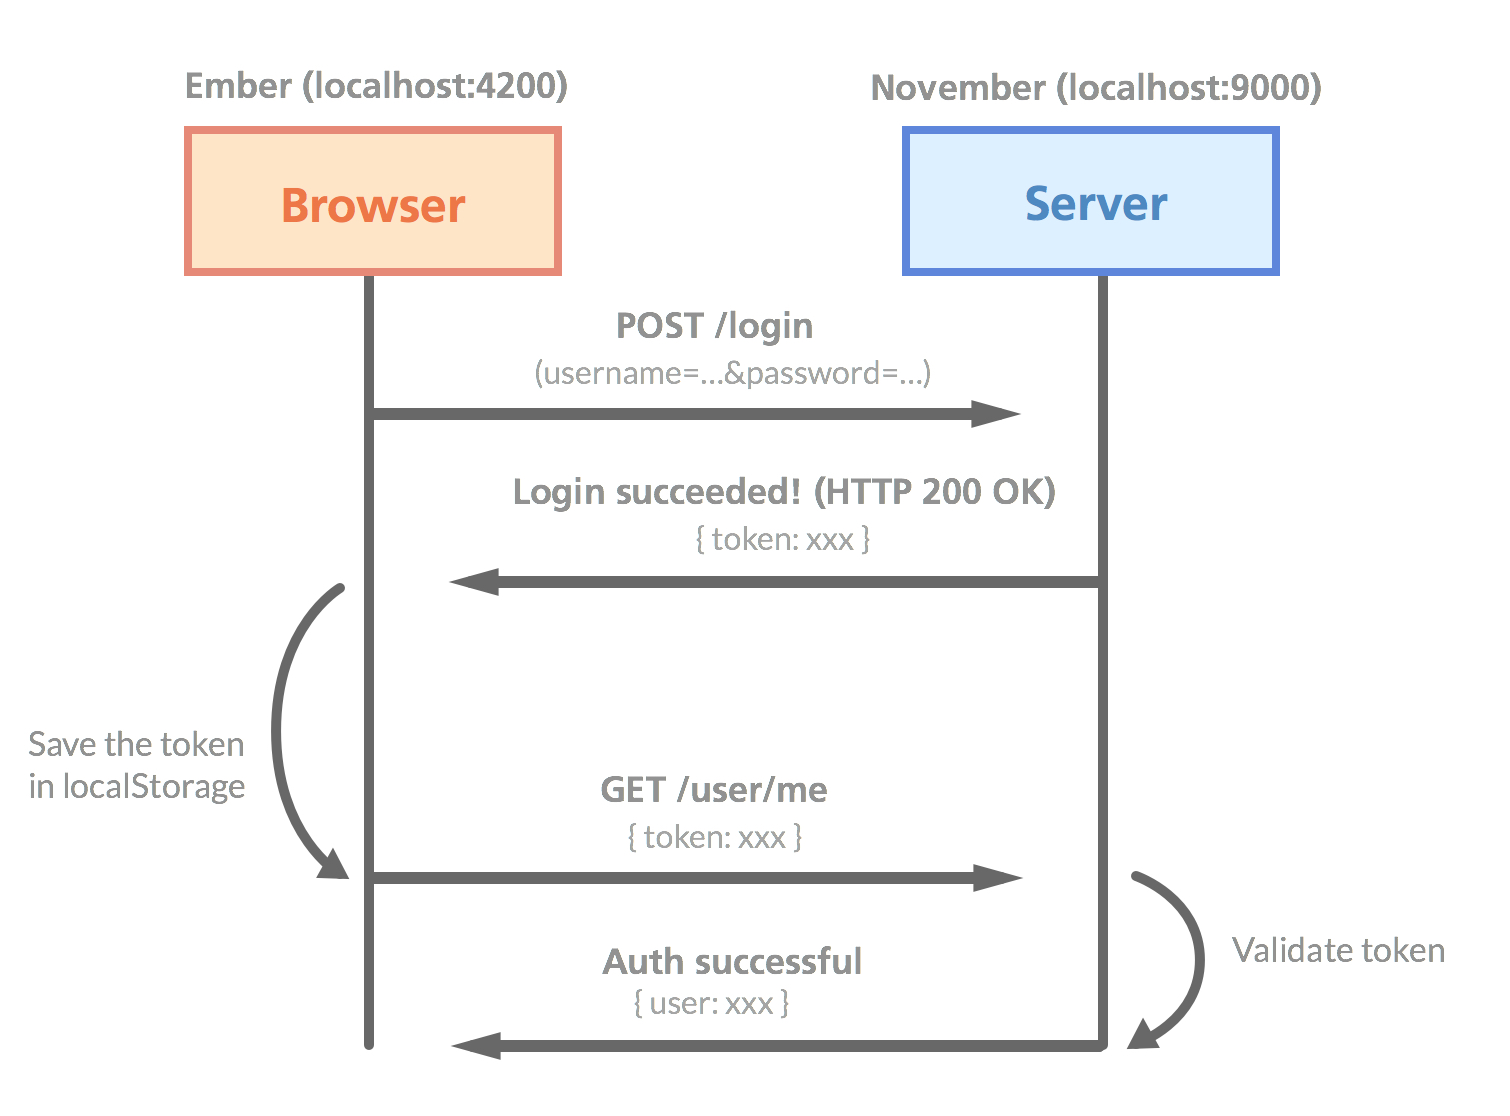
If you're a visual guy (like me), this picture might make the process clearer
Some of the main benefits with this solution is that it's stateless (your backend doesn't need to keep a session store) and much more suitable for mobile application (in case you ever want to extend your service beyond the browser).
Installing Ember Simple Auth
First of all, we'll install the Simple Auth addon for Ember CLI:
ember install ember-simple-authRemember to restart the Ember server so that your new addon can get activated. Now it's time to edit our files to take advantage of this new authentication system!
Allowing signups
The signup-part doesn't actually need Ember Simple Auth, but it's a good way to show how our Ember frontend and our November backend can work together seamlessly.
Let's start from the beginning and assume that we don't have any users registered yet. We'll begin by adding a signup-action to our signup-button on the index page:
{{! app/index/template.hbs }}

<button class="signup" {{action 'signup'}}>Sign up</button>
What we want is to have the user enter their desired credentials, click "Sign up", and then make a POST request to localhost:9000/signup where we'll grab the credentials and add the user to the database.
Let's create the signup action in our controller file. We'll also remove the fake-login action and replace it with just a console.log for now:
// app/index/controller.js

import config from '../config/environment'; // At the top of the file

// Further down:
actions: {
  signup: function() {
    var userData = {
      username: this.get('username'),
      password: this.get('password')
    };

    Ember.$.ajax({
      type: 'POST',
      url: config.apiURL + '/signup',
      dataType: 'json',
      data: userData
    })
    .done(() => {
      console.log("Created!");
      this.send('login');
    })
    .fail(() => {
      this.set('errorMessage', "Couldn't sign up!");
    });
  },

  login: function() {
    var username = this.get('username');
    var password = this.get('password');

    console.log(`Trying to log in with ${username} and ${password}`);
  }
}
Let's go through the changes we just made. As mentioned, the login action is still not working yet, although we're doing a console.log so that we know when our Ember app is attempting to log us in. Notice that we're using the new ES6 Template Strings.
Our signup action is a simple jQuery AJAX call that uses our apiURL-environment variable so that it makes a request to the correct domain.
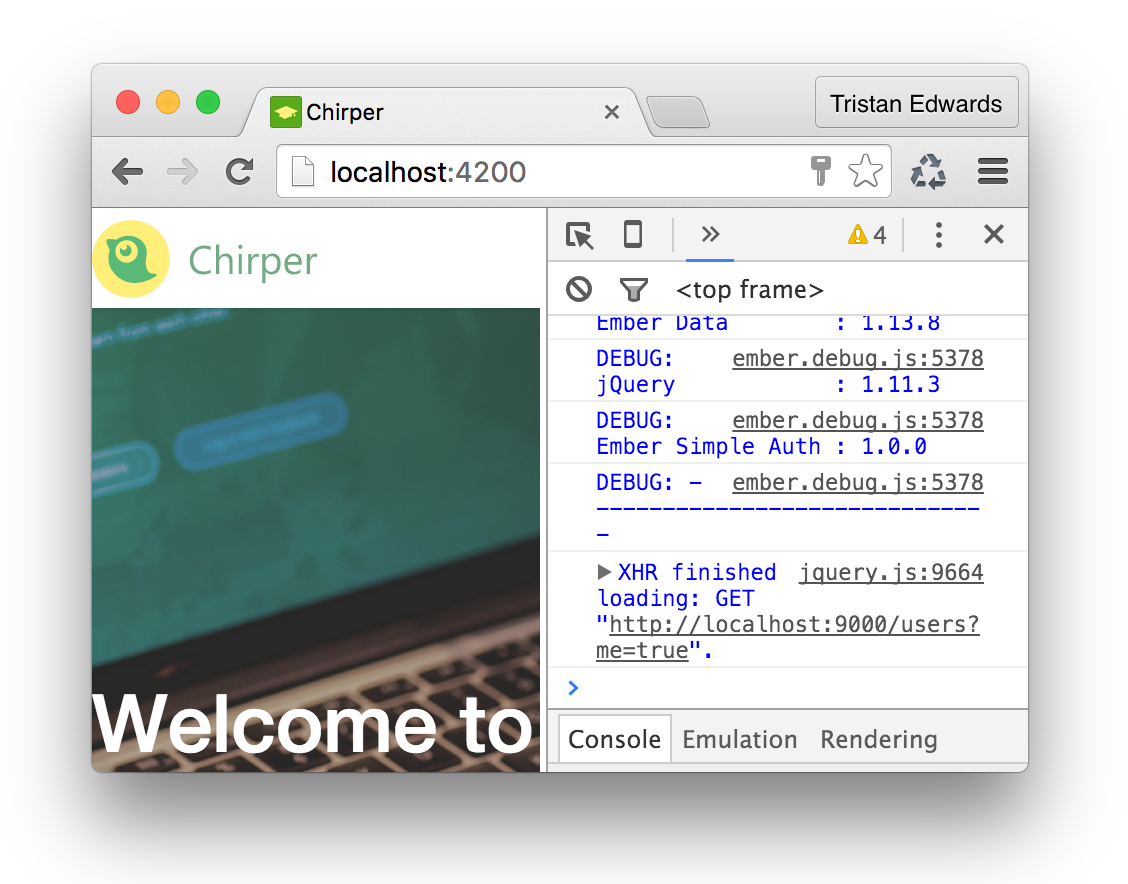
Alright, to see if our AJAX request gets fired correctly. Type in a username and password, click on the signup-button and bring up the console!
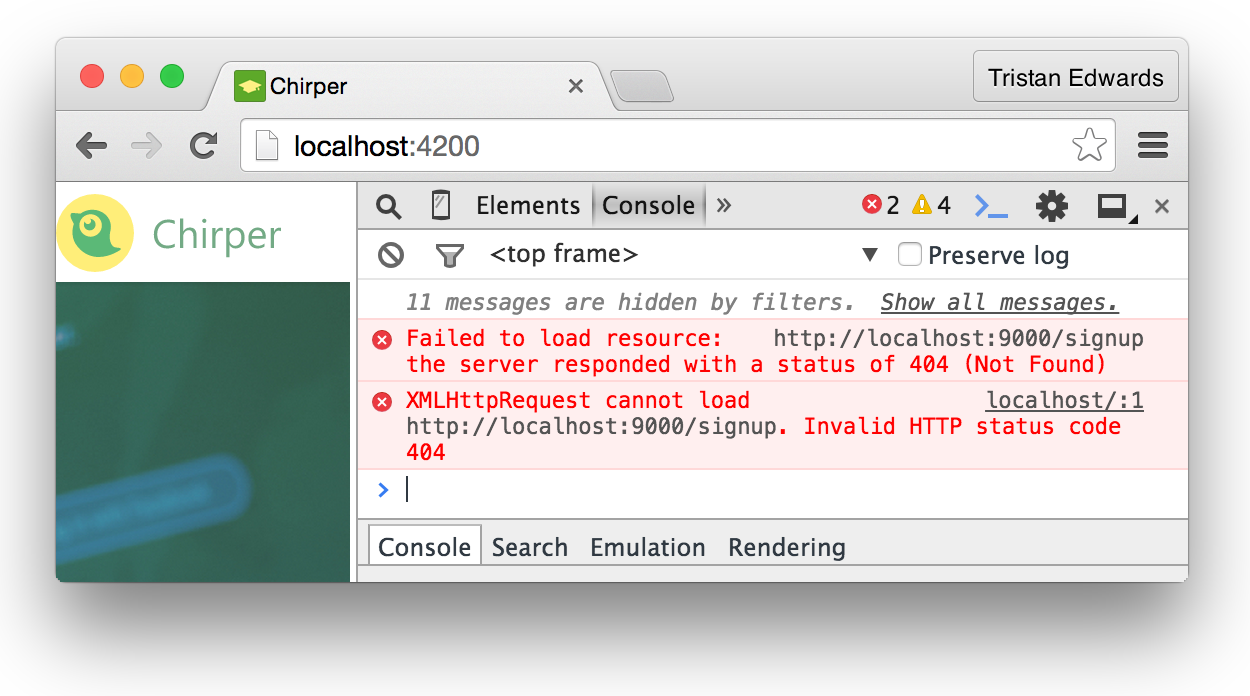 Yup, we're sending a request to localhost:9000/signup!
The Node.js API will return status 404 because obviously we haven't actually created the /signup endpoint in November yet. But apart from that, everything looks good on the front-end side!
Head back to your November project and bring up a terminal window! It's time to create that missing /signup page!
november g action signupThis will create the file app/actions/signup.js. Actions in November are like simplified models. All they do is add a POST route with the specified URL and it's up to you to code how it should behave from there.
Before we go on, we should add a password field to our user model in the backend, because right now, we've only specified a username and an about_me field.
Remember that passwords should always, always, always be encrypted in your database (in case something bad happens). What we're storing is therefore not the plain text password but a hash. We also, don't want it to be fetched by default (it should be admin-only). Let's specify that in our user model:
// app/models/user.js

var User = sequelize.define('users', {
  username: {
    type: DataTypes.STRING,
    allowNull: false,
    unique: true
  },
  about_me: DataTypes.TEXT,
  // What you need to add:
  hash: {
    type: DataTypes.STRING,
    roles: {
      admin: true
    }
  }
},
//...
To force Sequelize to update the table structure and add the hash column to the database, you will need to open up the file app/middleware/sequelize.js and specify sync({ force: true }) at the line where the database syncs:
// app/middleware/sequelize.js

db.sequelize.sync({ force: true })
.then(function(err) {
// ...
After this, visit localhost:9000/users so that the changes are made to your database.
Important! {force: true} will always reset your entire database (including the data) and reconstruct it from scratch to make sure that it has the latest structure, so use it carefully!
After the hash column has been added, make sure you remove {force: true} so that your data doesn't keep getting deleted!
Now, back to the signup! We're going to use an NPM library in our November project called bcrypt to encrypt the user's password, so let's download that first:
npm install bcrypt --saveNow we'll import that library in our file and add some simple logic:
app/actions/signup.js

var bcrypt = require('bcrypt');

module.exports = function(req, res, render) {

  if (!req.body.username || !req.body.password) {
    return render([412, "You need to specify a username and password!"]);
  }

  // Generate a salt (8 characters) and hash
  bcrypt.hash(req.body.password, 8, function(err, hash) {
    if (err) return render(err);

    // Create the new user
    var newUser = {
      username: req.body.username,
      hash: hash
    };

    // Add it to the database
    req.models.user.create(newUser)
    .then(function(user) {
      console.log("Created new user!");
      res.status(201).json({});
    })
    .catch(function(err) {
      render(err);
    });
  });

};
That's it! Now go back to your Chirper app's signup page. Type in your desired username and password, hit the signup-button and make sure that the console is visible.
 The signup seems to have worked!
To make sure that the user was indeed created, you can go into the MySQL CLI:
mysql> SELECT * FROM users;

+----+----------+----------+--------------+------------+------------+
| id | username | about_me | hash         | joined_at  | updated_at |
+----+----------+----------+--------------+------------+------------+
|  1 | t4t5     | NULL     | $$2a$08$U... | 2015-06-23 | 2015-06-23 |
+----+----------+----------+--------------+------------+------------+
Awesome, now we have a working signup! Let's move on to the login-part.
Logging in
This is where the Simple Auth addon will save us a massive amount of time! Let's go back to our index controller and start by injecting Simple Auth's session service:
// app/index/controller.js

export default Ember.Controller.extend({
  session: Ember.inject.service('session'),

  //...
The question we need to answer now is: how do we want to log in? As you probably know, many web apps offer their users multiple ways of logging in (e.g. "Log in with Facebook", "Log in with Twitter"... etc.)
Since we want to keep things simple, we're going to go for a standard "username + password" OAUTH2 login system. In order to support this, we need to create an OAUTH2 authenticator, which will simply send our username and password to a certain API endpoint.
This is very easy to manage with Simple Auth: we simply create a new app/authenticators-folder and inside we'll add all the authenticator types that we want to support (only OAUTH2 for now):
// app/authenticators/oauth2.js

import OAuth2PasswordGrant from 'ember-simple-auth/authenticators/oauth2-password-grant';
import config from '../config/environment';

export default OAuth2PasswordGrant.extend({
  serverTokenEndpoint: config.apiURL + '/login' // localhost:9000/login
});
As you can see, Simple Auth already has a OAUTH2PasswordGrant library. So we simply import it, and then export a slightly modified version where we specify where to send the request when we log in (localhost:9000/login).
Now that our authenticator is set up, we can replace the console.log() in our login-action with session.authenticate, which takes three parameters: the authenticator, the identification and the password:
// app/index/controller.js

login: function() {
  var username = this.get('username');
  var password = this.get('password');

  this.get('session')
  .authenticate('authenticator:oauth2', username, password)
  .then(() => {
    this.transitionToRoute('home');
  }, () => {
    this.set('errorMessage', 'Wrong username or password!');
  });
}
Try logging in with the username and password that you signed up with and you should see this in the console:
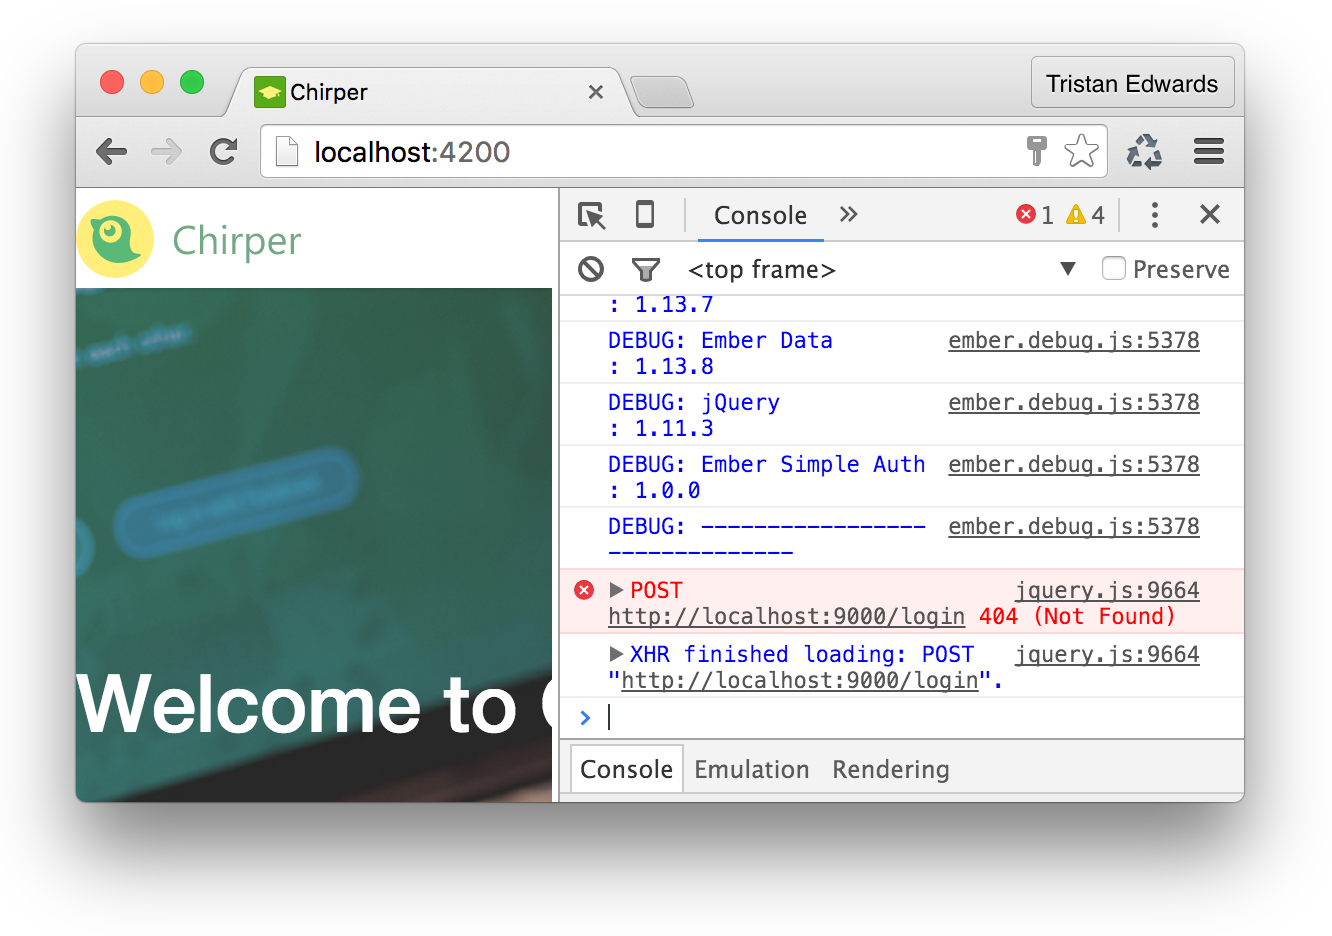
Again, the correct request is sent, but the /login endpoint doesn't yet exist in our API, so we need to generate that token on the backend. Let's create another November action, this time called "login":
november g action loginThe logic for our login action on the back-end will be very simple as well:
-
Check if there's a user in our database that matches the sent username
-
If it exists, use bcrypt to compare that user's password with the sent password
-
If it matches, generate a JWT token with the user's id and send it as a response
First, we'll install a little library for generating those JWT tokens we mentioned (Make sure you're in the November folder this time):
npm install jwt-simple --saveNow let's code that login action:
// app/actions/login.js

var jwt = require('jwt-simple');
var bcrypt = require('bcrypt');

module.exports = function(req, res, render) {

  if (req.body.grant_type !== 'password') {
    return render("Unsupported grant type");
  }

  // Check if a user with that username exists
  req.models.user.find({
    where: {
      username: req.body.username
    }
  })
  .then(function(user) {
    // The user exists! Fetch his/her hash:
    var hash = user.get({ role: 'admin' }).hash;

    // Compare that user's password (hash) with the sent password
    bcrypt.compare(req.body.password, hash, function(err, match) {
      if (err || !match) {
        return render([400, "Wrong password!"]);
      }

      // It matches! => generate a JWT token
      var claim = { userId: user.id };
      var secret = 's3cret_c0de'; // Use whatever you want here

      var token = jwt.encode(claim, secret);

      // Send response with token
      res.json({
        'access_token': token,
        'token_type': 'bearer'
      });
    });
  })
  .catch(function(err) {
    return render([400, "No user with this username was found!"]);
  });

};
And that's it! Back to the Chirper app and you should now be able to log in!
 Success! We're automatically redirected to the Home page!
Using our authenticated user on other pages
Even though this all looks good, there's still a big problem on the rest of the pages: they're not actually using our token! The home page still uses a static id of 11 to fetch the user we want to display in the profile glimpse for example.
What we want is to fetch the user based on our newly generated token, not from a static number. In order to achieve this, we need to create an authorizer, which will attach the token that November has generated for us to every request we make through Ember Data, and then create a little service that will fetch the user's info (this will be done every time we start the app).
Similar to authenticators, authorizers are stored in an app/authorizers-folder. Since this is an authorizer for our OAUTH2 authentication, we simply name the file oauth2.js. Again, Simple Auth already has a little library that we can use for this type of authentication, so we can simply import that:
// app/authorizers/oauth2.js

import OAuth2Bearer from 'ember-simple-auth/authorizers/oauth2-bearer';

export default OAuth2Bearer.extend();
Then we edit the adapter-file we created earlier to make sure that the OAUTH2-token is included in all Ember Data requests:
// app/application/adapter.js

import config from '../config/environment';
import DS from 'ember-data';
import DataAdapterMixin from 'ember-simple-auth/mixins/data-adapter-mixin'; // Add this!

// Also make sure you specify the "DataAdapterMixin" here:
export default DS.RESTAdapter.extend(DataAdapterMixin, {
  host: config.apiURL,
  authorizer: 'authorizer:oauth2' // ...and and this!
});
Next, we're going to create our own service (we'll call it session-account) that fetches the logged in user:
ember g service session-account// app/session-account/service.js
import Ember from 'ember';
export default Ember.Service.extend({
// Yes, you can inject other services into your own service!
session: Ember.inject.service(),
store: Ember.inject.service(),
loadCurrentUser() {
// session.isAuthenticated is set to true by Simple Auth when we log in
if (this.get('session.isAuthenticated')) {
this.get('store')
.query('user', { me: true })
.then((userList) => {
// Since GET requests to /users should always return an array, we want to make sure we only get the first object in the list
var me = userList.get('firstObject');
this.set('currentUser', me); // So that we can access it
});
}
}
});This will send a request to localhost:9000/users?me=true, and the idea is that our November backend should return the model of the logged in user, using the token which is appended to every request we make.
In order to retrieve the token on the backend, we're going to use a tiny package called express-bearer-token in our November app:
npm install express-bearer-token --saveThen we just add this to the rest of our Node.js middleware. By doing this, we'll be able to easily access our token with req.token:
// app/middleware/index.js (at the bottom)

// ...
app.use(loadDatabase);

app.use(require('express-bearer-token')()); // <-- The line to add
Now that we have the token in our req-object, we also need to decode it in order to see what userId it contains! For this, we'll make our own custom middleware by creating a new file in /app/middleware called user-from-token.js:
// app/middleware/user-from-token.js

var jwt = require('jwt-simple');

module.exports = function(req, res, next) {

  if (!req.token) {
    return next();
  }

  // Same secret code as we used before
  var secret = 's3cret_c0de';

  // Try to decode the token
  try {
    var claim = jwt.decode(req.token, secret);

    // Store the user in the request object if decoding was successful
    if (claim.userId) {
      req.user = claim.userId;
    }

    next();
  } catch (err) {
    console.log("Error decoding");
    next();
  }

}
We'll add this to the rest of our middleware, right after the express-bearer-token. Your final app/middleware/index.js-file should look something like this:
// app/middleware/index.js

var express = require('express');
var bodyParser = require('body-parser');

var accessControls = require('./access-controls');
var loadDatabase   = require('./sequelize');
var userFromToken  = require('./user-from-token'); // <-- ADD THIS!


module.exports = function(app) {

  // Allow JSON and URL-encoded bodies
  app.use(bodyParser.json({ limit: '10mb' }));
  app.use(bodyParser.urlencoded({ extended: false }));

  // Allow static assets
  app.use(express.static('public'));

  // Access control
  app.use(accessControls);

  // Load the models and their relations
  app.use(loadDatabase);

  // Load the user from the token
  app.use(require('express-bearer-token')());
  app.use(userFromToken); // <-- ...AND THIS!

};
Finally, we need to edit our SQL query slightly so that i can handle the URL /users?me=true :
// app/controllers/user/list.js

module.exports = function(req, res, render) {

  var findQuery;

  if (req.query.me && !req.user) {
    return render("You're not logged in!");
  }

  // Get the user from the token
  if (req.query.me) {
    findQuery = {
      where: { id: req.user }
    }
  }

  req.models.user
  .findAll(findQuery)
  .then(function(users) {
    render(users);
  })
  .catch(function(err) {
    render(err);
  });

};
Alright, the backend is ready! The users?me=true request should now return the logged-in user if a valid token is provided.
In our Ember app, we want to make sure that this request is triggered as soon as the app boots, so that we know as early as possible if the user is logged in or not. It would therefore make sense to call it in our application route:
// app/application/route.js

import Ember from 'ember';

export default Ember.Route.extend({
  sessionAccount: Ember.inject.service('session-account'),

  beforeModel() {
    this.get('sessionAccount').loadCurrentUser();
  }
});
If you refresh the page now, you should see that the request is indeed fired!
We also want this request to fire the first time we log in from the index-page, so let's also inject it to our index controller:
// app/index/controller.js

export default Ember.Controller.extend({
  session: Ember.inject.service('session'),
  sessionAccount: Ember.inject.service('session-account'), // Inject this!

  // ...

  login: function() {
    var username = this.get('username');
    var password = this.get('password');

    this.get('session')
    .authenticate('authenticator:oauth2', username, password)
    .then(() => {
      // Then add this line to your login-action:
      this.get('sessionAccount').loadCurrentUser();
  //...
We're almost there! Now we just need to edit some files on the frontend in order to show the session user we just loaded instead of the "statically-decided" user.
In order to be able to access sessionAccount.currentUser in our templates, we need to inject the session-account service in the corresponding controllers.
// app/application/controller.js

import Ember from 'ember';

export default Ember.Controller.extend({
  showingComposeModal: false,
  session: Ember.inject.service(), // Add this line
  sessionAccount: Ember.inject.service('session-account'), // ...and this
  // ...
{{! app/application/template.hbs }}
<div class="logo"></div>
{{#if session.isAuthenticated}} <!-- New! -->
<nav>
{{#link-to "home"}}Home{{/link-to}}
{{#link-to "user"}}
<img class="avatar" src="/images/avatar.jpg" />
{{sessionAccount.currentUser.username}} <!-- New! -->
{{/link-to}}
<button class="chirp" {{action "toggleComposeModal"}}>Chirp</button>
</nav>
{{/if}} {{! New! }} If you see your user's username in the header after refreshing, then that means it worked!
We also need to replace model.user with sessionAccount.currentUser in the profile glance (on the home page). While we're at it, let's also add a simple logout-action to our home controller:
// app/home/controller.js

import Ember from 'ember';

export default Ember.Controller.extend({
  application: Ember.inject.controller(),
  // Make sure you add our new session services:
  session: Ember.inject.service(),
  sessionAccount: Ember.inject.service('session-account'),

  actions: {
    openComposeModal: function() {
      this.get('application').send('toggleComposeModal');
    },
    // Our new logout action:
    logout: function() {
      this.get('session').invalidate();
    }
  }
});
{{! app/home/template.hbs }}
<aside class="left">
{{profile-glance user=sessionAccount.currentUser}}
<button class="logout" {{action 'logout'}}>Log out</button>
</aside>// app/home/route.js
import Ember from 'ember';
export default Ember.Route.extend({
model: function() {
return Ember.RSVP.hash({
user: this.store.findRecord('user', 1), // <-- This line can now be removed since we're using session.currentUser instead
chirps: this.store.findAll('chirp')
});
}
});Phew! That was a lot of work, but we finally have a working authentication, and hopefully you've learnt something in the process! Don't worry if it was a lot to take in at once. Just re-read the code again carefully and make sure you understand the flow of the app and how the frontend and backend work together. Also, check out Simple Auth's official docs.
Protecting your routes
Another common thing to have when dealing with authentication is protected routeswhich redirect the user based on if he's logged in or not.
In our Chirper app, we just need two behaviours:
-
If the user is logged out and visits
/home, he should be redirected to the index page where he can log in. -
If the user is logged in and visits
index, he should be redirected to the home page.
This is easily done thanks to Simple Auth's AuthenticatedRouteMixin and UnauthenticatedRouteMixin. We'll start by setting the home-route as an authenticated route:
// app/home/route.js

import Ember from 'ember';
import AuthenticatedRouteMixin from 'ember-simple-auth/mixins/authenticated-route-mixin'; // Just import the mixin

export default Ember.Route.extend(AuthenticatedRouteMixin, { // ...and add it to the Route object
  model: function() {
  //...
Next, we set the index-route as an unauthenticated route:
// app/index/route.js

import Ember from 'ember';
import UnauthenticatedRouteMixin from 'ember-simple-auth/mixins/unauthenticated-route-mixin'; // Import the mixin

export default Ember.Route.extend(UnauthenticatedRouteMixin, { // ...and use it here
  // ...
Finally, we need to specify where these authenticated and unauthenticated routes should redirect, which we do in config/environment.js . In some apps, you might for example want the AuthenticatedRouteMixin to redirect to a dedicated login route. In our case, we just want to take the user to index, since that's where our login form is. And we want logged in users to be redirected to home:
// config/environment.js

EmberENV: {
  FEATURES: {
    // Here you can enable experimental features on an ember canary build
    // e.g. 'with-controller': true
  }
},

  // ADD THIS:
'ember-simple-auth': {
  authenticationRoute: 'index',
  routeIfAlreadyAuthenticated: 'home'
},
Voila! You'll now notice that, if you're logged in and visit the index route, you'll be redirected to home, and if you're logged out and visit the home route, you'll be redirected to index. Perfect!
Fixing the chirp posting
As we mentioned in the previous chapter, the chirps that we try to post in our modal are still not saved to the database!
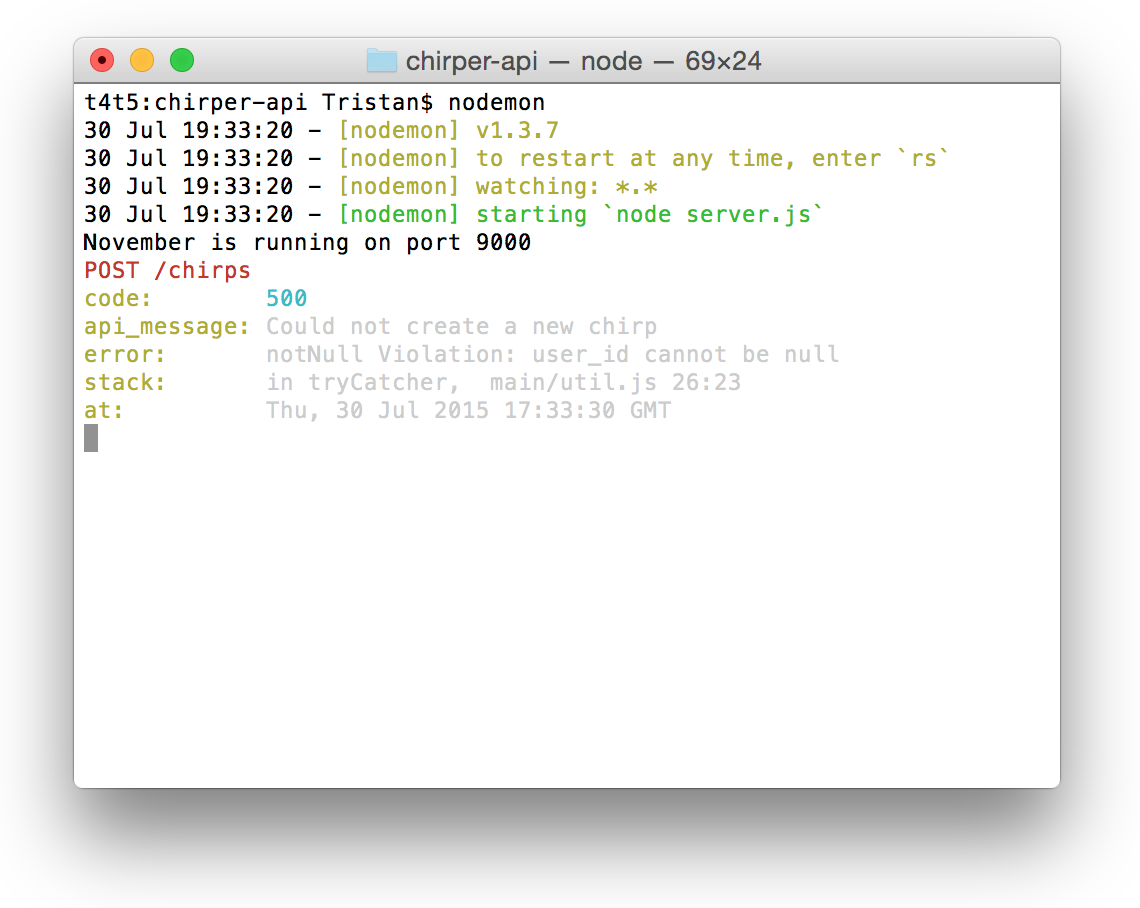 If you check the November console, you'll get a hint about why it's not working.
This is because the user -object that we're sending to November isn't handled correctly, so it reads the user_id as NULL (which isn't allowed in the database). However, we also want to stop sending the user in the request object (otherwise someone could potentially post as any user!) and instead use the token for setting the user_id!
Let's first fix the Ember frontend by removing the reference to the user object...
// app/components/compose-modal/component.js

postChirp: function() {

  if (this.get('noCharsLeft')) {
    swal("Woops!", "You have too many characters in your chirp!", "error");
    return false;
  }

  // Retrieve the value of {{textarea}}
  var text = this.get('chirpText');

  // We've remove the user object
  var chirpData = {
    text: text,
    createdAt: new Date()
  };

  var newChirp = this.get('store').createRecord('chirp', chirpData);

  newChirp.save().then(() => {
    this.attrs.dismiss(); // Hide the modal
  });
}
And then we fix the November backend...
// app/controllers/chirp/add.js

module.exports = function(req, res, render) {

  if (!req.body.chirp) {
    return render("You need to specify a chirp object!");
  }

  if (!req.user) {
    return render("You need to be logged in to post!");
  }

  req.body.chirp.user_id = req.user;

  req.models.chirp
  .create(req.body.chirp)
  .then(function(chirp) {
    render(chirp);
  })
  .catch(function(err) {
    render(err);
  });

};
We fixed it!
To sum it up: we've now implemented a signup, a login, and a system for fetching the user for every server request we make (which is handy when posting for example). It might have seemed very lengthy, but it's actually not too bad an achievement for just one chapter's work!
In the next chapter, we're going to improve our existing profile page by making it possible to view multiple profiles (right now you can only see your own).