Now that we can properly connect to our rooms, we can focus on the fun part -- sending and receiving messages. Here's how it's going to work:
-
The user types a message in the input and clicks "send"
-
The message is pushed to the room's channel
-
Phoenix receives the message, adds it to the database, and broadcasts its ID to all the members of that room
-
The room members receive the new message ID and use it to fetch the message object from the API
-
The message's full** JSON** is returned and the users can add it to their application's store with Redux.
As you can see, we have quite some work to do, so let's just take it one step at a time.
Creating a message
The first thing we want to do is to be able to read what message the user has written in the input tag. For that, we'll add some state in the ChatContainer component that gets updated whenever the user types:
// assets/js/components/chat-container.js

// ...

class ChatContainer extends React.Component {

  // Add the initial state in the component:
  constructor(props) {
    super(props);

    this.state = {
      draft: '',
    };
  }

  // Update the state when the user types:
  updateDraft(e) {
    this.setState({
      draft: e.target.value,
    });
  }

  render() {

    // ...

    return (

      // ...

      <input
      	placeholder="Type a message..."
      	value={this.state.draft} // Read from state
      	onChange={this.updateDraft.bind(this)} // Update when user types
  	  />

	  // ...

    )
  }
}

// ...
Next, we'll also handle the click event on the button, so that we can read the state of the draft, log it, and reset it:
// assets/js/components/chat-container.js

// ...

class ChatContainer extends React.Component {

  // ...

  sendMessage() {
    // Read the message:
    let message = this.state.draft;

    if (!message) return false;

    // Log it:
    console.log(message);

    // Reset it:
    this.setState({
      draft: ''
    });
  }

  render() {

    // ...

    return (
      // ...

        <button onClick={this.sendMessage.bind(this)}>
          Send
        </button>

      // ...
    )
  }
}
If you type a message and click "Send", you should now see it being logged in your console.
So far so good. Now, in order to send this message out to the room's channel, we need to retrieve the channel object for the room (stored in the Redux store), and use .push, just like we did previously when we "shouted" in the "lobby".
We start by passing down room as a prop (because we need both the room's id and its channel), near the end of the file:
// assets/js/components/chat-container.js
// ...

const mapStateToProps = (state) => {

  // ...

  return {
    messages: (activeRoom) ? activeRoom.messages : [],
    room: activeRoom, // Add this line!
  };
};
Then we push the message out to the channel -- under the identifier "message:new" -- in our sendMessage method:
// assets/js/components/chat-container.js

// ...

  sendMessage() {
    let message = this.state.draft;

    if (!message) return false;

    let room = this.props.room;

    room.channel.push('message:new', {
      text: message,
      room_id: room.id,
    });

    this.setState({
      draft: ''
    });
  }

  // ...
If we try to send a message again, it might seem as if nothing has changed. But that's only because we're not handling this incoming message on the Phoenix server! Let's bring back a handle_in/2-function that prints the message and the room's ID, then returns an :ok message:
# lib/messengyr_web/channels/room_channel.ex

defmodule MessengyrWeb.RoomChannel do

  # ...

  def handle_in("message:new", %{"text" => text, "room_id" => room_id}, socket) do
    IO.puts("Got message #{text} from room #{room_id}")

    {:reply, :ok, socket}
  end

end
Now you should see the message in your Phoenix console:
Cool! Let's keep following our checklist. The next thing we want to do is to add this message to our database, and then broadcast the ID to all the users of the room!
# lib/messengyr_web/channels/room_channel.ex

defmodule MessengyrWeb.RoomChannel do

  # ...

  def handle_in("message:new", %{"text" => text, "room_id" => room_id}, socket) do
    me = socket.assigns.current_user
    room = Chat.get_room(room_id)

    with {:ok, message} <- Chat.add_message(%{
      room: room,
      user: me,
      text: text,
    }) do
      IO.puts "Added message!"

      json = %{
        messageId: message.id,
      }

      # Broadcast the ID to all the connected users of the room:
      broadcast! socket, "message:new", json

      # Return an {:ok} message to the author:
      {:reply, :ok, socket}
    else
      _ -> {:error, %{reason: "Couldn't add message!"}}
    end
  end

end
So how do we make sure that the client can receive this JSON message? For that, we head back to our menu-container.js-file, where we previously connected to all the room channels, and we'll create a new listenToNewMessages-method, which will be called for each of these channels:
// assets/js/components/menu-container.js

// ...

class MenuContainer extends React.Component {

  componentDidMount() {
    fetch('/api/rooms', {
      // ...
    })
    .then((response) => {

      // ...

      rooms.forEach((room) => {
        room.channel = getRoomChannel(room.id);
        this.listenToNewMessages(room); // Add this line!
      });

      // ...

    })
    .catch((err) => {
      // ...
    });
  }

  // Add this method:
  listenToNewMessages(room) {
    room.channel.on('message:new', resp => {
      let messageId = resp.messageId;

      console.log(`Message with ID ${messageId} was posted!`);
    });
  }

  // ...

}

// ...
You should now be able to send messages from one user, and see its ID appear in the log of the other user almost instantly! Cool!
Fetching the message with AJAX
Instead of just logging the message, we will now create a getNewMessage method, where we fetch a message's JSON given its ID:
// assets/js/components/menu-container.js

// ...

class MenuContainer extends React.Component {

  // ...

  // Add this method:
  getNewMessage(room, messageId) {
    fetch(`/api/messages/${messageId}`, {
      headers: {
        "Authorization": "Bearer " + window.jwtToken,
      },
    })
    .then((response) => {
      return response.json();
    })
    .then((response) => {
      console.log(response);
    })
    .catch((err) => {
      console.error(err);
    });
  }

  listenToNewMessages(room) {
    room.channel.on('message:new', resp => {
      let messageId = resp.messageId;

      this.getNewMessage(room, messageId); // Add this line!
    });
  }

  // ...

}

// ...
The only problem now is that the API endpoint /messages/{message_id} doesn't exist, so we need to create that as well. You should know the drill by now when it comes to creating routes! We start with the router file:
# lib/messengyr_web/router.ex

defmodule MessengyrWeb.Router do

  # ...

  scope "/api", MessengyrWeb do

    # ...

    # Add this line:
    resources "/messages", MessageController, only: [:show]
  end
end
Since the MessageController doesn't exist yet, we need to create the file and add a show/2-function. In the function, we need to fetch the message, with its room, and make sure that the user is allowed to see the requested message (we don't want users to be able to fetch messages from a room unless they're a member).
To do this, we'll create a new get_message/1-function in our "chat" context, and then we'll use our existing Chat.room_has_user?/2-function in the controller:
# lib/messengyr/chat/chat.ex

defmodule Messengyr.Chat do

  # ...

  # Add this function:
  def get_message(id) do
    Repo.get(Message, id) |> Repo.preload(:room)
  end

  # ...

end
# lib/messengyr_web/controllers/api/message_controller.ex
defmodule MessengyrWeb.MessageController do
use MessengyrWeb, :controller
alias Messengyr.Chat
alias Messengyr.Chat.Message
# We use our fallback controller to handle "nil" and ":not_allowed"
action_fallback MessengyrWeb.FallbackController
def show(conn, %{"id" => message_id}) do
# Get the logged-in user:
me = Guardian.Plug.current_resource(conn)
# Get the message
case Chat.get_message(message_id) do
%Message{room: room} = message ->
# Make sure that the user is allowed to see the message:
if Chat.room_has_user?(room, me) do
render(conn, "show.json", %{message: message, me: me})
else
:not_allowed
end
_ -> nil
end
end
endIn order to handle the :not_allowed response, we need to add a new pattern matched function in the fallback controller:
# lib/messengyr_web/controllers/fallback_controller.ex

defmodule MessengyrWeb.FallbackController do

  # ...

  def call(conn, :not_allowed) do
    conn
    |> put_status(403)
    |> render(ErrorView, "error.json", message: "You're not allowed to access this resource")
  end

end
Finally, we need a render/3 function in our MessageView so that we can show our JSON. Luckily, most of the work has already been done in that file, thanks to the message_json/2-function that we created earlier:
# lib/mesengyr_web/views/api/message_view.ex

defmodule MessengyrWeb.MessageView do
  use MessengyrWeb, :view

  def render("show.json", %{message: message, me: me}) do
    %{
      message: message_json(message, %{me: me})
    }
  end

  # ...

end
Now try to send messages again, and you'll see the full message JSON being logged instead of just the ID!
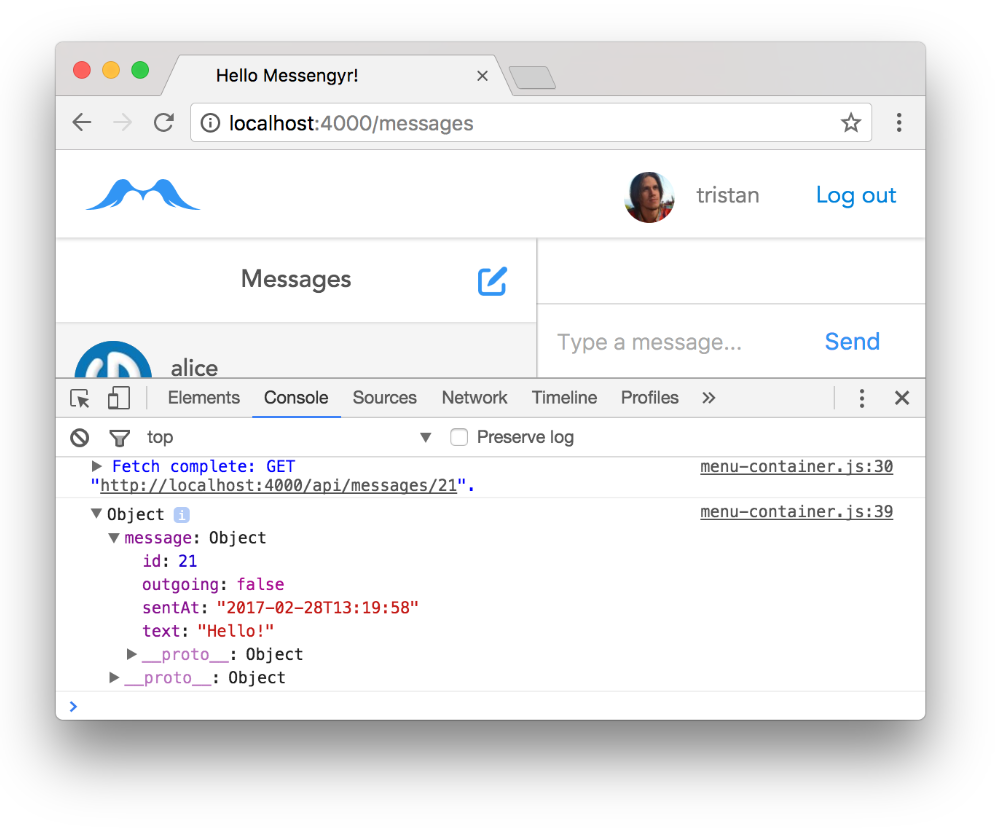 Boom!
Boom!
Adding the message with Redux
We're almost there! The final step is to make the message appear in the UI using Redux. For this, need a new action called "ADD_MESSAGE". We can start by defining it in the actions.js-file. For this action, we're going to need the **message object **and the room ID in order to know how to manipulate the current state tree:
// assets/js/actions.js

// ...

export function addMessage(message, roomId) {
  return {
    type: "ADD_MESSAGE",
    message,
    roomId,
  }
};
We can then import the action into menu-container.js and map it to a prop:
// assets/js/components/menu-container.js

// ...

// Make sure you add "addMessage"...
import { setRooms, selectRoom, addRoom, addMessage } from '../actions';

// ...

class MenuContainer extends React.Component {

  // ...

  getNewMessage(room, messageId) {
    fetch(`/api/messages/${messageId}`, {
      // ...
    })
    .then((response) => {
      // Call the "addMessage" action...
      this.props.addMessage(response.message, room.id);
    })
    .catch((err) => {
      // ...
    });
  }

  // ...
}

// ...

const mapDispatchToProps = {
  setRooms,
  selectRoom,
  addRoom,
  addMessage, // ...and add this line!
};

// ...
Finally, we add a reducer so that Redux knows how to change the state given the action it receives:
// assets/js/reducers.js

// We create a new function to take care
// of the state of a room's messages:
export const messages = (state = [], action) => {
  switch (action.type) {
    case "ADD_MESSAGE":
      // Add the new message to the list of messages:
      return [
        ...state,
        action.message,
      ];

    default:
      return state;
  }
};

const room = (state, action) => {
  switch (action.type) {

    // ...

    case "ADD_MESSAGE":
      // If the action's "roomId" isn't this room,
      // don't change the state of the room, just return it:
      if (state.id !== action.roomId) {
        return state;
      }

      // Edit the "messages" object of this room:
      return Object.assign({}, state, {
        messages: messages(state.messages, action)
      });

    // ...

  }
};

const rooms = (state = [], action) => {
  switch (action.type) {

    // ...

    // ...and here's where the handling starts:
    case "ADD_MESSAGE":
      return state.map(r => {
        return room(r, action);
      });

    // ...

  }
};

export default rooms;
And that's it! Now try sending messages again.
Some last UI fixes
We've now implemented all the core functionality of our web app! Well done! There's only a few fixes to be made before we can move on. First, we should scroll down automatically whenever a new message is posted, otherwise we risk missing it, as you can see in the video below.
We'll fix this by creating a scrollToBottom function in chat-container.js, outside of the component class:
// assets/js/components/chat-container.js

// ...

// Create this function:
function scrollToBottom() {
  let chatEl = document.querySelector('.chat ul');
  if (!chatEl) return false;

  chatEl.scrollTop = chatEl.scrollHeight;
}

class ChatContainer extends React.Component {
  // ...// ...

// Create this function:
function scrollToBottom() {
  let chatEl = document.querySelector('.chat ul');
  if (!chatEl) return false;

  chatEl.scrollTop = chatEl.scrollHeight;
}

class ChatContainer extends React.Component {
  // ...
The idea here is that we will call this function to scroll down whenever there's a new message or whenever the user selects a new room.
To look for these changes, we can use React's componentDidUpdate-hook. There, we can compare our current props with the props we had before the last re-render. If the room prop's id has changed for example, it means the user just selected a new room, (and that the window should scroll)! Likewise, if the messages prop's length changes, that means a new message was just posted (and the window should scroll)!
Here's how we code this in the componentDidUpdate hook:
// assets/js/components/chat-container.js

// ...

class ChatContainer extends React.Component {

  // ...

  /*
   * Check if a new room is selected or if a message is added.
   * If it is, scroll down!
   */
  componentDidUpdate(prevProps) {
    let prevRoomId = prevProps.room && prevProps.room.id;
    let newRoomId  = this.props.room && this.props.room.id;

    let prevNumMessages = prevProps.messages.length;
    let newNumMessages  = this.props.messages.length;

    let changedRoom  = (prevRoomId !== newRoomId);
    let addedMessage = (prevNumMessages !== newNumMessages);

    if (changedRoom || addedMessage) {
      scrollToBottom();
    }
  }

  // ...
Now, that's better! Finally, it's also a bit tedious to have to click the "Send"-button with the cursor every time we want to send a message. We should be able to just press "enter"!
Fortunately, that's very easy, we just need to handle the onKeyPress event on our input tag and trigger the sendMessage method whenever "enter" is pressed:
// assets/js/components/chat-container.js

// ...

class ChatContainer extends React.Component {

  // ...

  // Add this method:
  handleKeyPress(e) {
    if (e.key === "Enter") {
      this.sendMessage();
    }
  }

  render() {

    // ...

    return (
      // ...

      <input
        placeholder="Type a message..."
        value={this.state.draft}
        onChange={this.updateDraft.bind(this)}
  		onKeyPress={this.handleKeyPress.bind(this)} // Add this line!
	  />

      // ...
    )
  }
}

// ...
Voila! Your app is now basically ready! However, that doesn't mean that there isn't more to learn. In the next lesson, we're going to go through automatic testing in Elixir!