In our Messengyr application, we're obviously going to need a database if we want to store data such as users and messages. That's why, in this lesson, we're going to learn about Phoenix's database wrapper -- Ecto.
Ecto works with all Elixir applications, and is the default database wrapper for Phoenix. It supports the most popular databases (Postgres, MySQL, MongoDB) through specific adapters. The default database is Postgres, and that's also the one that we're going to use in this course.
Checking out the database
Remember when we ran mix ecto.create earlier, right after generating our app? We haven't yet gone through in detail what actually happened there, so let's do it now!
Open a new terminal window and launch psql (Postgres' interactive UI) by typing psql and hitting enter. Now that you're in the interactive UI, use the \list command to view all your databases:
# \list

 List of databases

 Name          |  Owner   | Encoding |   Collate   |    Ctype    |

---------------+----------+----------+-------------+-------------|

 messengyr_dev | postgres | UTF8     | en_US.UTF-8 | en_US.UTF-8 |
You might have some other databases there from previous projects, but among them you should find messengyr_dev. That's the one that was created when you ran the mix ecto.create command before. The name is pretty telling -- this is the database for the Messengyr project that you're going to use during development. If you deploy your application to a production server, Phoenix will automatically name the database messengyr_prod instead, and if you're writing automatic tests, it will create a messengyr_test database. Pretty handy!
Using psql to check out your database can be a bit cumbersome sometimes, so if you want something simpler, I recommend installing a nice GUI app for Postgres. I personally use Postico for Mac.
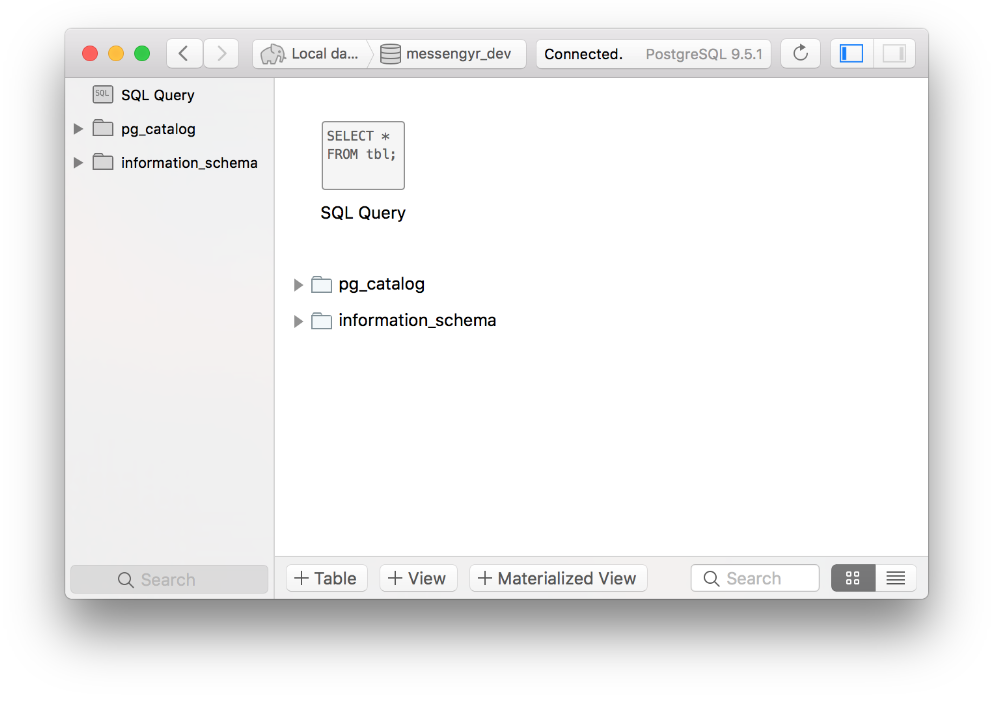 This is what you'll see if you use Postico to open the database.
As expected, there are no tables in the database yet.
Creating the user schema
A quick note before we start: If you check out older tutorials on Phoenix, you might see references to "Phoenix models" or "Ecto models". However, the concept of "models" has been deprecated since Phoenix 1.3 in favour of Ecto schemas and plain modules, which is what we'll use here.
Let's start with the user schema. Think about what kind of data you want to store for your users. In our Messengyr app, it will be the following:
-
A username
-
An email address
-
A password (which should be encrypted for security reasons)
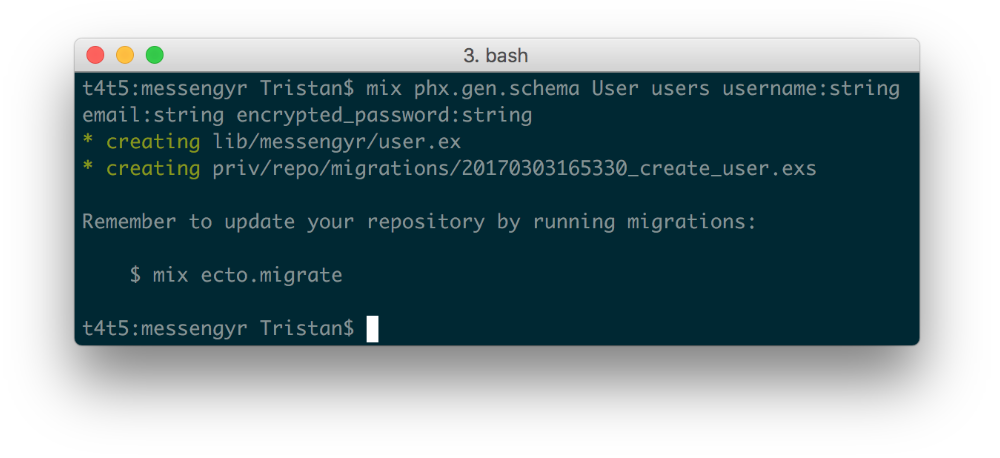
Phoenix comes with a handy Mix task (mix phx.gen.schema) that helps us generate the boilerplate for this new schema through the command line! Exit psql with \q and run this in your terminal:
mix phx.gen.schema User users username:string email:string encrypted_password:stringIf everything went well, you should see something like this, informing you that two files were created:
Don't run the migration command just yet.
Let's go through what we just did:
-
phoenix.gen.schemainforms Phoenix that we want to generate a new schema. -
Useris the name of the module that we're creating -
usersis the name that we want to give to the database table (which is usually pluralised) -
username:string email:string...etc are the column names and their type. In this case, they're all strings.
With this command, we've generated two files:
-
An Ecto schema file, which specifies the user's properties. It serves as an abstraction for whenever we want to change something in the
users-table. -
A migration file, so that your database can be initialised with the
users-table.
Tinkering with our schema
Before we run the migration command to add the "users"-table to our database, we'll do some small adjustments to the schema.
First of all, we want to make sure that the fields username and email are unique for each user. Open your model file and add unique: true to these fields, so that the schema looks like this:
# lib/messengyr/user.ex
defmodule Messengyr.User do
  use Ecto.Schema
  import Ecto.Changeset

  schema "users" do
    field :email, :string, unique: true    # Added here...
    field :encrypted_password, :string
    field :username, :string, unique: true # ...and here

    timestamps()
  end

  # ...
end
We also want this uniqueness to be a constraint in the database, so that we can guarantee that no data accidentally bypasses it. Open your migration file and add two unique_index lines after the table creation. The final change function in your migration file should look like this:
# priv/repo/migrations/xxxx_create_user.exs

defmodule Messengyr.Repo.Migrations.CreateMessengyr.User do
  use Ecto.Migration

  def change do
    create table(:users) do
      # ...
    end

    # Add these 2 lines:
    create unique_index(:users, [:username])
    create unique_index(:users, [:email])
  end
end
Running the migration
Now that we're happy with our migration file, we're ready to run the migrate task. Open a terminal window and run:
mix ecto.migrate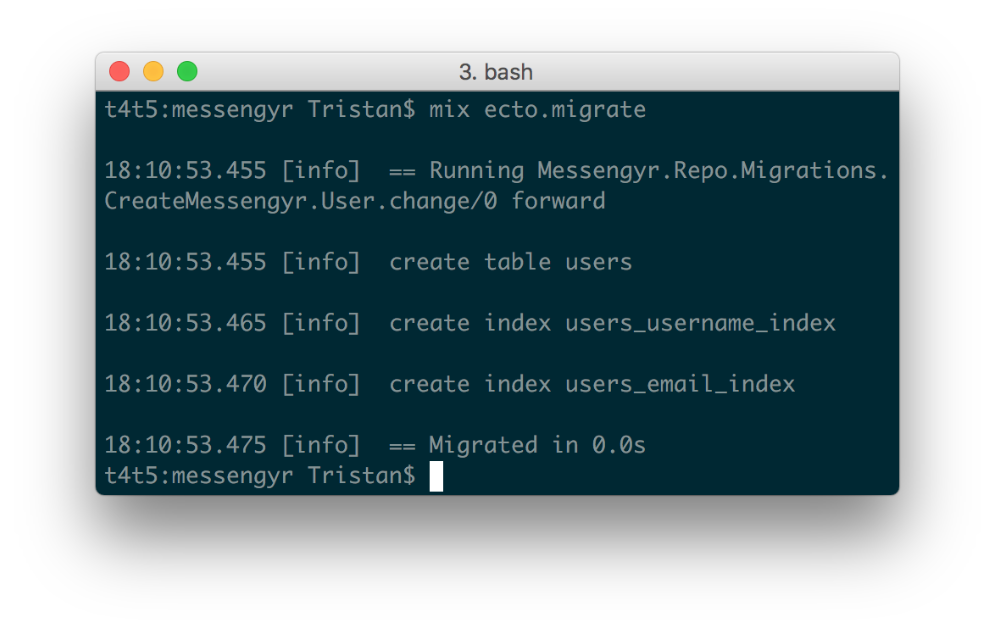
If everything went well, you should see how Ecto creates the new table and then adds our two indices.
Now check your Postgres database, and you'll see that two new tables have been created: schema_migrations and users.
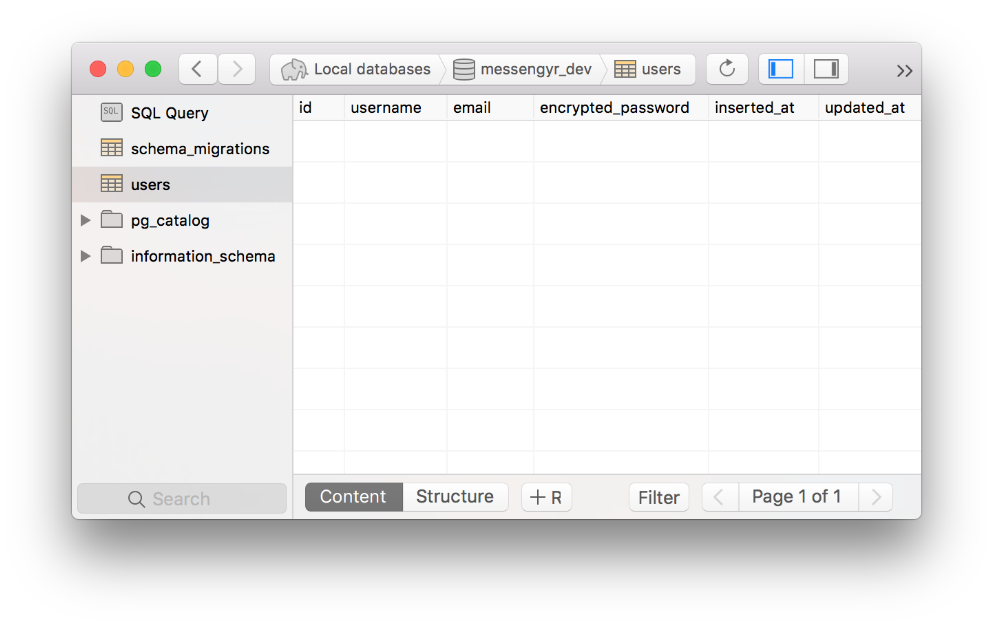
The "schema_migrations" table keeps track of which migrations have been run. This way you can easily compare your development database with the one that's in production, or with your teammate's version.
As you might have noticed, the users table also contains two bonus columns: inserted_at and updated_at. These were added through the timestamps() function in your migration file and are automatically updated. If you don't want them, you can remove the timestamps() line before running the migration command, but most of the time I think you'll find that they are very useful!
Rolling back
If you ever need to do some minor changes to your database structure, always use a migration file, so that the changes are explicit in your code. You can easily generate new ones through the task mix ecto.gen.migration.
Also, if you make a mistake in your migration file, don't be afraid to use the task mix ecto.rollback to reverse the last migration. The rollback command essentially looks at every action in your change function from your last migration file, and then performs the opposite action (create table becomes drop table... etc).
I encourage you to try this yourself right now! Run mix ecto.rollback and you'll see how your users table is destroyed (don't panic!). Then run mix ecto.migrate, and you'll see how it's restored once again (phew).
 "mix ecto.rollback" followed by "mix ecto.migrate".
Hopefully, you'll have a basic understanding of how Ecto works with your databases now. In the next chapter, we'll look at how you can edit your model records through something called changesets.