We now have an app that gets its initial state by fetching data from the API, and renders the UI according to the data that it receives. Pretty sweet! But what if we want to update this data?
Let's say we post a new message to our room. When we do that, we want an AJAX call to be sent to the server (so that we store the new message in the database), but we also want this new data to be instantly visible on the page without us having to refresh the page. To accomplish this, we should use some kind of state management tool for our app. Fortunately, there's a great library that fits out use case pretty well -- Redux.
Before we start, let me assure you by saying that this is the last lesson in the course that has more JavaScript code than Elixir code. :-)
Understanding Redux
 Redux's official logo
The concept of Redux is pretty simple: you have a single JavaScript object that describes the entire state of your app -- called the store. This is actually similar to what we already have -- the data from our AJAX request contains our rooms, our counterparts and our messages, all in a single JSON object.
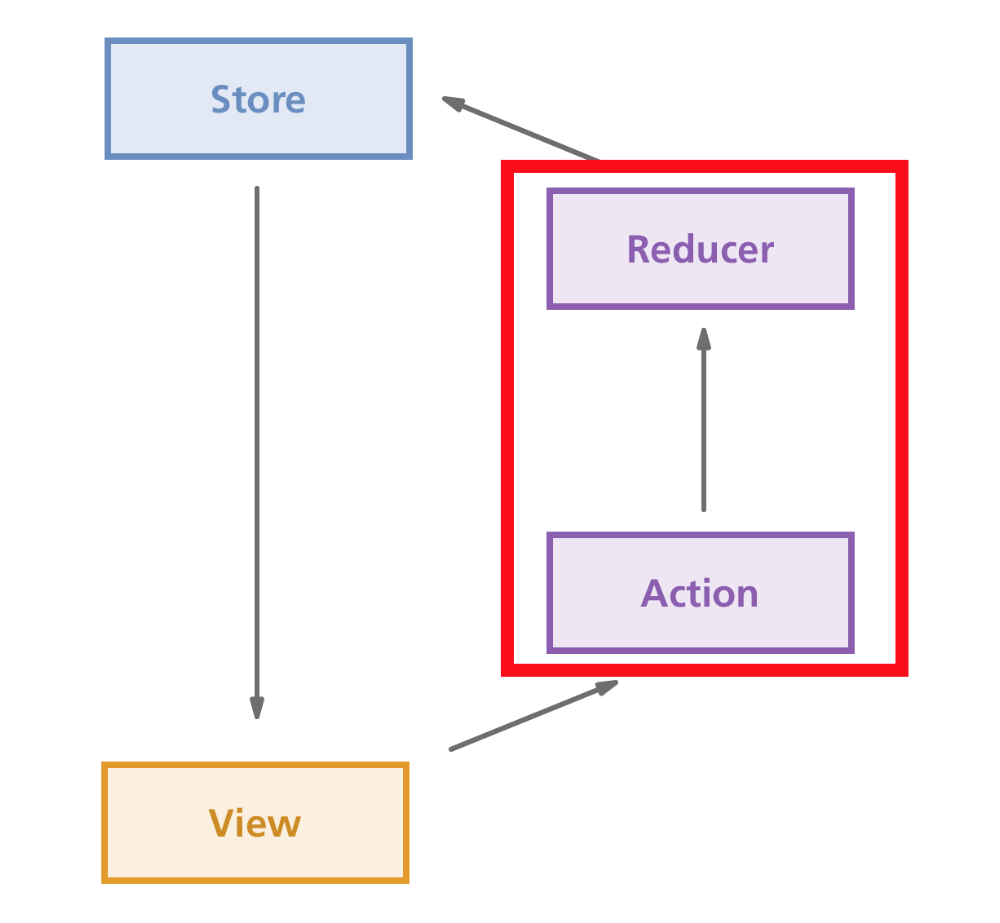
What makes Redux so special is that it makes updating this single resource easy and predictable using actions and reducers. Here's our vision for how Redux should work in our app:
-
We have an object representing the state of our app -- the store. It currently contains one room and one message.
-
After we compose a message, we click the "send"-button, which triggers a Redux action.
-
The Redux action sends all the necessary info (the message and the room that it was sent to) to a certain reducer.
-
The reducer takes the object representing the current state of our app, clones it, and makes certain changes (in this case, it adds a message). When it's done, it returns the new state.
-
Our UI detects that our Redux store has been updated, and re-renders.
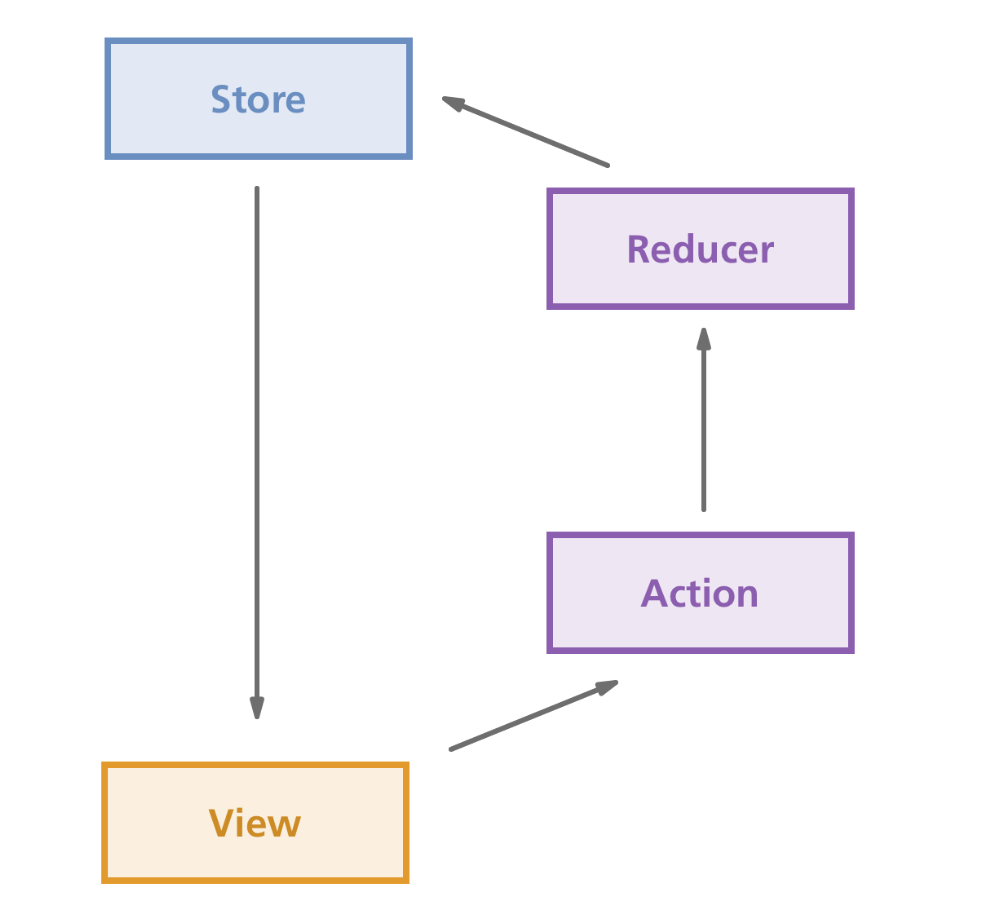
If you're having trouble grasping the concept of this one-way data flow, this picture might clarify some things. Otherwise, don't worry, it will get clearer once we actually start using it!
Creating the Redux store
To start using Redux, we'll install redux and react-redux with NPM (again, in the assets-folder):
npm install --save redux react-reduxWe whitelist the packages...
// assets/brunch-config.js

  // ...

  npm: {
    enabled: true,
    whitelist: ["react", "react-dom", "whatwg-fetch", "moment", "redux", "react-redux"],
  }
};
...and we import the stuff that we need (createStore and Provider) near the top of our app.js-file:
// assets/js/app.js

import React from 'react';
import ReactDOM from 'react-dom';
import 'whatwg-fetch';

// Add these 2 lines:
import { createStore } from 'redux';
import { Provider } from 'react-redux';
Alright, are you ready for some Redux? We're now going to be a bit bold and comment out the componentDidMount() hook, while completely removing the constructor() hook from our component. This way, we no longer have any data!
// assets/js/app.js

// ...

class App extends React.Component {

  /*
  componentDidMount() {
    // ... (NOTE: don't delete any of the code that's here!)
  }
  */

  render() {
    return (
      // ...
Since we no longer have any component state, we cannot pass that down as props to the MenuContainer and ChatContainer components. We should therefore remove those lines too:
// assets/js/app.js

  // ...

  render() {
    return (
      <div>
        <MenuContainer /> // Remove the "rooms" prop that was here
        <ChatContainer /> // ...and the "messages" prop that was here
      </div>
    )
  }
}
Goodbye sweet data! :( Don't worry, it will soon come back.
Next, we're going to create our Redux store, which is the new place where our data will live. To create a store, we first need a function that returns the state of our app. In order to get started quickly, we'll simply return the DATA constant (from fake-data.js) as the result of this function.
This function, which we now store in a rooms constant, is called a reducer, and we create the store by passing it as a parameter to the createStore function:
// assets/js/app.js

// ...

import DATA from './fake-data';

// Our reducer function:
const rooms = () => {
  return DATA.rooms;
};

// Our store:
const store = createStore(rooms);

class App extends React.Component {
  // ...
Finally, in order for our MenuContainer and ChatContainer components to be able to read from that store, our App component needs to be wrapped in a Provider component! We'll do this at the very bottom of the file:
// assets/js/app.js

// ...

ReactDOM.render(
  <Provider store={store}>
    <App />
  </Provider>,
  document.getElementById('app'),
);
Are you still following? Good! Now we need to take care of the first flow of this data -- from the store to one of our components.
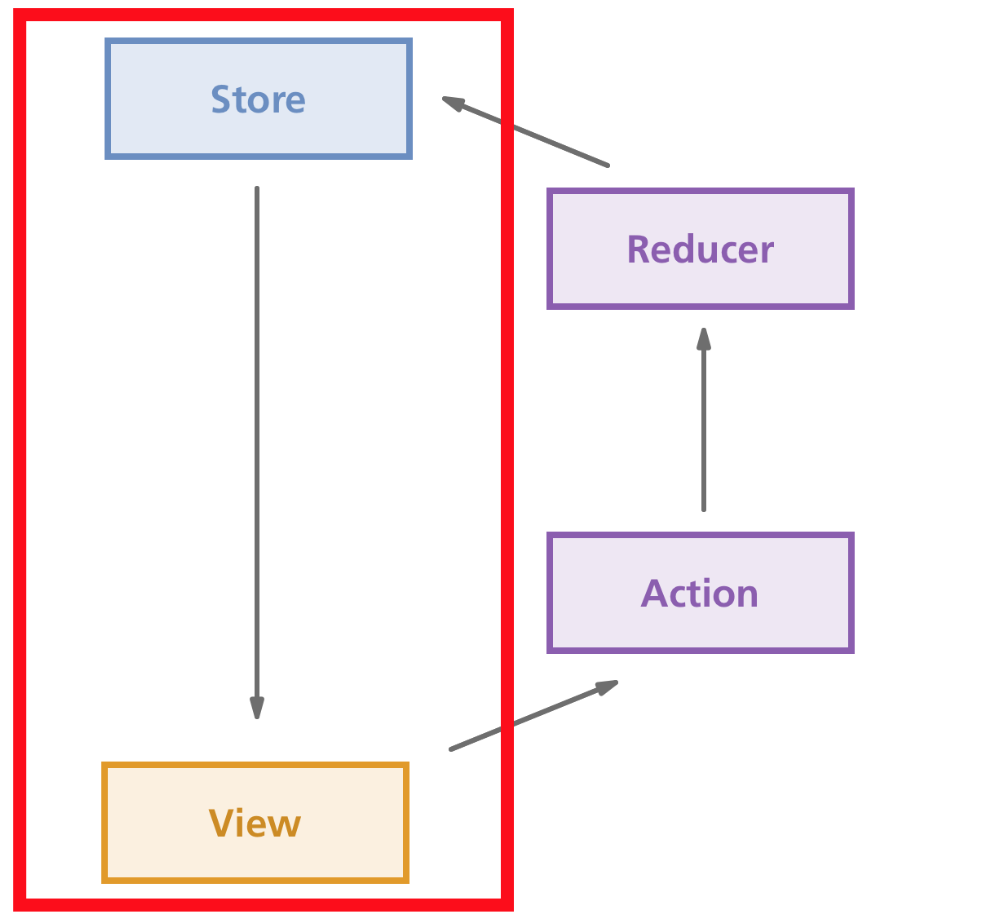 This is the part of the Redux flow that we're focusing on.
We'll start with the MenuContainer component. As you know, this component expects to find a rooms prop so that it can render the list of rooms. Only now, we're not passing down that prop anymore, because we want to read the data from the Redux store instead, right? The trick is therefore to map the state of our store to a prop called rooms. We do this using the connect-function given by the react-redux library:
// assets/js/components/menu-container.js

// ...

import { connect } from 'react-redux'; // Add this line!

// ...

class MenuContainer extends React.Component {
  // ...
}

MenuContainer.defaultProps = {
  rooms: [],
};

// Create this function:
const mapStateToProps = (state) => {
  return {
    rooms: state,
  };
};

// And apply it on the component with "connect":
MenuContainer = connect(
  mapStateToProps,
)(MenuContainer);

export default MenuContainer;
Our mapStateToProps-function will read the global Redux state (from the argument state) and return an object that simulates the behaviour of passing down props. In this case, the prop is rooms and its value is whatever the value of state is.
And with that, you've successfully created your Redux store and read its data from a component!
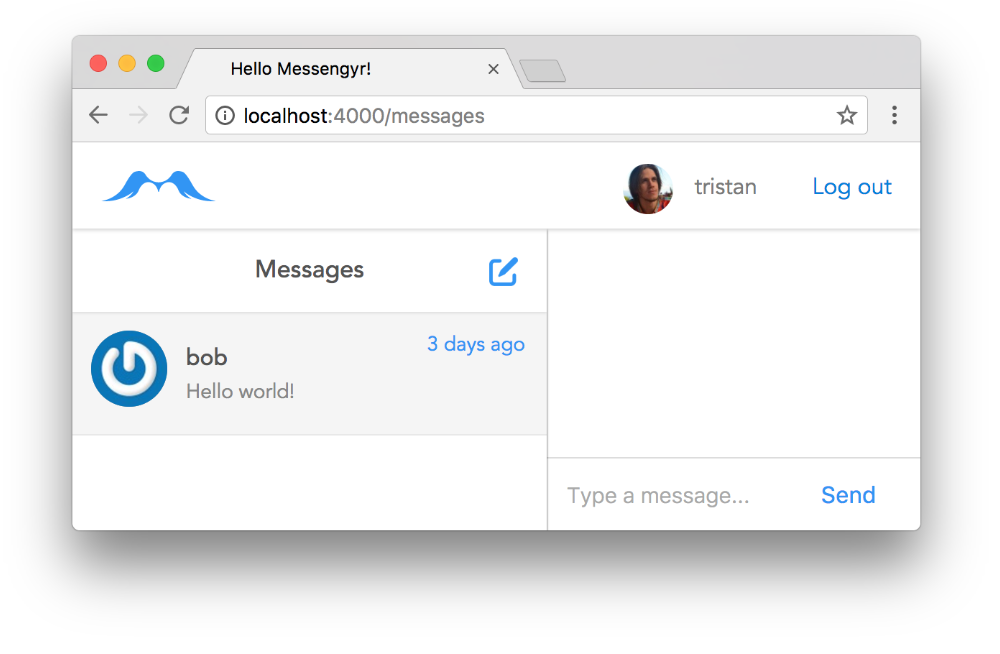
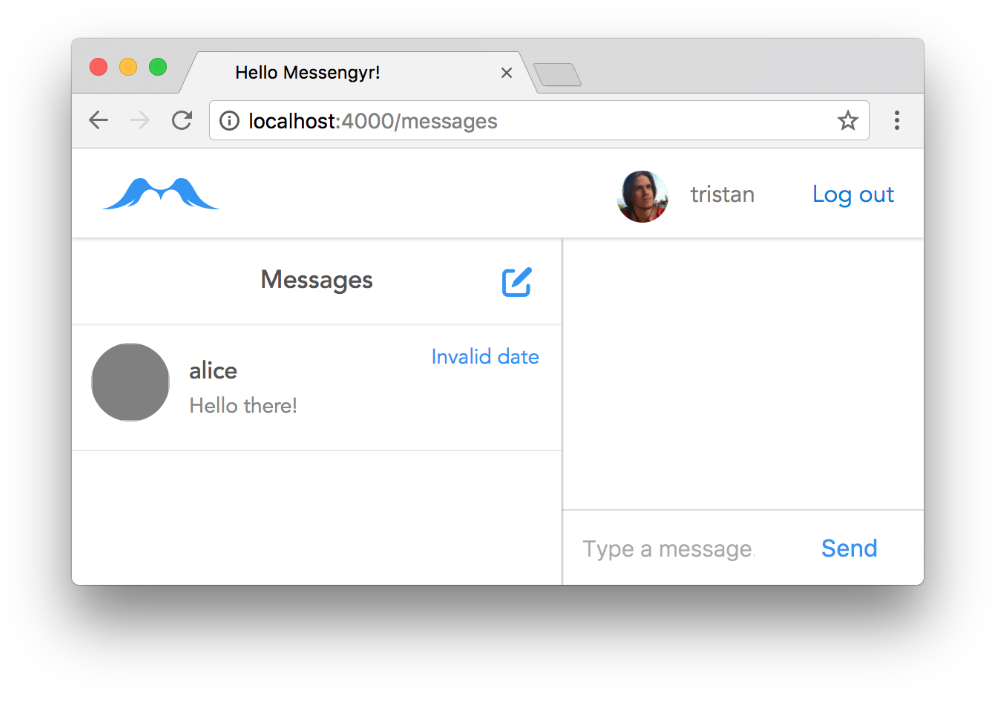 Fake data is back! No messages are visible yet, but we'll take care of that soon.
Our first action
Even though we've set up Redux, you might be thinking right now that this feels like a step back. We used to have database data in our UI, but now we just have that stupid fake data again! I agree, let's try to bring back our real data by creating our first Redux action!
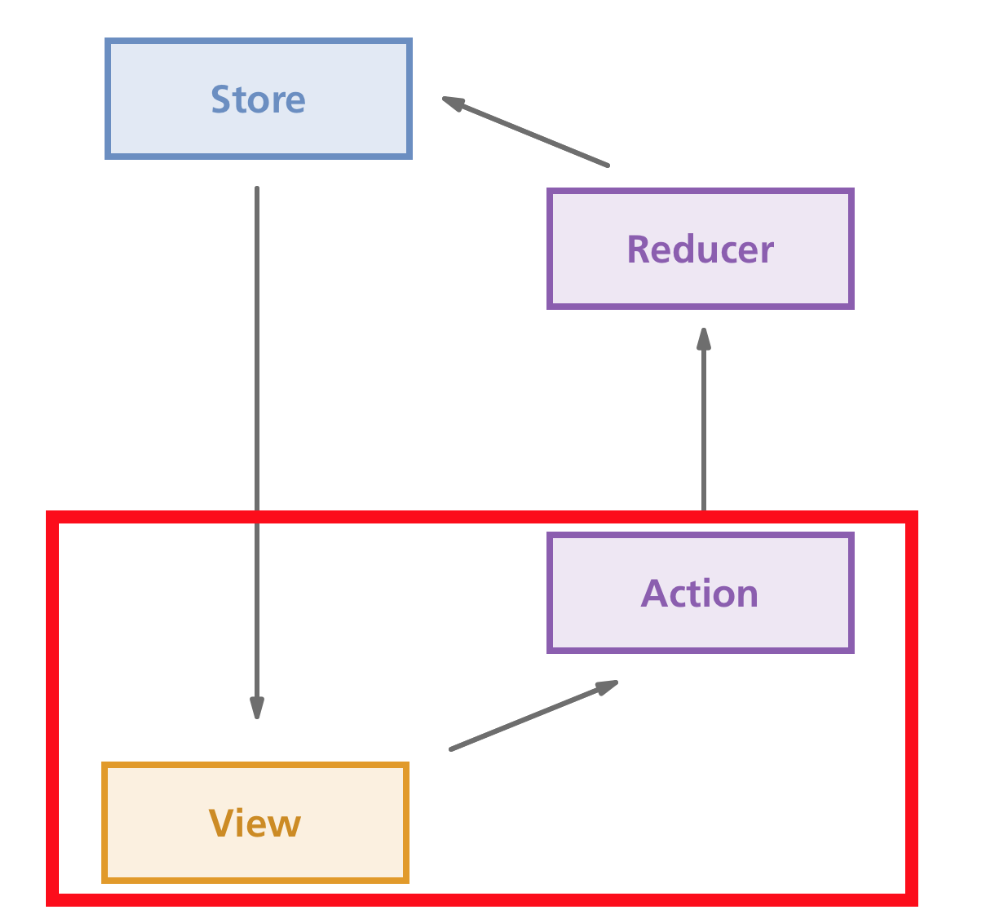 We will now focus on this part of the flow
Our Redux action will be called "SET_ROOMS" (Redux actions are usually all-caps and use underscores), and its responsibility will be to initialise the "rooms" data as soon as we start our app. To get the data from our API, we need to use the Fetch request that we commented out earlier. This time however, we're going to make that request in the MenuContainer component instead of the App component.
Copy the componentDidMount-hook from your app.js-file and place it in menu-container.js instead:
// assets/js/components/menu-container.js

// ...

class MenuContainer extends React.Component {

  // Here's where we place the hook:
  componentDidMount() {
    fetch('/api/rooms', {
      headers: {
        "Authorization": "Bearer " + window.jwtToken,
      },
    })
    .then((response) => {
      return response.json();
    })
    .then((response) => {
      let rooms = response.rooms;

      this.setState({
        rooms: rooms,
        messages: rooms[0].messages,
      });
    })
    .catch((err) => {
      console.error(err);
    });
  }

  render() {
	  // ...
  }
}
When we get our data this time, instead of using this.setState to set some local component state, we want to set the state in our Redux store. This is done by dispatching an action. This might sound advanced, but the concept is actually pretty simple -- we invoke a special prop on the component as function, and that function will "bubble up" the new data to our reducer.
Since we called the Redux action "SET_ROOMS", we'll call this special prop function setRooms, and here's how we invoke it after our Fetch request is done:
// assets/js/components/menu-container.js

  // ...

	})
    .then((response) => {
      return response.json();
    })
    .then((response) => {
      let rooms = response.rooms;

      // Use this instead of "this.props.setState(..."
      this.props.setRooms(rooms);
    })
	.catch((err) => {
    // ...
The setRooms prop obviously doesn't exist yet, so if we try to run this it will just say this.props.setRooms is not a function. How do we then create this prop and map it to a Redux action?
Remember how we used mapStateToProps to turn data from the Redux store into props? Well, it turns out that we can easily turn dispatch actions into props too, using mapDispatchToProps!
First, we need to create our action. A Redux action should simply return an object with the action's type, and some eventual data, which will be **used by the reducer **later. In this case, the type is "SET_ROOMS", and the data is the array of rooms that was returned from the API. We can put this Redux action in the same file, right above the component class:
// assets/js/components/menu-container.js

// ...

// Add this function:
let setRooms = (rooms) => {
  return {
    type: "SET_ROOMS",
    rooms,
  }
};

class MenuContainer extends React.Component {
  // ...
Now we simply connect this action to the setRooms prop by creating a mapDispatchToProps object and passing it to the connect-function at the end of the file. Again, this is very similar to what we just did with mapStateToProps.
// assets/js/components/menu-container.js

// ...

const mapStateToProps = (state) => {
  return {
    rooms: state,
  };
};

// Create this object:
const mapDispatchToProps = {
  setRooms,
};

MenuContainer = connect(
  mapStateToProps,
  mapDispatchToProps, // ...and add this line!
)(MenuContainer);

export default MenuContainer;
Now, when we use this.props.setRooms in our component, the setRooms function declared at the top of the file will be called!
Thanks to connect, the setRooms-function will, in turn, trigger the reducer function:
In case you've forgotten, our reducer is the rooms-function at the top of our app.js-file. Let's stop returning fake data in that function and instead we'll simply log the arguments of the function when it's called, just to see what happens:
// assets/js/app.js

// ...

// The reducer function can take two parameters: "state" and "action"
const rooms = (state, action) => {
  console.log(state, action);
};

const store = createStore(rooms);

class App extends React.Component {
  // ...
If you refresh the page, you should see this in your JavaScript console:
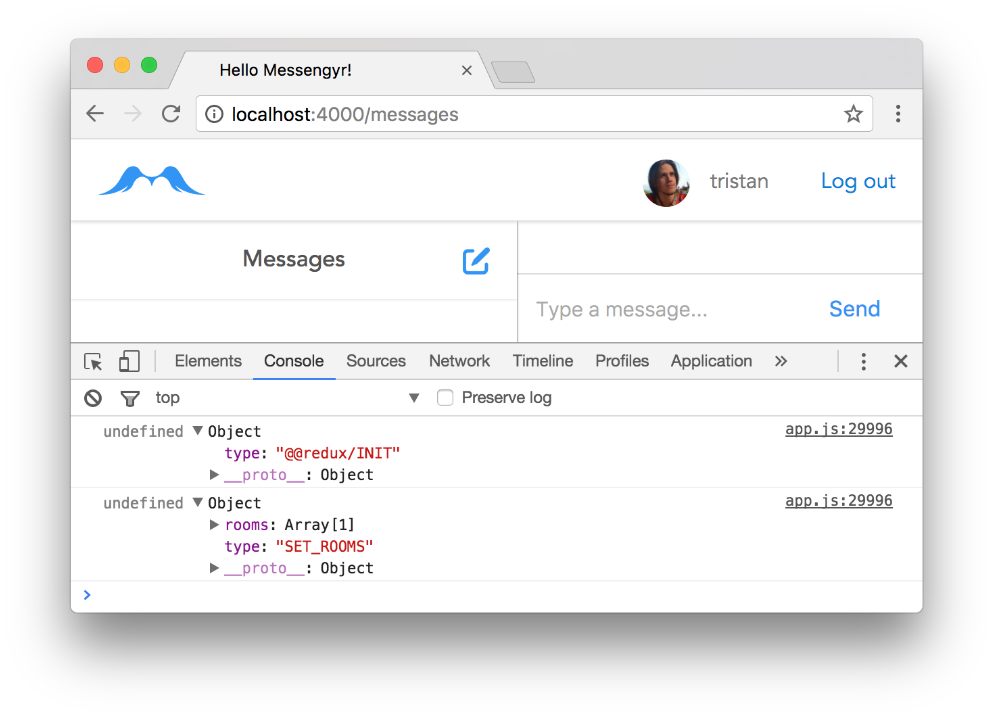 The "state" parameter is always undefined, but the "action" parameter contains interesting information!
The reason why state stays undefined is because we're not returning anything from our reducer function now.
What's interesting is that you can still see the different actions that are triggered! The first one is of type "@@redux/INIT", which, as you probably guessed, is initialised by Redux itself and sets the default state. The second action however, "SET_ROOMS", is the one that we just created!
The only thing left to do now is to return a new state based on the **previous state **and the **action **(both of which we receive as arguments)! For this, we're going to use a switch statement:
// assets/js/app.js

// ...

const rooms = (state = [], action) => {
  switch (action.type) {
    case "SET_ROOMS":
      return action.rooms;

    default:
      return state;
  }
};

const store = createStore(rooms);

class App extends React.Component {
  // ...
By setting state = [] in the arguments section, we make sure that the default value of the state is an **empty list **(which seems reasonable since our data is supposed to be a list of rooms).
Then, based on the action type, we return a new state. If the action type is SET_ROOMS, we completely disregard the previous state and we return the new list of rooms that we receive. All other actions are currently handled by default, which simply returns the previous state without making any modifications whatsoever.
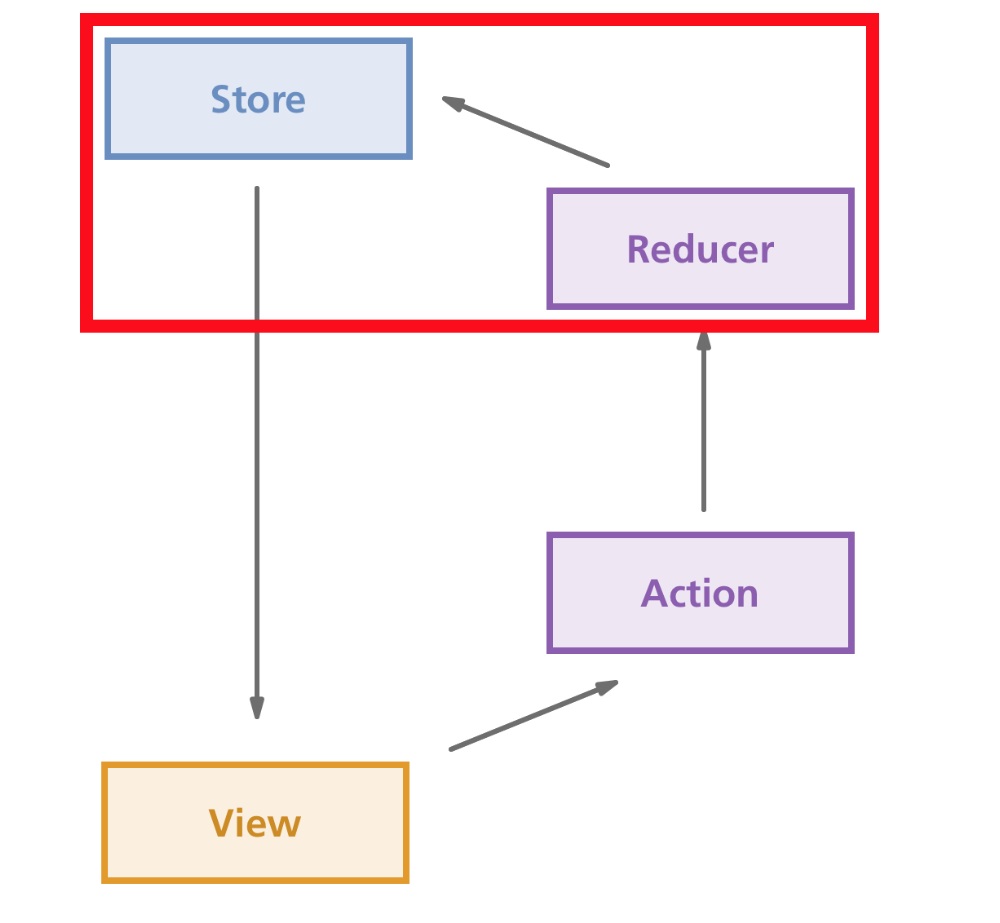 The circle is now complete!
Refresh the page again and we should be back to using database data for our list of rooms!
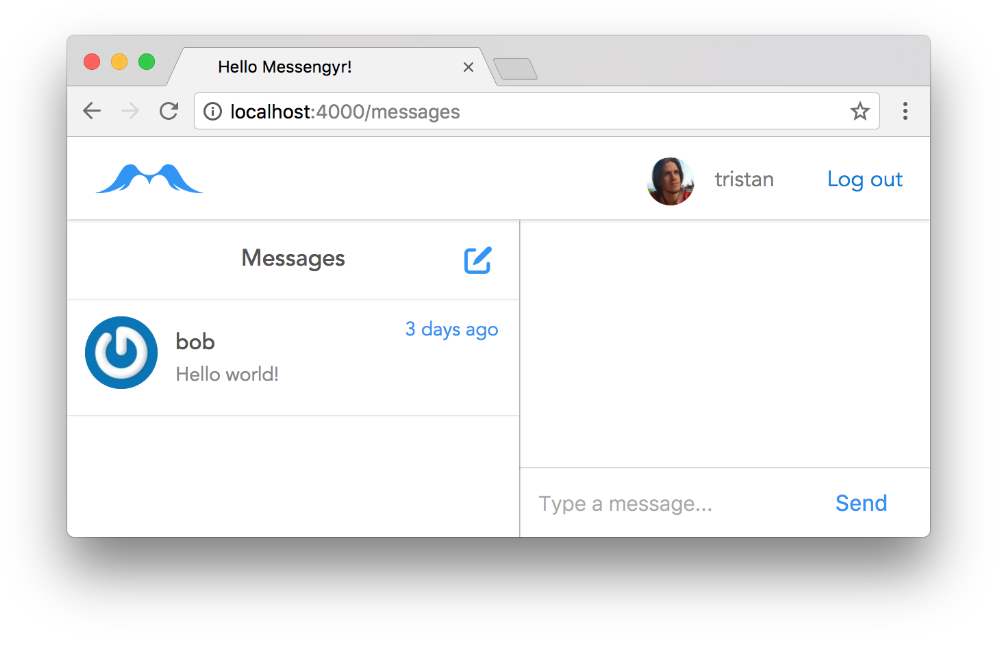 Hooray!
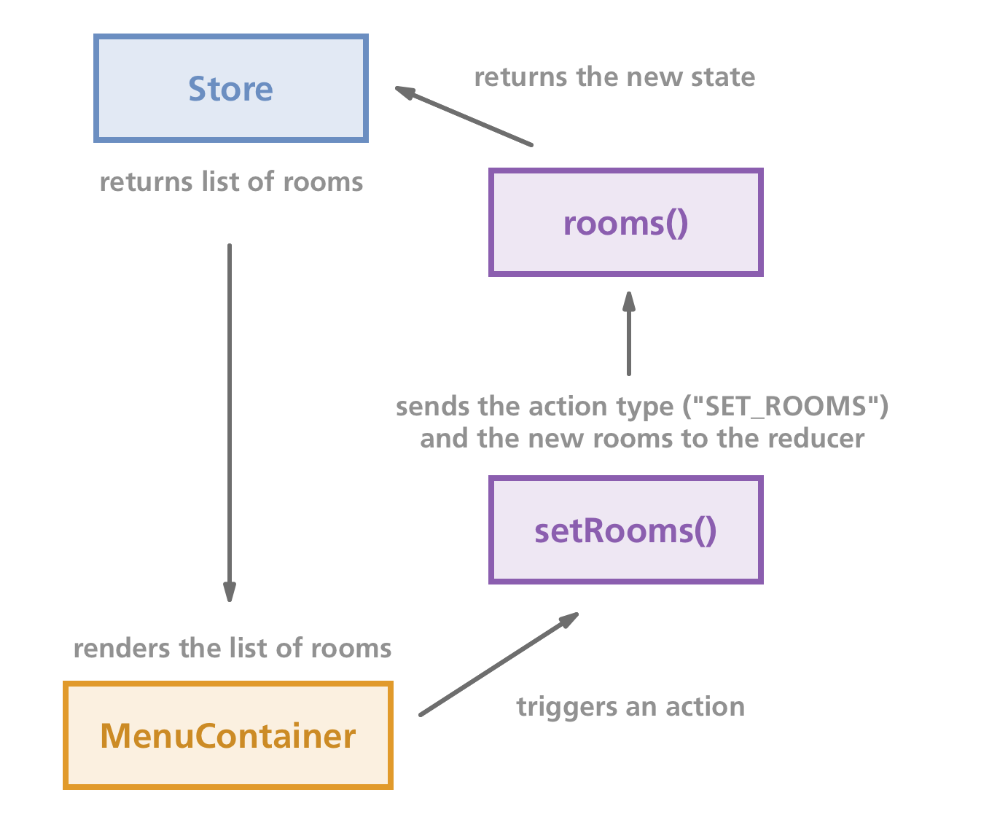
You've now gone through the full loop of Redux in only two files -- app.js and menu-container.js! We first created our store. Then we extracted the store's data and set it as a prop for our component. Finally, we dispatched an action from the component and modified the store based on the action type and data. Here's an updated picture of the Redux flow, based on our little project:
Don't worry if you're new to Redux and you're still confused -- I was as well for a long time. Usually, you have to go through a couple of examples before you get to a stage where it finally "clicks"!
Our list of rooms is now rendered perfectly, but the **message list is still empty **since that component is not receiving any props. Let's fix that!
Selecting a room
Before we continue, it might be a good idea to extract our current action and reducer into their own files to make our project more maintainable.
We'll start with our reducer function. Let's create a new file called reducers.js and move the rooms-function from app.js to that new file:
// assets/js/reducers.js

const rooms = (state = [], action) => {
  switch (action.type) {
    case "SET_ROOMS":
      return action.rooms;

    default:
      return state;
  }
};

export default rooms;
Now we can just import that function from app.js, and everything will work as expected:
// web/static/js/app.js

// ...

// Replace the function declaration with this line:
import rooms from './reducers';

const store = createStore(rooms);

class App extends React.Component {
  // ...
Next, we'll create a separate actions.js file as well. We currently only have one action, setRooms, so let's move it from menu-container.js to our new file:
// assets/js/actions.js

export function setRooms(rooms) {
  return {
    type: "SET_ROOMS",
    rooms,
  }
};
Now we can just import setRooms in menu-container.js:
// assets/js/components/menu-container.js

// ...

import { setRooms } from '../actions';

class MenuContainer extends React.Component {
  // ...
After this is is done, everything should still work as before. Great!
We're now going to create a new "SELECT_ROOM" action. The idea is that there should always be one room among our list of rooms that is selected and has an isActive property that is true. Then, in our ChatContainer component, we'll read the data from the store, determine which room is currently active, and get the messages from that room. Sounds good? Let's get to work!
The first thing we want to do is to set the first room in the list as active, right after we get the data from our fetch request. We'll do this in the MenuContainer, and call a selectRoom action with the room's ID:
// assets/js/components/menu-container.js

// ...

class MenuContainer extends React.Component {

  componentDidMount() {
    fetch('/api/rooms', {
      // ...
    })
    .then((response) => {
      let rooms = response.rooms;
      this.props.setRooms(rooms);

      // Get the first room in the list:
      let firstRoom = rooms[0];

      // If it exists, send its ID to the "selectRoom" action:
      if (firstRoom) {
        this.props.selectRoom(firstRoom.id);
      }
    })
    .catch((err) => {
      // ...
    })
  }

  // ...
}

// ...
Obviously, this selectRoom action doesn't exist yet, so let's create it!
// assets/js/actions.js

// ...

// Add this function:
export function selectRoom(roomId) {
  return {
    type: "SELECT_ROOM",
    roomId,
  }
};
Now we can import this function in our menu-container.js file, and connect it to the prop action, just like we did with setRooms:
// assets/js/components/menu-container.js

// ...

// import "selectRoom"...
import { setRooms, selectRoom } from '../actions';

class MenuContainer extends React.Component {
  // ...
}

// ...

const mapDispatchToProps = {
  setRooms,
  selectRoom, // ...and add it to the dispatcher!
};

// ...
So far so good. Now we need to write the reducer for this action. This is where it gets a little complicated, but just stay focused!
In our reducer function, we receive an action with the roomId that we want to select. What we want to return is the exact *same *list of rooms as we start out with, except that we want one of our rooms (the only one we have for now), to have the property isActive set to true whereas the other ones should have it as false.
To do this, we need to loop through every room that's in the list, check if the room's ID matches the roomId from our action, and, if it does, we set that room as active.
Here's how we could write this case (don't copy this into your code yet!)
case "SELECT_ROOM":

  // Loop through the rooms (or the "state")
  // Every room is set as "r"
  return state.map(r => {

    // Check if the room should be active
    // (e.g. if the room's ID === action.roomId)
    let isActive = (r.id === action.roomId);

    // Clone the room object and add the "isActive"-field
    // (which is either "true" of "false")
    // then return the new object!
    return Object.assign({}, r, {
      isActive,
    });

  });
This is already pretty good, but we can make it even better! Whenever one loops through multiple objects to determine a new state, it's usually a good idea to extract the part determining the state of a single object into its own function.
Therefore, we'll create a new room-function (in addition to the existing rooms), which will respond to the same actions and perform the same logic as above, but for only one given room at the time. The final code of our reducer looks like this (now you can copy it):
// assets/js/reducers.js

// Create this function:
const room = (state, action) => {
  switch (action.type) {
    case "SELECT_ROOM":
      let isActive = (state.id === action.roomId);

      return Object.assign({}, state, {
        isActive,
      });

    default:
      return state;
  }
};

const rooms = (state = [], action) => {
  switch (action.type) {
    case "SET_ROOMS":
      return action.rooms;

    case "SELECT_ROOM":
      // Loop through the rooms:
      return state.map(r => {
        // Determine the state of each room:
        return room(r, action);
      });

    default:
      return state;
  }
};

export default rooms;
To see if this worked as we expected, we'll log the room object in our MenuMessage component's render-function:
// assets/js/components/menu-message.js

// ...

class MenuMessage extends React.Component {
  render() {

    // ...

    console.log(room); // Add this line!

    return (
      // ...
If everything's working, you should see two logged messages in your JavaScript console:
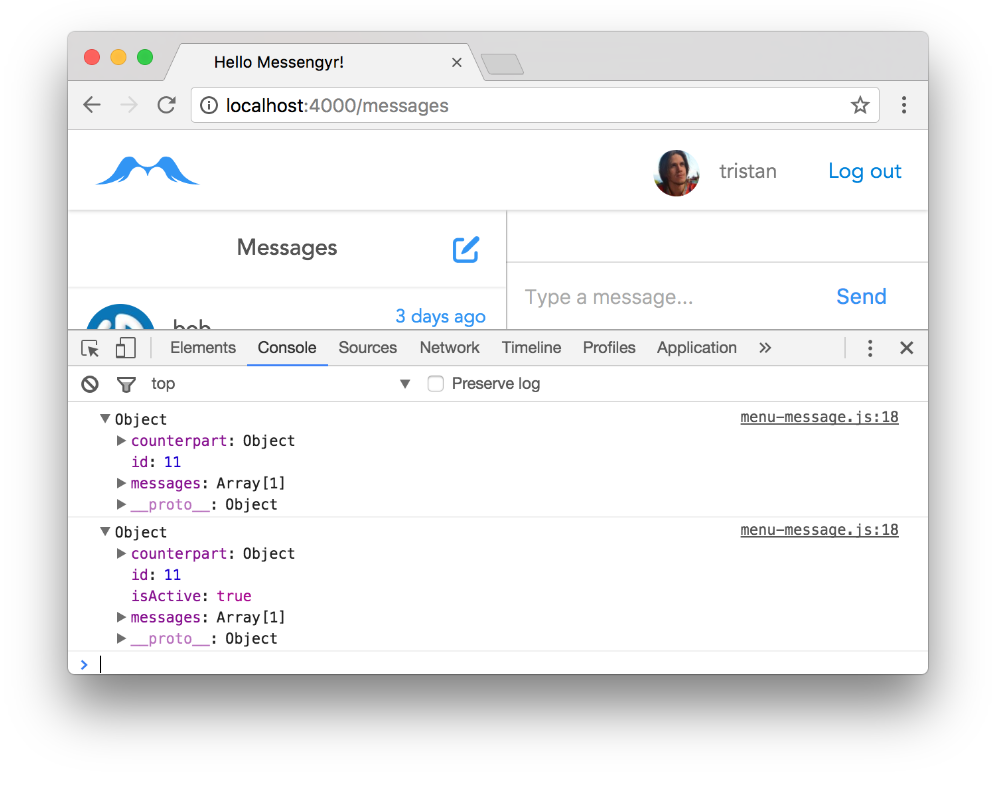 The first one doesn't contain the "isActive" property, but the second should, and it should be set to "true"
The first logging occurs as soon as your fetch request finishes. The "SET_ROOMS" action is called, and your MenuMessage component is rendered with that data.
The second logging occurs after our "SELECT_ROOM" action is called. That's when we take all the room data and edit it to set one of the rooms as active. Since the component's data has changed, it trigger a re-render and logs the new data that is has received, which now contains isActive: true.
So it seems like our data gets updated correctly! Let's now delete that console.log line and instead add an active class to the rendered room so that we can clearly distinguish it from the rest of the rooms in the future (in our CSS-file the active class darkens the background):
// assets/js/components/menu-message.js

// ...

class MenuMessage extends React.Component {
  render() {

    // ...

    // A room can either have the class "active" or nothing:
    let activeClass = (room.isActive) ? 'active' : '';

    return (
      <li className={activeClass}>
      {/* ... */}
The background of the selected room is now grey instead of white!
Displaying the messages
The last part of the puzzle is to always show the messages for whatever room is selected! For this, we head over to chat-container.js.
As we know, the ChatContainer component expects to receive a list of messages through the messages prop. Just like we did with MenuContainer, we need to give it this prop by extracting the relevant data from the store and pass it down using mapStateToProps!
First, we import connect at the top of the file:
// assets/js/components/chat-container.js

import React from 'react';
import ReactDOM from 'react-dom';
import { connect } from 'react-redux'; // Add this line!

// ...
Then we write our mapStateToProps function and pass it to connect. This function is in charge of only retrieving the messages from the active room.
// assets/js/components/chat-container.js
// ...
// Create this function:
const mapStateToProps = (state) => {
// Get only the active room:
let activeRoom = state.filter((room) => {
return room.isActive;
})[0];
return {
// If there is an active room, get its messages!
// Otherwise, just return an empty list
messages: (activeRoom) ? activeRoom.messages : [],
}
};
// Add it to connect:
ChatContainer = connect(
mapStateToProps,
)(ChatContainer);
export default ChatContainer;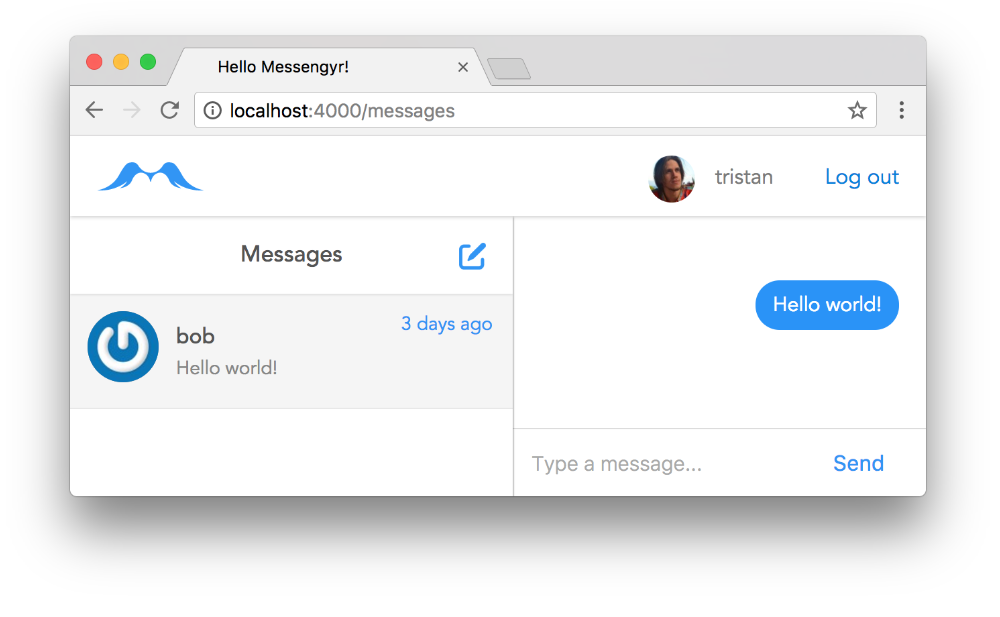 That's it? Well that was easy!
In conclusion
Redux might seem overly-complicated at first, but there are many benefits to having a single state tree that provides your components with only the data that they need. It's pretty nice knowing that you can easily follow the order of your actions and know *exactly *what they did to **change the state **of your application.
Now that we have this setup, the next chapter till focus on creating new rooms and new messages. This time, we'll go back to writing Elixir code!