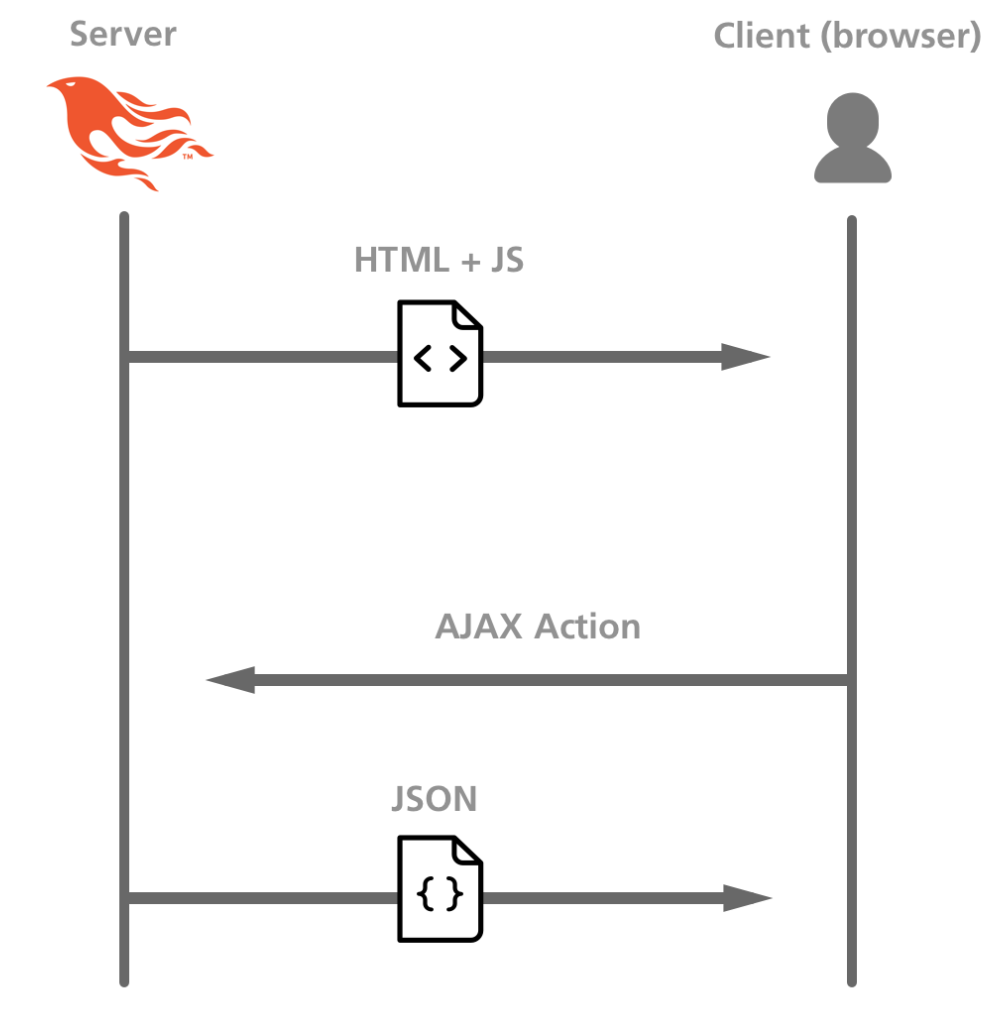
In this chapter, we're going to build our messaging interface as a single page application (a.k.a SPA). This means that there will be no page reloads here for the user -- all the UI is instead updated dynamically using JavaScript.
In order to achieve this, we're going to use a very different approach compared to the previous lessons. Our Phoenix app will deliver all the initial static content on the first page load, and then act only as a thin API client to transmit JSON data.
As you probably know if you're a web developer, there are many JavaScript frameworks to choose from when building a single-page application, and they all have their strengths and weaknesses. For this Messengyr project, we're going to use React, since it's easy to drop into our existing app structure.
Quick note: I apologise in advance for all the JavaScript code that we have in this lesson. I know that this is an Elixir course, but if you want to build modern web applications, it's virtually impossible to ignore JavaScript. In my opinion, it's better to learn how to do some things the right way, even if it includes utilising some other languages in the process, rather than always sticking to the course language just for the sake of it. Anyway, let's move on!
Moving our JS file
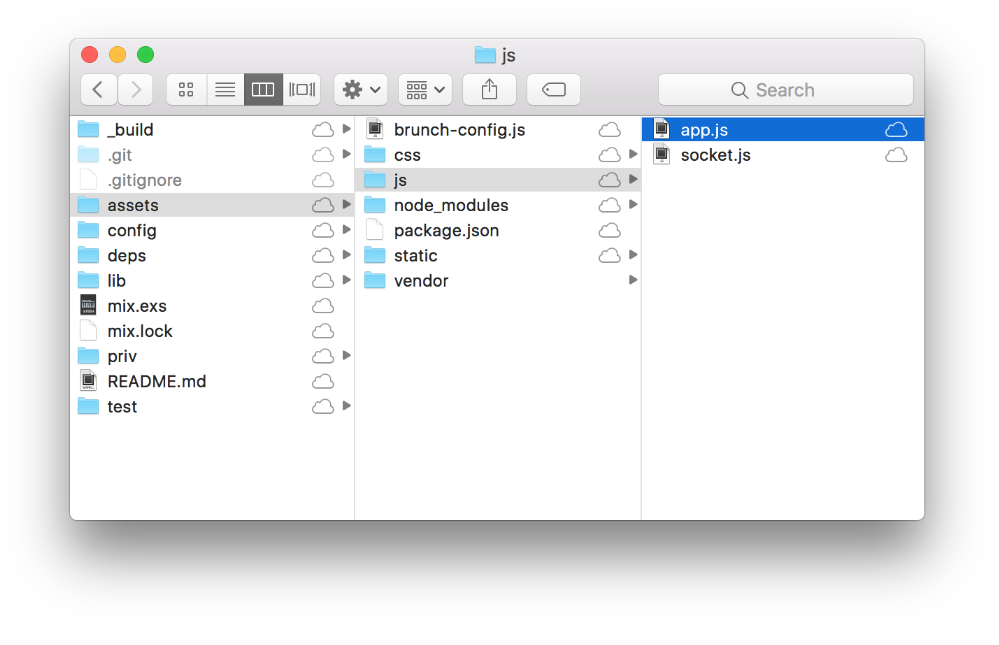
You might have noticed that there's already an existing JavaScript-file in our application, at assets/js/app.js.
This file gets imported as soon as we fire up any Phoenix page, since it's imported in in our layout template (lib/messengyr/web/templates/layout/app.html.eex). However, we actually don't need any JavaScript in our app *until *the user hits the /messages path. Therefore, let's delete the line that imports it in our layout template, and instead add it to our newly created Chat template instead:
<!-- lib/messengyr_web/templates/layout/app.html.eex -->

<!DOCTYPE html>
<html lang="en">
  <!-- ... -->

  <body class=<%= @conn.path_info %>>
    <!-- ... -->

    <!-- Delete the following line: -->
    <script src="<%= static_path(@conn, "/js/app.js") %>"></script>
  </body>
</html>
<!-- lib/messengyr_web/templates/chat/index.html.eex -->
<!-- And add it here instead: -->
<script src="<%= static_path(@conn, "/js/app.js") %>"></script>Setting up Babel and React
Next, we're going to install two NPM dependencies -- Babel and React. React is what we'll use to build our dynamic messaging interface, and Babel lets us use the newest JavaScript syntax to make it more pleasant to write.
We'll start by installing both the core React library and React DOM (so that we can use React in the browser). Go to the assets-folder and run this command:
npm install --save react react-dom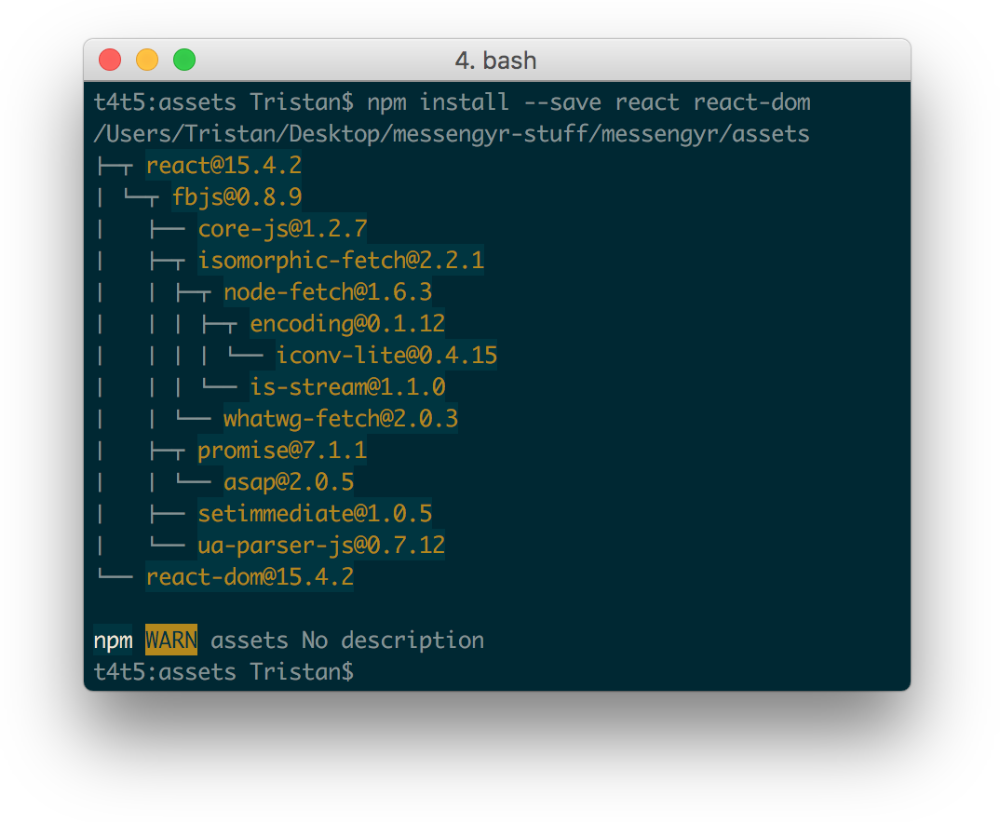 Installing our two libraries...
In order to be able to use these libraries in our client JavaScript, we need to whitelist them in our brunch-config.js file. Scroll all the way down until you see the npm key:
// assets/brunch-config.js

exports.config = {
  // ...

  npm: {
    enabled: true,
    whitelist: ["react", "react-dom"], // Add this line
  }
};
Next up: Babel! We're going to install the core Babel library, as well as babel-preset-react (so that it understands React syntax) and babel-preset-es2015 (so that we can use the new ES2015 syntax).
npm install --save-dev babel babel-preset-react babel-preset-es2015These dependencies are not actually going to be used in the browser, so we don't need to whitelist them. We do however want to use them when we compile our JavaScript, so go back to brunch-config.js and look for the plugins key, and make sure that you add "es2015" and "react" in the list of presets:
// assets/brunch-config.js

exports.config = {
  // ...

  // Configure your plugins
  plugins: {
    babel: {
      // Do not use ES6 compiler in vendor code
      ignore: [/vendor/],
      presets: ["es2015", "react"], // Add this line!
    }
  },

  // ...
};
That's it! Now let's try out these new fancy libraries!
"Hello world" in React
To make sure that React and Babel work, we'll render a simple "Hello world" text on our /messages page. Start by opening up assets/js/app.js and delete everything that's in it (including the import "phoenix_html" statement), and replace it with this code instead:
// assets/js/app.js

import React from 'react';
import ReactDOM from 'react-dom';

class App extends React.Component {
  render() {
    return (
      <div>
        Hello world!
      </div>
    )
  }
}

ReactDOM.render(
  <App />,
  document.getElementById('app'),
);
Let's quickly go through what we're doing here, in case you aren't familiar with React:
-
We import our two newly installed dependencies -- React and ReactDOM, so that we can use them in the file
-
We create a new
Appclass, which is a React component. In it, we simply specify that it should render adiv-tag containing the string "Hello world!". -
Finally, we use ReactDOM to render this component. We specify the name of the component (
App), and the element on the page that it should be rendered inside of (an element with the id"app").
This element with the ID "app" doesn't exist on our messages page yet, so we need to create it:
<!-- lib/messengyr_web/templates/chat/index.html.eex -->

<div id="app"></div> <!-- Add this line! -->

<script src="<%= static_path(@conn, "/js/app.js") %>"></script>
After doing this, you should see "Hello world!" when you reload /messages (if not, you might have to restart your Phoenix server).
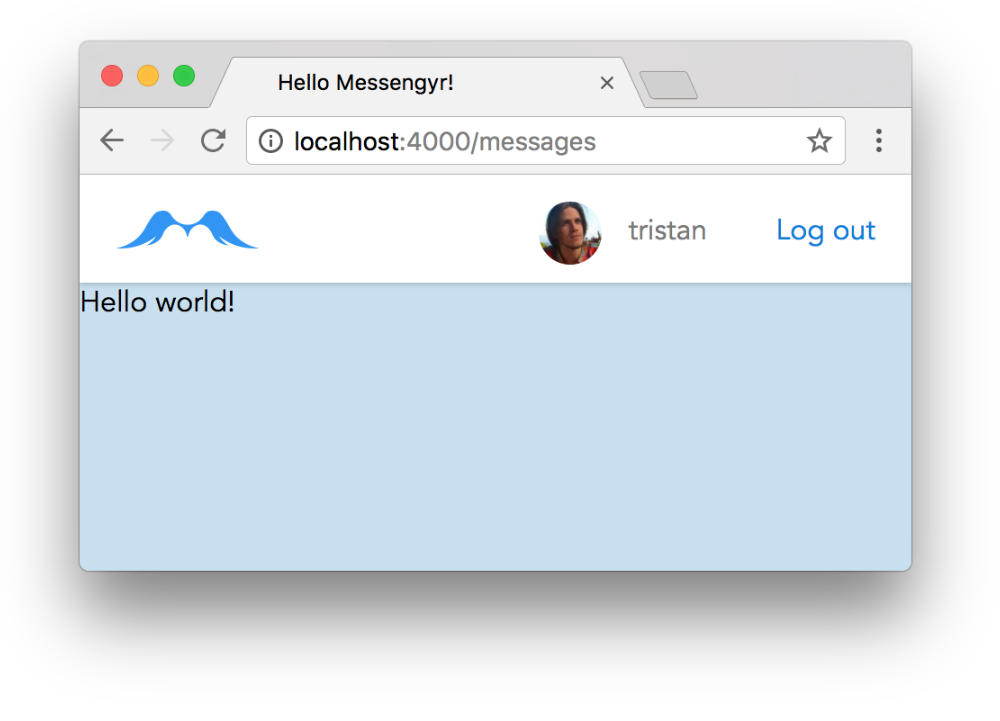 React works!
Composing our UI
Now, you might be thinking "Gee, that was a lot of work just to render a shitty 'Hello world!' text"! And yes, you'd be right about that. But remember what the interface that we actually want to build looks like:
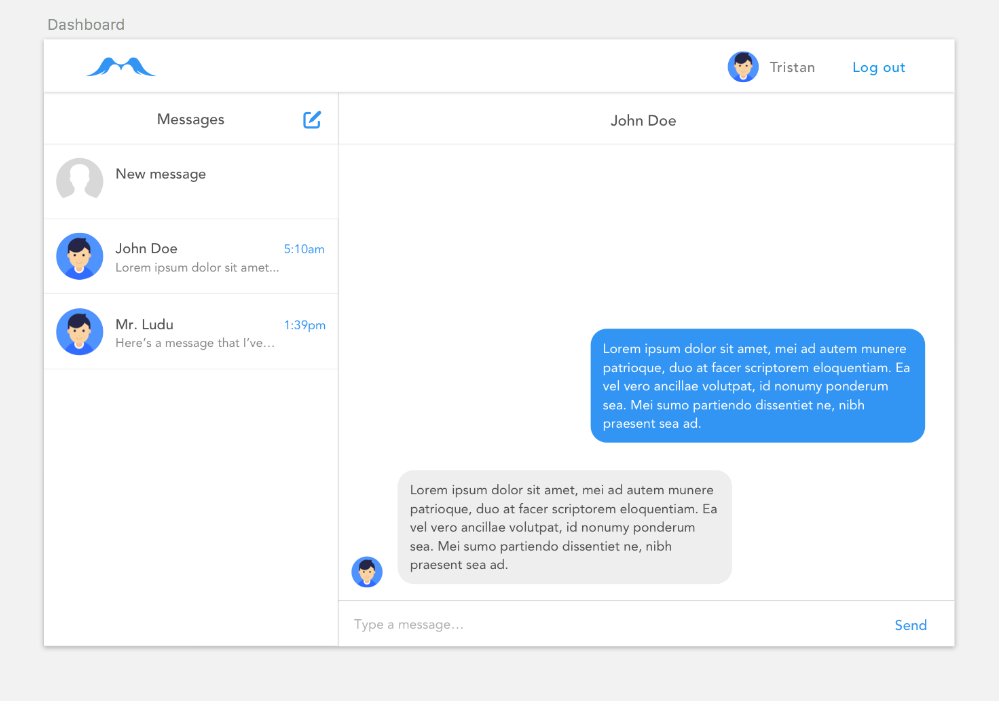 From our Sketch file
No matter how good Elixir's own EEx templating language is, it's still being rendered on the server instead of the client. If we want to see our messages come in in real-time, without manually refreshing the page (which would be a terrible user experience), we need to use JavaScript. ¯_(ツ)_/¯
With that out of the way, let's start building our messaging interface! Whenever you use a component-based UI library such as React, it's good to try to estimate in advance the number of components that we're going to need.
Based on our Sketch file, it seems logical to split our app into four components:
-
MenuContainer -
MenuMessage -
ChatContainer -
ChatMessage
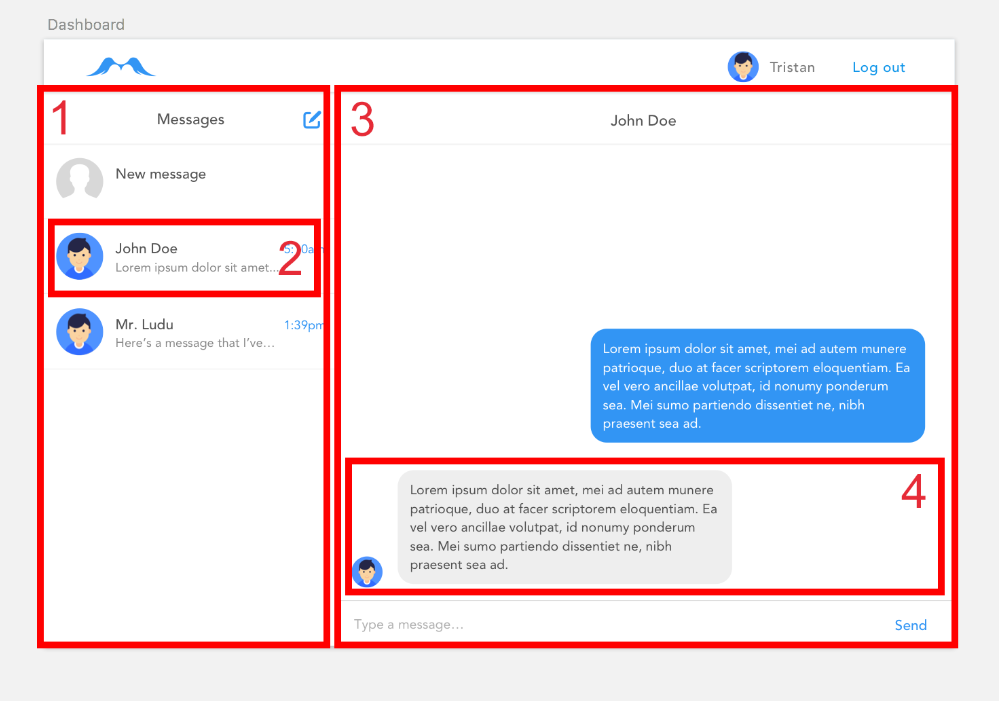 MenuContainer to the left, ChatContainer to the right.
We're going to create a new folder in our js folder called components where we'll put these.
We'll start by creating our two main components -- MenuContainer and ChatContainer. Since this isn't really a React course, we won't go through every little part in detail, so you can just copy and paste the following code. You'll notice that our React components are basically just outputting HTML anyway, the only caveat with JSX is that if you want to add a class to an element, you have to use the className attribute instead.
// assets/js/components/menu-container.js

import React from 'react';
import ReactDOM from 'react-dom';

import MenuMessage from './menu-message';

class MenuContainer extends React.Component {
  render() {
    return (
      <div className="menu">

        <div className="header">
          <h3>Messages</h3>
          <button className="compose"></button>
        </div>

        <ul>
          <MenuMessage />
        </ul>

      </div>
    )
  }
}

export default MenuContainer;
// assets/js/components/chat-container.js
import React from 'react';
import ReactDOM from 'react-dom';
import ChatMessage from './chat-message';
class ChatContainer extends React.Component {
render() {
return (
<div className="chat">
<ul>
<ChatMessage />
</ul>
<div className="compose-box">
<input placeholder="Type a message..." />
<button>Send</button>
</div>
</div>
)
}
}
export default ChatContainer;As you can see, we're importing the MenuMessage component in our menu container, and the ChatMessage component in our chat container and rendering them inside a list. So we need to create these components as well!
// assets/js/components/menu-message.js

import React from 'react';
import ReactDOM from 'react-dom';

class MenuMessage extends React.Component {
  render() {
    return (
      <li>
        <img className="avatar" />

        <div className="profile-container">
          <p className="name">John Doe</p>

          <date>Two hours ago</date>

          <p className="message">
            Here's a message!
          </p>
        </div>

      </li>
    )
  }
}

export default MenuMessage;
// assets/js/components/chat-message.js
import React from 'react';
import ReactDOM from 'react-dom';
class ChatMessage extends React.Component {
render() {
return (
<li className="user">
<p>
Here's a message!
</p>
</li>
)
}
}
export default ChatMessage;Finally, now that all our components have been defined, we simply need to import ChatContainer and MenuContainer into our initial app.js file, and render them there instead of "Hello world!":
// assets/js/app.js
import React from 'react';
import ReactDOM from 'react-dom';
// Add these imports:
import ChatContainer from "./components/chat-container";
import MenuContainer from "./components/menu-container";
class App extends React.Component {
render() {
// Use the components here:
return (
<div>
<MenuContainer />
<ChatContainer />
</div>
)
}
}
ReactDOM.render(
<App />,
document.getElementById('app'),
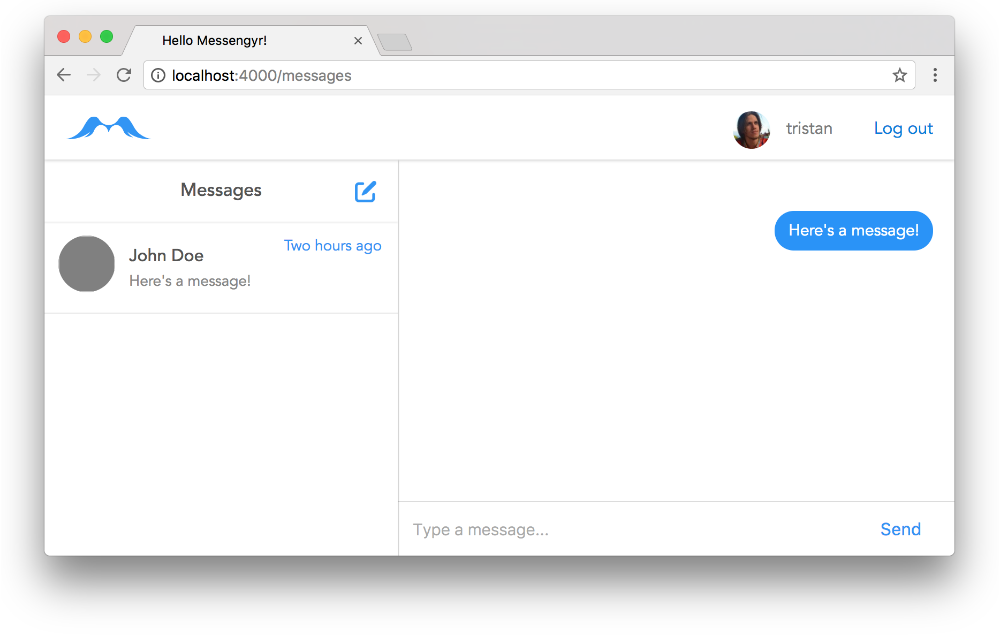
);Now restart your Phoenix server and reload the page. If everything went well, you should see all the HTML from your components rendered onto the page!
 It's ugly, but it works!
To make it look good, we can create a new messages.scss file in our css folder, and add these styles (sorry, it's long, but it's the last CSS we'll need!)
// assets/css/messages.scss
#app {
  position: fixed;
  left: 0;
  right: 0;
  top: 60px;
  bottom: 0;
  background-color: white;

  .menu {
    width: 330px;
    position: absolute;
    top: 0;
    bottom: 0;
    left: 0;
    box-shadow: 0px 1px 1px 0px rgba(0,0,0,0.77);
    z-index: 3;
    overflow-y: scroll;

    .header {
      box-shadow: 0px 1px 1px 0px rgba(0,0,0,0.09);
      height: 58px;
      position: relative;
      z-index: 2;

      button.compose {
        background-image: url("/images/compose-icon.svg");
        background-color: transparent;
        border: none;
        width: 20px;
        height: 20px;
        position: absolute;
        right: 20px;
        top: 20px;
      }
    }

    h3 {
      font-size: 17px;
      font-weight: 500;
      color: #545454;
      letter-spacing: 0px;
      text-align: center;
      line-height: 58px;
      margin: 0;
    }

    ul {
      margin: 0;
      padding: 0;

      li {
        box-shadow: 0px 1px 0px 0px rgba(0,0,0,0.09);
        padding: 13px;
        min-height: 58px;
        cursor: pointer;
        &.active {
          background-color: rgba(0, 0, 0, 0.04);
        }

        .profile-container {
          display: inline-block;
          width: calc(100% - 68px);
          vertical-align: top;
        }

        img {
          width: 53px;
          height: 53px;
          background-color: gray;
          border-radius: 50%;
          margin-right: 13px;
        }

        &.new {
          .profile-container {
            margin-top: 10px;
          }
          .avatar {
            width: 53px;
            height: 53px;
            background-image: url("/images/empty-avatar.svg");
            background-size: contain;
            background-position: center center;
            background-repeat: no-repeat;
            display: inline-block;
            vertical-align: top;
            margin-right: 13px;
          }
        }

        .name {
          display: inline-block;
          margin: 0;
          font-size: 16px;
          color: #545454;
          font-weight: 500;
          margin-top: 8px;
        }

        p.message {
          margin: 0;
          font-size: 14px;
          color: #878787;
          max-width: 100%;
          white-space: nowrap;
          overflow: hidden;
          text-overflow: ellipsis;
          margin-top: 3px;
        }

        date {
          font-size: 14px;
          color: #3295F4;
          letter-spacing: 0px;
          float: right;
        }
      }
    }
  }

  .chat {
    position: absolute;
    left: 330px;
    top: 0;
    right: 0;
    bottom: 0;

    .destination {
      position: absolute;
      left: 1px;
      right: 0;
      top: 0;
      z-index: 3;
      padding: 7px 15px;
      box-shadow: 0px 1px 0px rgba(0, 0, 0, 0.08);
      background-color: rgba(255, 255, 255, 0.95);

      label {
        color: #676767;
      }

      input {
        display: inline-block;
        width: calc(100% - 50px);
        margin-left: 8px;
        box-shadow: none;
        border: none;
      }
    }

    .compose-box {
      position: absolute;
      bottom: 0;
      left: 0;
      right: 0;
      box-shadow: 0px -1px 0px 0px rgba(0,0,0,0.14);
      background-color: white;
      padding: 3px 0;

      input {
        border: none;
        box-shadow: none;
        max-width: calc(100% - 100px);
        font-weight: 300;
        &:focus {
          outline: none;
          box-shadow: none;
          border: none;
        }
      }

      button {
        border: none;
        background: none;
        font-size: 16px;
        color: #3295F4;
        margin: 0 auto;
        width: 100px;
        &:focus {
          outline: none;
        }
      }
    }

    ul {
      padding: 0;
      margin: 0;
      list-style-type: none;
      padding: 0;
      margin: 0;
      list-style-type: none;
      position: absolute;
      top: 0;
      bottom: 44px;
      right: 0;
      left: 0;
      overflow-y: scroll;
      padding: 20px;

      li {
        margin: 28px 0;

        p {
          margin: 0;
          background-color: #EEEEEE;
          padding: 8px 13px;
          border-radius: 18px;
          font-size: 15px;
          color: #505050;
          line-height: 21px;
          max-width: 376px;
          display: inline-block;
        }

        img {
          width: 35px;
          height: 35px;
          background-color: gray;
          border-radius: 50%;
          vertical-align: bottom;
          margin-right: 13px;
          position: relative;
          bottom: -6px;
        }

        &.user {
          text-align: right;

          p {
            text-align: left;
            background-color: #2A93F7;
            color: white;
          }

          img {
            display: none;
          }
        }
      }
    }
  }
}
Boom!
Boom!
Adding fake data
Right now, our React templates contain static data such as "John Doe" and "Here's a message!". We want to remove this static data from our templates and instead use whatever data is given to the components via props!
There are primarily three types of data in our UI that we need to account for -- rooms, messages, and users. The "rooms" list is the collection of conversations in our MenuContainer. Each room then contains a list of "messages", which are rendered in theChatContainer.
For now, we'll just define some fake data in a separate file (don't worry, in the next chapter, we'll learn how to fetch it from the database instead). Let's create a file called fake-data.js in our js folder and add a big JS object inside of it that contains all the data we're interested in:
// assets/js/fake-data.js

const DATA = {
  rooms: [
    {
      id: 1,
      counterpart: {
        id: 2,
        username: 'alice',
      },
      messages: [
        {
          id: 1,
          text: "Hi!",
          outgoing: true,
          sentAt: "1 hour ago",
        },
        {
          id: 2,
          text: "Hello there!",
          outgoing: false,
          sentAt: "Just now",
        }
      ],
    },
  ],
};

export default DATA;
Let's take a moment to analyse this data. We have a single room with an ID of 11. Our counterpart (the other user) in that room is "alice", who has the user ID 22. Alice and our user have a list of messages. The first one ("Hi!") is outgoing,whereas the second one ("Hello there") was sent from her to us.
Alright, let's render this data! We'll start by importing the fake data into app.js, and there we'll also create the constants ROOMS and MESSAGES. The first constant is passed as a prop to the MenuContainer and the second one is passed as a prop to the ChatContainer:
// assets/js/app.js

// ...

import DATA from './fake-data'; // Add this line!

class App extends React.Component {
  render() {
    // Extract the data:
    const ROOMS = DATA.rooms;
    const MESSAGES = DATA.rooms[0].messages;

    // Pass the relevant data as props:
    return (
      <div>
        <MenuContainer
          rooms={ROOMS}
        />
        <ChatContainer
          messages={MESSAGES}
        />
      </div>
    )
}

// ...
Next, we go to the MenuContainer. The important thing here is that we want to render each room as a MenuMessage inside our ul tag. In other words, each object in our ROOMS-data needs to be transformed into a MenuMessage component. To do this, we can use JavaScript's map function. Notice that we pass down every room as a prop to the MenuMessage component too.
// assets/js/components/menu-container.js

// ...

class MenuContainer extends React.Component {
  render() {

    // Add this block of code:
    let rooms = this.props.rooms.map((room) => {
      return (
        <MenuMessage
          key={room.id}
          room={room}
        />
      );
    });

    return (
      // ...
    )
  }
}
Then, we simply render our newly created rooms variable inside the ul tag:
// assets/js/components/menu-container.js

// ...

    return (

      // ...

         <ul>
          {rooms} // Set this instead of <MenuMessage />
        </ul>

      </div>
    )

// ...
Next, we go to MenuMessage. Now that we receive the room prop from MenuContainer, we can correctly render that data in the component.
There are three things that we want to render here (if we exclude the avatar, since we don't have any fake data for that yet) -- the** username** of the counterpart, the last message that was sent (by either of us), and **the time **when it was sent. All this can easy be extracted from the room prop that we receive:
// assets/js/components/menu-message.js

// ...

class MenuMessage extends React.Component {
  render() {
    let room = this.props.room;
    let counterpart = room.counterpart;

    // Get the last element of the messages list:
    let lastMessage = room.messages.slice(-1)[0];
    let sentAt = lastMessage.sentAt;

    return (
      <li>
        <img className="avatar" />

        <div className="profile-container">
          <p className="name">
            {counterpart.username}
          </p>

          <date>
            {sentAt}
          </date>

          <p className="message">
            {lastMessage.text}
          </p>
        </div>

      </li>
    )
  }
}
After doing this, you should be able to see our fake data in the Messages menu!
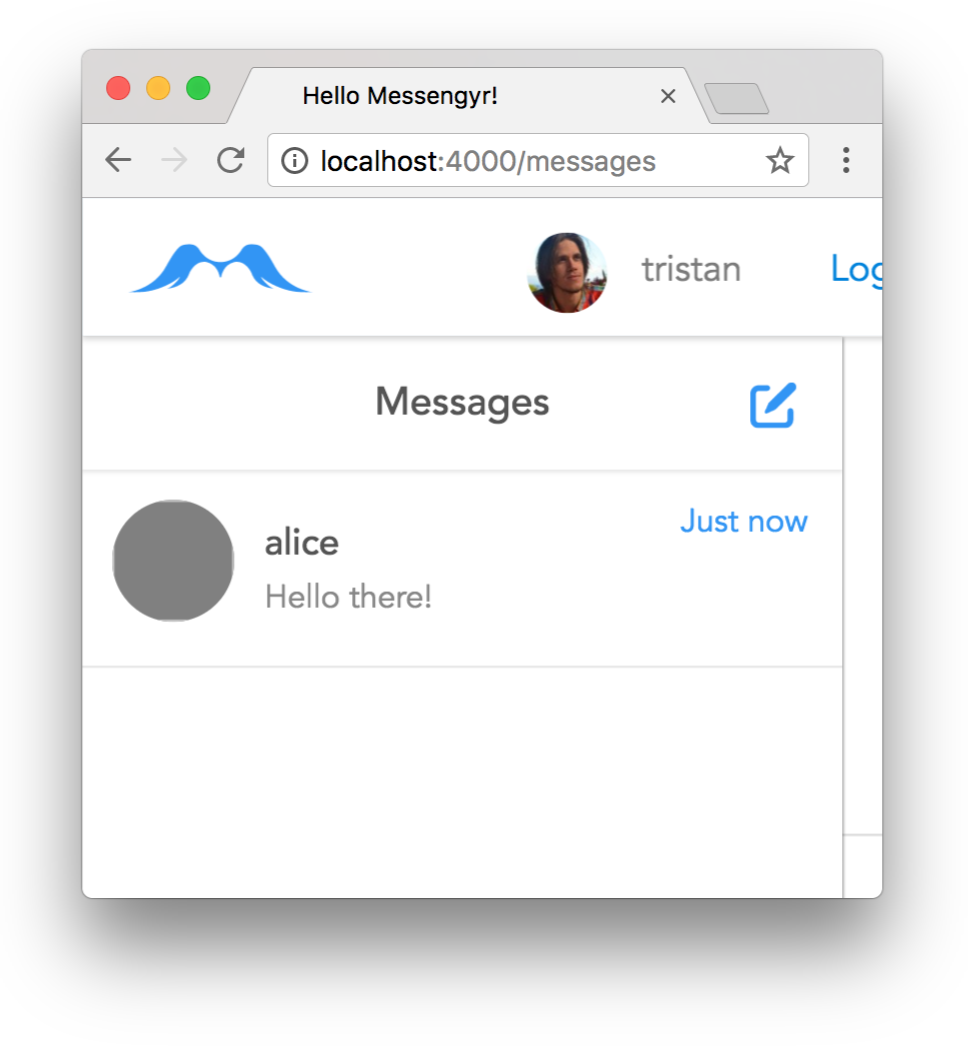 Sweet!
Next, we move on to the ChatContainer. Here, we apply the same principle as with the MenuContainer -- we want to render each item in the messages list as a ChatMessage component. Again, we use the .map function, and we replace the content inside the ul-tag with our new messages variable instead:
// assets/js/components/chat-container.js

// ...

class ChatContainer extends React.Component {
  render() {

    // Create this variable:
    let messages = this.props.messages.map((message) => {
      return (
        <ChatMessage
          key={message.id}
          message={message}
        />
      );
    });

    return (
      <div className="chat">

        <ul>
          {messages}
        </ul>

        {/* ... */}
    )
  }
}
Finally, we go to ChatMessage. Here, we first need to know if the message is outgoing or not. If it is, we apply the class "user" on our li element, otherwise we use "counterpart" instead. This will render the chat bubbles as either blue (outgoing) or **gray **(incoming). Then we simply render the text.
// assets/js/components/chat-message.js

// ...

class ChatMessage extends React.Component {
  render() {

    let message = this.props.message;
    let messageClass = (message.outgoing) ? 'user' : 'counterpart';

    return (
      <li className={messageClass}>
        <p>
          {message.text}
        </p>
      </li>
    )
  }
}
And now, we're finally done!
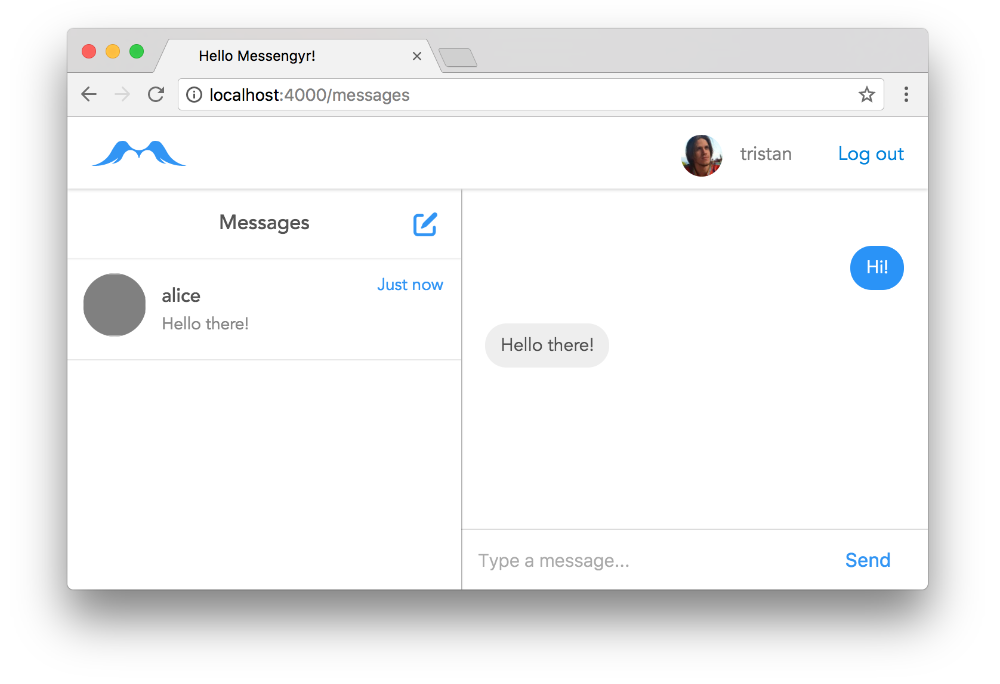 You can play around by changing the data in our fake-data.js file, and you'll see how the UI changes accordingly.
In review
Phew, all this JavaScript gives me fatigue! You should now know roughly how to set up Babel and React (or a similar frontend library) with Phoenix, as well as how to render some dynamic UI as components by passing down data as properties.
In the next chapter, we're going to go back to Elixir (yay!) to learn how to fetch this data from our database and render it as JSON so that we can use it in our client.