In this chapter, we're going to fetch the JSON data that we've generated. Only this time, we'll do it from our client app using the new Fetch API, and we'll learn how to use proper **API authentication **using JSON Web Tokens.
Polyfilling Fetch
Not too long ago, JavaScript developers had to either learn how to use the cumbersome XMLHttpRequest API or use an external library like jQuery in order to get data asynchronously from a server. Today, there's a new JavaScript API called Fetch which makes it much easier!
Most modern browsers support Fetch already, however, there are still some that haven't implemented it (most notably Safari and Internet Explorer). Therefore, we're going to use a polyfill to handle those older browsers in our app! Run this npm install command in the assets folder to get it:
npm install whatwg-fetch --saveThen, just like we did with our React and Babel dependencies, we need to whitelist the whatwg-fetch library in our brunch configuration, so that we can use it on the client.
// assets/brunch-config.js

exports.config = {

  // ...

  npm: {
    enabled: true,
    whitelist: ["react", "react-dom", "whatwg-fetch"],
  }
};
Now we simply import the library in our app.js file, and we're ready to use the global Fetch-function everywhere!
// assets/js/app.js

import React from 'react';
import ReactDOM from 'react-dom';
import 'whatwg-fetch'; // Add this line

// ...
Making our first requests
Let's see how Fetch works! We'll make our first request in our App-component's componentDidMount hook, and fetch one of the users from our database there. Thanks to the work we did in the previous lesson, we can retrieve the user in JSON format by sending a simple GET request to /api/users/1 (remember that your own user's ID might not be 11, but something else).
// assets/js/app.js

// ...

class App extends React.Component {

  componentDidMount() {
    fetch('/api/users/1')
    .then((response) => {
      return response.json();
    })
    .then((response) => {
      console.log(response);
    })
    .catch((err) => {
      console.error(err);
    });
  }

  render() {
    // ...
  }
}
Note that Fetch is a promise-based library, which is why we use .then() and .catch() (if you're not too familiar with promises, check out this awesome write-up). In the code we just wrote, we send an asynchronous GET-request to /api/users/1. Then, we take the response and we convert it to JSON using return response.json() and finally, we log the result.
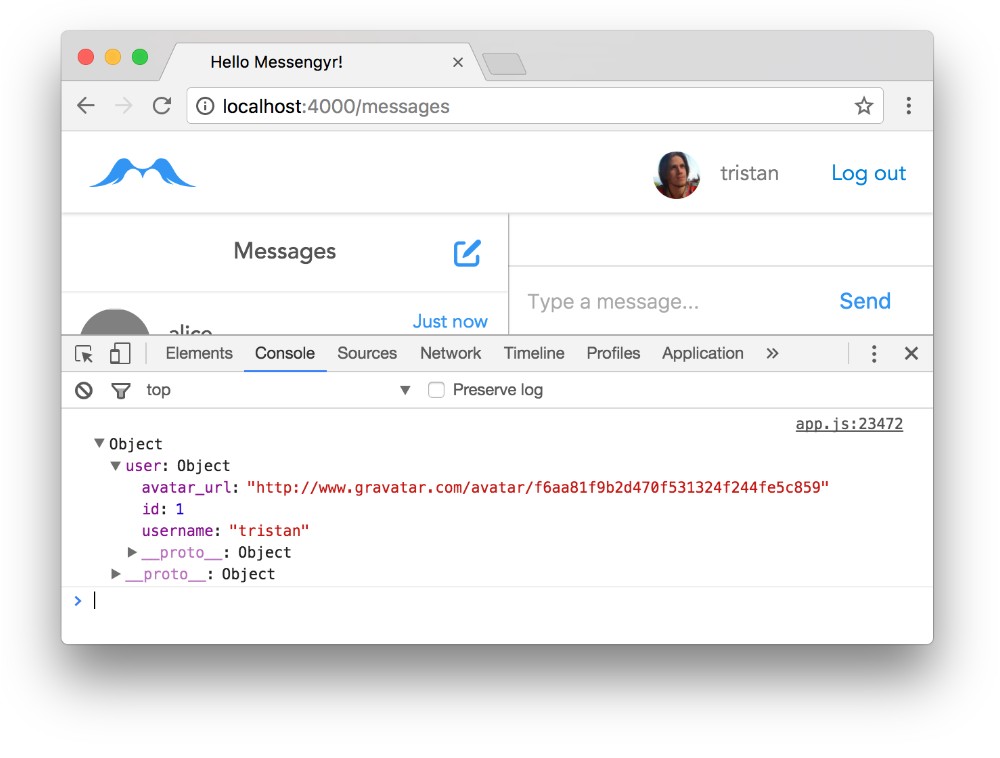
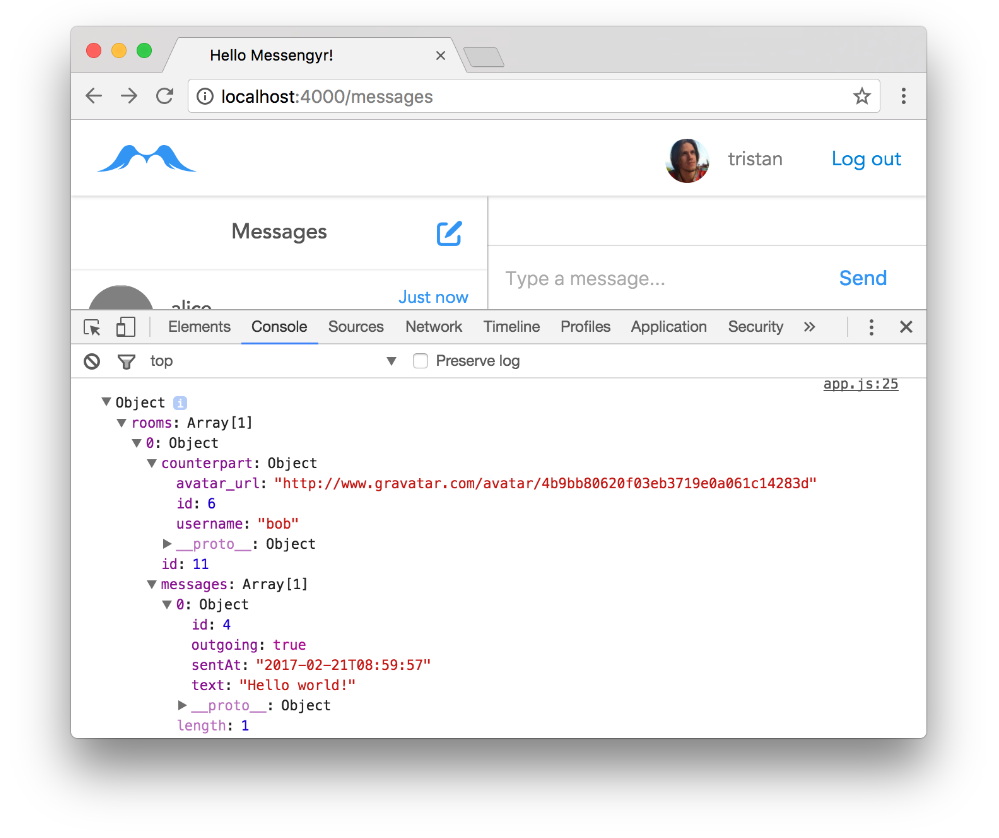
If you now load /messages in your browser and open the JavaScript console, you should see your user being logged there:
Sweet! Our fetch request works! However, we don't really need this user info. What we really want to do is fetch the rooms from our API so that we can replace the mock data from fake-data.js with data from the actual database!
Let's see what happens if we change our request URL to /api/rooms instead:
// assets/js/app.js
// ...
class App extends React.Component {
componentDidMount() {
fetch('/api/rooms') // Edit this line!
.then((response) => {
// ...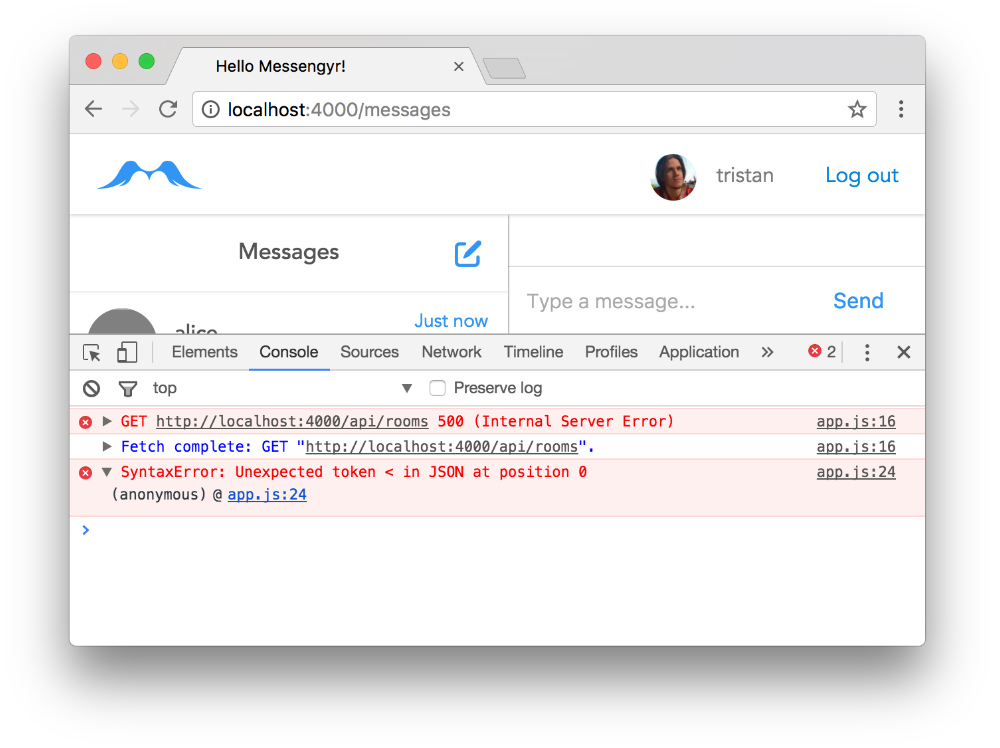 "Internal Server Error". Oh noez!
Hm, it seems like something went wrong on our server when we tried to do that. Let's check the Phoenix log to get some more info:
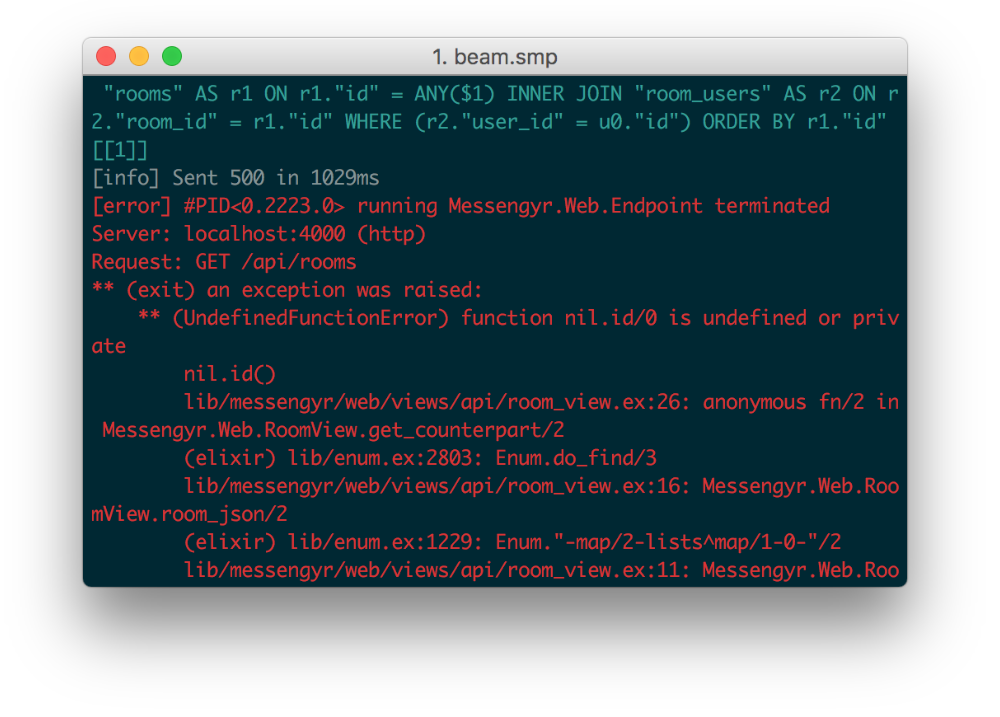
Now we can see the source of the error: we're trying to get the ID of our logged-in user in the get_counterpart/2 function. But since me is nil, there's no ID to get!
The reason me is nil is because we're currently only using Guardian's browser authentication, and not their API authentication. You'll notice that we can retrieve our rooms in JSON format if we go to /api/rooms directly in our browser (which we did in the previous lesson), but if we're sending AJAX requests, it's a no-go. Let's fix this!
Using JWT tokens
Let's comment out the componentDidMount hook in our component for now so that the error message doesn't distract us.
// assets/js/app.js

// ...

class App extends React.Component {

  /*
  componentDidMount() {
    // ...
  }
  */

}
What we need to do now is extract the JSON Web Token (JWT) that Guardian generated automatically for us when we logged in, and manually send it in our Fetch request so that Phoenix knows that we're authenticated. Here's a picture illustrating this new flow:
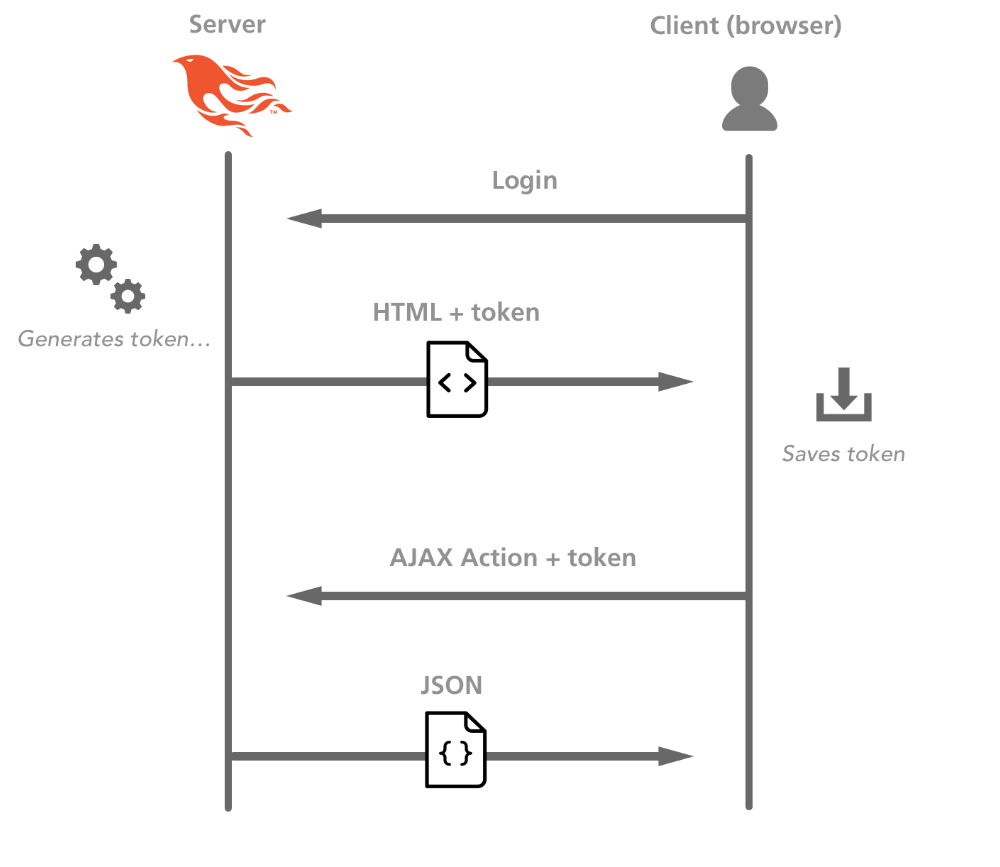 The main takeaway from this picture is that, as long as we supply the server with a valid token when we make a request, we should always be able to retrieve the JSON we want.
Since the token was already generated by Guardian when we logged in a few lessons ago, the only thing we need to do now is to find this token in Elixir and give it to the browser somehow so that the browser can send it back again when it makes requests.
This is easy to do thanks to Phoenix's views! We simply open our existing ChatView and we create a jwt/1-function there which uses Guardian to return the generated JWT token:
# lib/messengyr_web/views/chat_view.ex

defmodule MessengyrWeb.ChatView do
  use MessengyrWeb, :view

  # Add this function:
  def jwt(conn) do
    Guardian.Plug.current_token(conn)
  end
end
Now we can use this function in our EEx-template! Instead of just rendering it as text in an HTML-tag though, we're going to log it as a JavaScript string (because we need to be able to easily get it with JavaScript).
<!-- lib/messengyr_web/templates/chat/index.html.eex -->
<div id="app"></div>
<!-- Add this script: -->
<script>
console.log("<%= jwt(@conn) %>");
</script>
<script src="<%= static_path(@conn, "/js/app.js") %>"></script>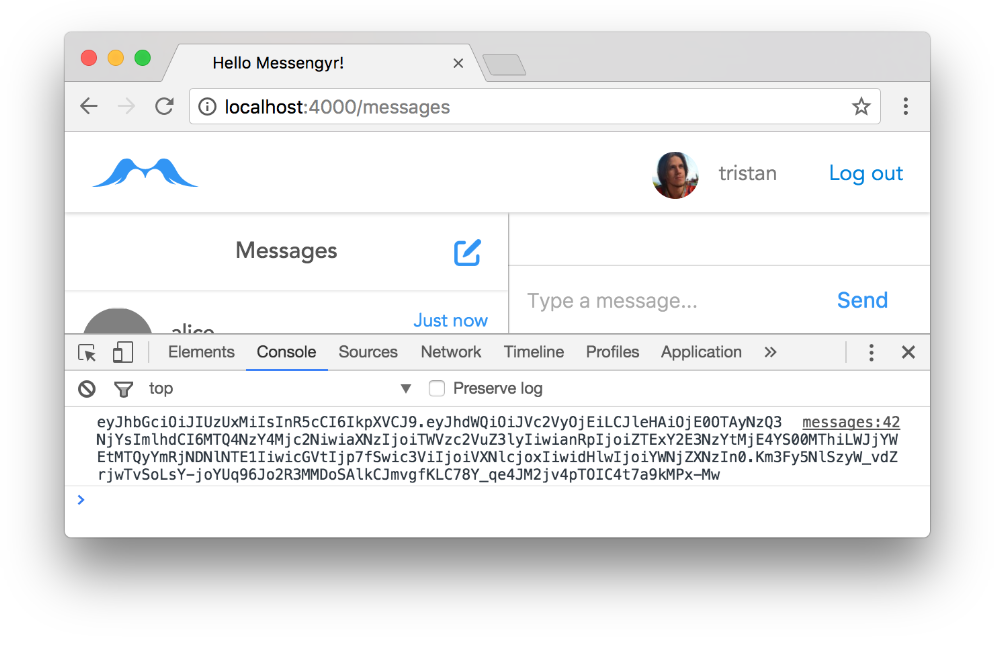 Look, there's our token!
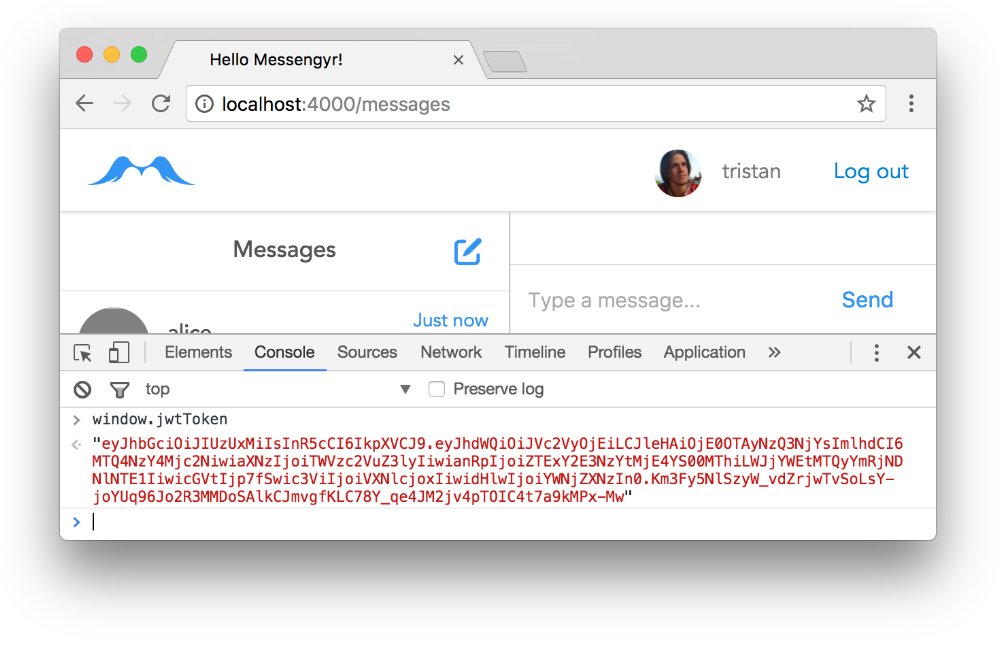
Now we need to **store this token **somehow so that we can use it when we send our AJAX request. Other websites often store the tokens as cookies or in the user's local storage. However, since we'll only need the token for this particular page (/messages) right now, we'll just store the token as a global variable by setting it to the window object:
<!-- lib/messengyr_web/templates/chat/index.html.eex -->

<div id="app"></div>

<script>
  // Save it as a string to the "window" object:
  window.jwtToken = "<%= jwt(@conn) %>";
</script>

<script src="<%= static_path(@conn, "/js/app.js") %>"></script>
After doing this and refreshing the page, you should be able to type window.jwtToken in your JavaScript console and confirm that the token has been saved
Next, we need to make sure that we use this token when we make our request. The standardized way to do this (according to the OAuth 2.0 protocol) is to set an Authorization header on the request with the string "Bearer xxxxx" (where xxxxx is the JWT token). It's usually good to follow conventions, so let's do that. Uncomment the componentDidMount-hook, and set the headers:
// assets/js/app.js
class App extends React.Component {
componentDidMount() {
fetch('/api/rooms', {
headers: {
"Authorization": "Bearer " + window.jwtToken,
},
})
.then((response) => {
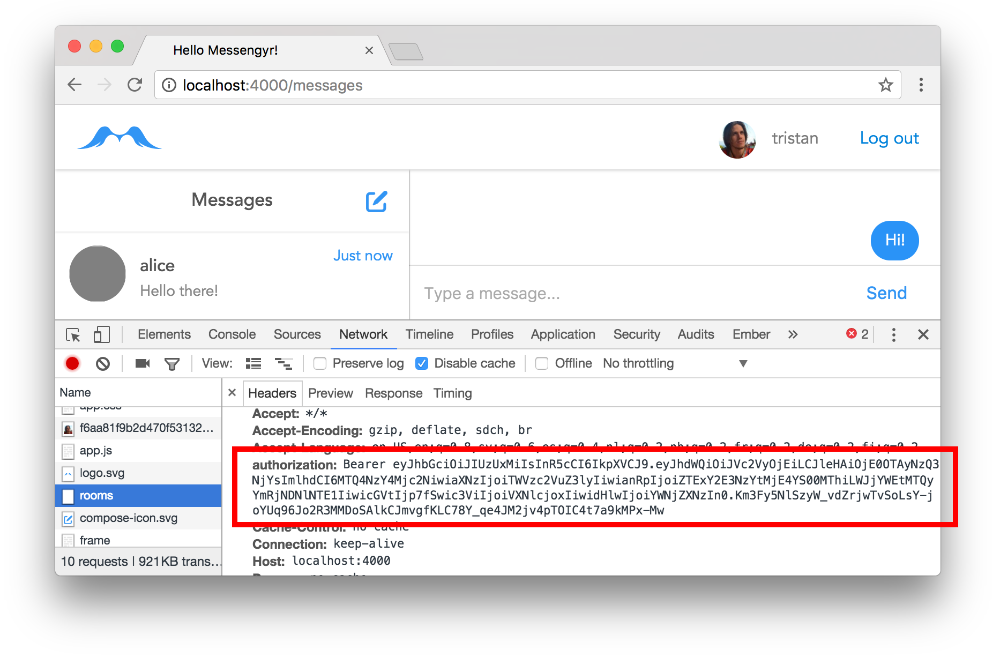
// ...If you refresh the page now... you'll still see the same error message, and it might look as if nothing has changed! However, if you open the "Network"-tab in your DevTools, and click on the request we just made, you'll notice that we're now sending out the authorization header with the token, which is an important difference!
Using API authentication in Guardian
The last step to make our request work is to change the :api pipeline in our router.ex-file. Instead of using the browser session to verify the user, we want to use the header's Bearer token.
For this, we'll create a new custom pipeline module in the lib/messengyr/auth folder. It's called ApiPipeline and is very similar to the original Pipeline module:
# lib/messengyr/auth/api_pipeline.ex

defmodule Messengyr.Auth.ApiPipeline do
  use Guardian.Plug.Pipeline,
    otp_app: :messengyr,
    module: Messengyr.Auth.Guardian

  plug Guardian.Plug.VerifyHeader, realm: "Bearer" # <-- This line makes all the difference!
  plug Guardian.Plug.LoadResource, allow_blank: true
end
# lib/messengyr_web/router.ex
defmodule MessengyrWeb.Router do
# ...
pipeline :api do
# Replace the previous plugs with these 2:
plug :accepts, ["json"]
plug Messengyr.Auth.ApiPipeline
end
# ...
end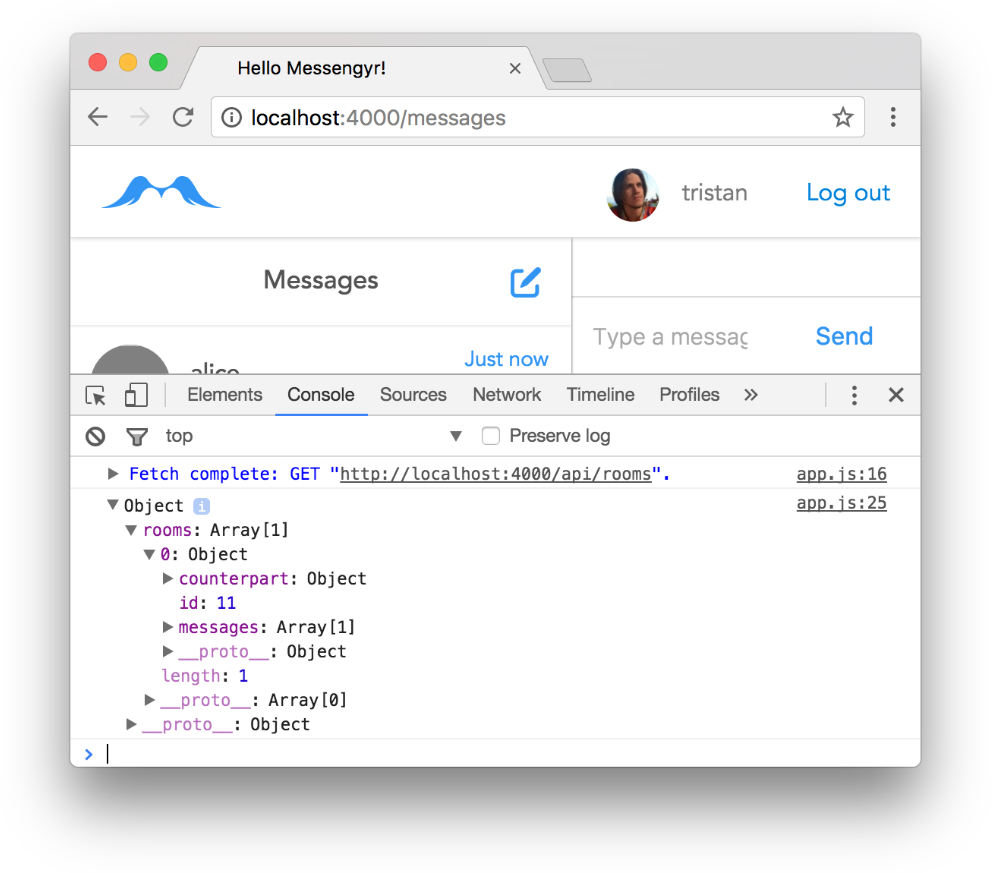 Refresh... and there's our room data! Yay!
Awesome! Now we'll just do some **error handling **to make this perfect. For example, we don't want anyone to be able to fetch any rooms unless they're logged-in. Therefore, we'll use the EnsureAuthenticated plug in RoomController, just like we did previously in ChatController:
# lib/messengyr_web/controllers/api/room_controller.ex

defmodule MessengyrWeb.RoomController do

  # ...

  # Alias the ErrorView:
  alias MessengyrWeb.ErrorView

  # Add this plug:
  plug Guardian.Plug.EnsureAuthenticated, error_handler: __MODULE__

  # ...

  # ...and this function:
  def auth_error(conn, {_type, _reason}, _opts) do
    conn
    |> put_status(401)
    |> render(ErrorView, "error.json", message: "You are not authenticated.")
  end

end
We'll again use the already defined "error.json"-template in our ErrorView to render the error as JSON.
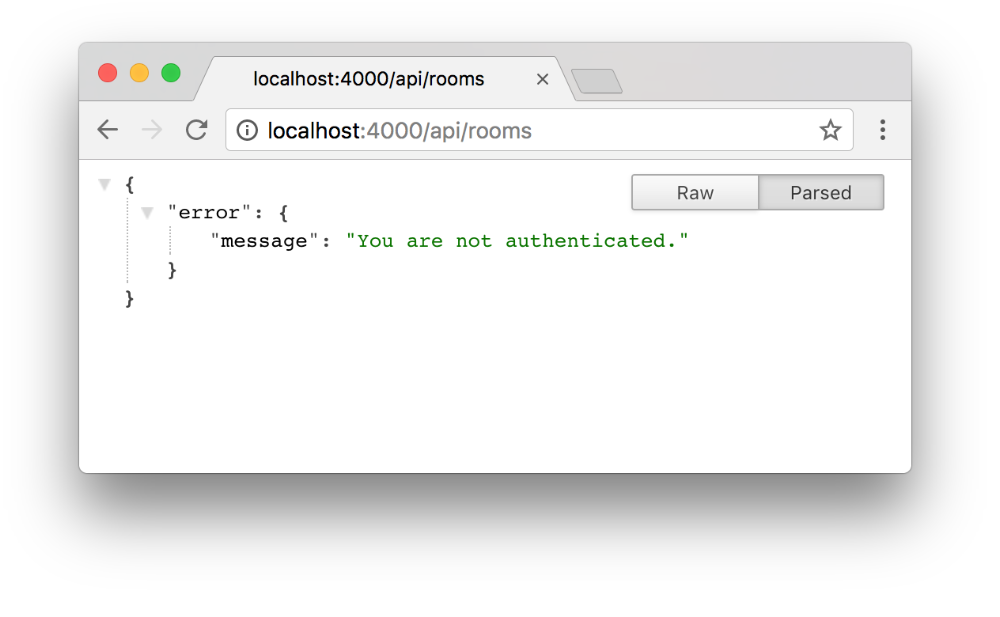 If you go to /api/rooms in your browser now, you should see the error message since the "Authorization" header is not set here.
Ecto queries
Our authentication now works great. The last step on the Elixir-side of things is to make some adjustments to the way we handle the request, and to the JSON that we return.
The first flaw in our RoomController is that we currently return all the rooms that exist in the database. In reality, we only want to return the rooms that the user is a member of!
To do this, we'll create a new list_user_rooms/1-function in our chat context. In this function, we can build a little Ecto query (which is like a traditional SQL statement, but with some syntactic sugar) where we join the rooms-table with the users-table, and then specify what we want:
# lib/messengyr/chat/chat.ex

defmodule Messengyr.Chat do

  # ...

  # Import this module so that we can use "from":
  import Ecto.Query

  # ...

  def list_user_rooms(user) do
    # Build the Ecto query:
    query = from r in Room,
      join: u in assoc(r, :users),
      where: u.id == ^user.id

    # Use the query:
    Repo.all(query) |> Repo.preload(:messages) |> Repo.preload(:users)
  end

  # ...

end
# lib/messengyr_web/controllers/api/room_controller.ex
defmodule MessengyrWeb.RoomController do
# ...
def index(conn, _params) do
user = Guardian.Plug.current_resource(conn)
# Use the new function:
rooms = Chat.list_user_rooms(user)
render(conn, "index.json"...
# ...
endAlso, one missing piece of data in our messages JSON is whether the message is outgoing or not (in other words, whether it was sent by the user or the counterpart). For this we'll create an outgoing?/2 function in the MessageView that simply checks if the logged-in user's ID is the same as the message author's ID:
# lib/messengyr_web/views/api/message_view.ex

defmodule MessengyrWeb.MessageView do
  use MessengyrWeb, :view

  # Use outgoing?/2 here...
  def message_json(message, %{me: me}) do
    %{
      id: message.id,
      text: message.text,
      outgoing: outgoing?(message, me),
      sentAt: message.inserted_at,
    }
  end

  # ...and add the function:
  defp outgoing?(message, me) do
    message.user_id == me.id
  end

end
Refresh the page one last time, and you'll see that we finally have all the data that we need in order to replace fake-data.js!
 Rooms, check! Counterpart, check! Messages, check!
Replacing the fake data
We now have the possiblity to finally use some real data on the client! To do this, we'll stop using the DATA constant in app.js and instead use React's state.
We start by creating a constructor method where we set the initial state of the component (= an empty list of rooms and an empty list of message).
// assets/js/app.js

// ...

class App extends React.Component {

  constructor() {
    super();

    this.state = {
      rooms: [],
      messages: [],
    };
  }

  // ...
It's probably also a good idea to set the defaultProps in our MenuContainer and ChatContainer to match this initial state (just in case the props passed down to these 2 components happens to be undefined for some reason)! We can set these at the very end of our files, right before we export the component:
// assets/js/components/menu-container.js

// ...

class MenuContainer extends React.Component {
  // ...
}

// Add this:
MenuContainer.defaultProps = {
  rooms: [],
};

export default MenuContainer;
// ...
class ChatContainer extends React.Component {
// ...
}
// Add this:
ChatContainer.defaultProps = {
messages: [],
};
export default ChatContainer;Next, we go back to app.js and use the response from our Fetch request to mutate the state:
// assets/js/app.js

// ...

class App extends React.Component {

  // ...

  componentDidMount() {
    fetch('/api/rooms', {
      // ...
    })
    .then((response) => {
      // Get the rooms from the JSON:
      let rooms = response.rooms;

      // Mutate the state with "setState":
      this.setState({
        rooms: rooms,
        messages: rooms[0].messages,
      });
    })
    .catch((err) => {
      // ...
    });
  }

  // ...
}

// ...
With this new state, we can pass down the relevant data to our MenuContainer and ChatContainer components as props:
// assets/js/app.js

// ...

class App extends React.Component {

  // ...

  render() {
    return (
      <div>
        <MenuContainer
          rooms={this.state.rooms}
        />
        <ChatContainer
          messages={this.state.messages}
        />
      </div>
    )
  }
}

// ...
Also, since the users in our JSON data actually have the field avatarURL now, we can use it in our img-tag inside the MenuMessage component:
// assets/js/components/menu-message.js

// ...

class MenuMessage extends React.Component {
  render() {

    // ...

    return (
      <li>
        <img className="avatar" src={counterpart.avatarURL} />

        // ...

1

// ...
Now refresh the page and pat yourself on the back!
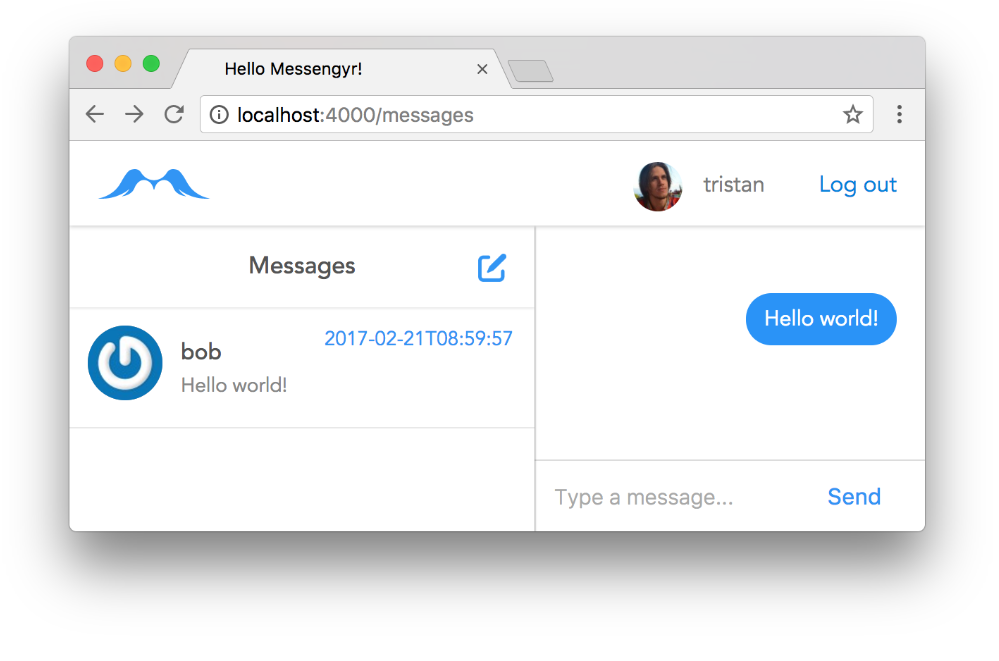 We did it! There's our database data!
One last thing -- Moment.js
You might have noticed that the timestamp for the last sent message looks a bit ugly. Preferably, we'd want it to show a relative time (e.g. 2 minutes ago), instead of a timestamp (2017-02-21T08:59:57).
To do this, we can use a great little library called Moment.js. Again, we use the same process as with our other JavaScript plugins; we start by installing it via NPM in the assets folder:
npm install moment --save...we whitelist it in our Brunch configuration...
// assets/brunch-config.js

  // ...

  npm: {
    enabled: true,
    whitelist: ["react", "react-dom", "whatwg-fetch", "moment"],
  }
};
...and finally we import it into menu-message.js where we use it to format the timestamp for the sentAt variable:
// assets/js/components/menu-message.js
import React from 'react';
import ReactDOM from 'react-dom';
import moment from 'moment'; // Import moment...
class MenuMessage extends React.Component {
render() {
// ...
// ...and use it here!
let sentAt = moment.utc(lastMessage.sentAt).fromNow();
return (
// ...
)
}
}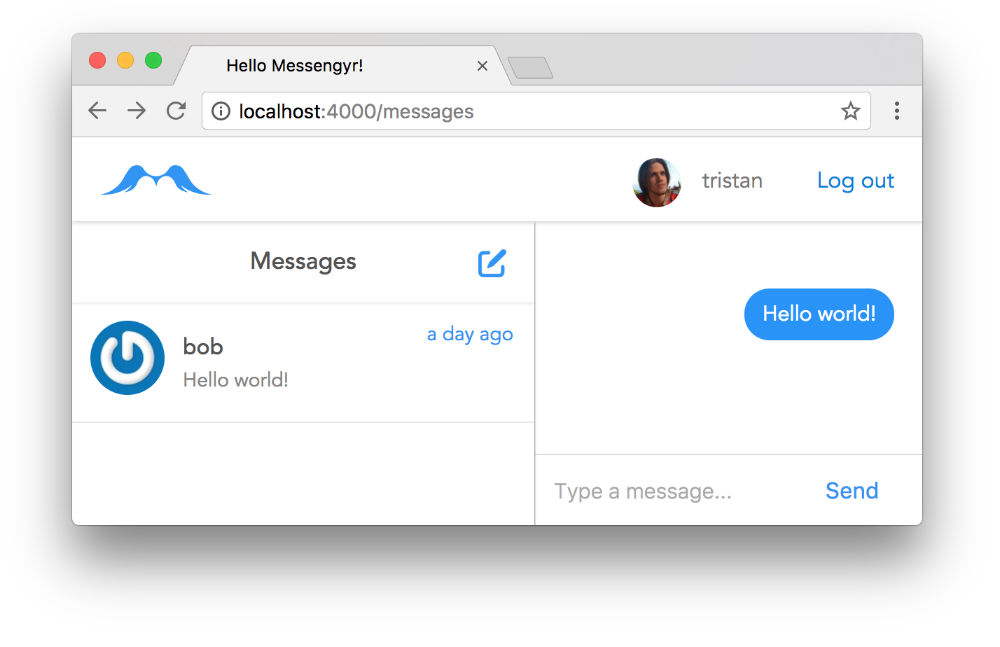 Now you should have a nice relative time instead!