Now that you know more about how routes, templates and controllers work together, let's start building the app we want! In this lesson, we're going to design three pages:
-
The landing page (index)
-
The "Login"-page
-
The "Signup"-page
In case you haven't already taken a look at the Sketch-file in the "Phoenix"-lesson, this is what they should look like:
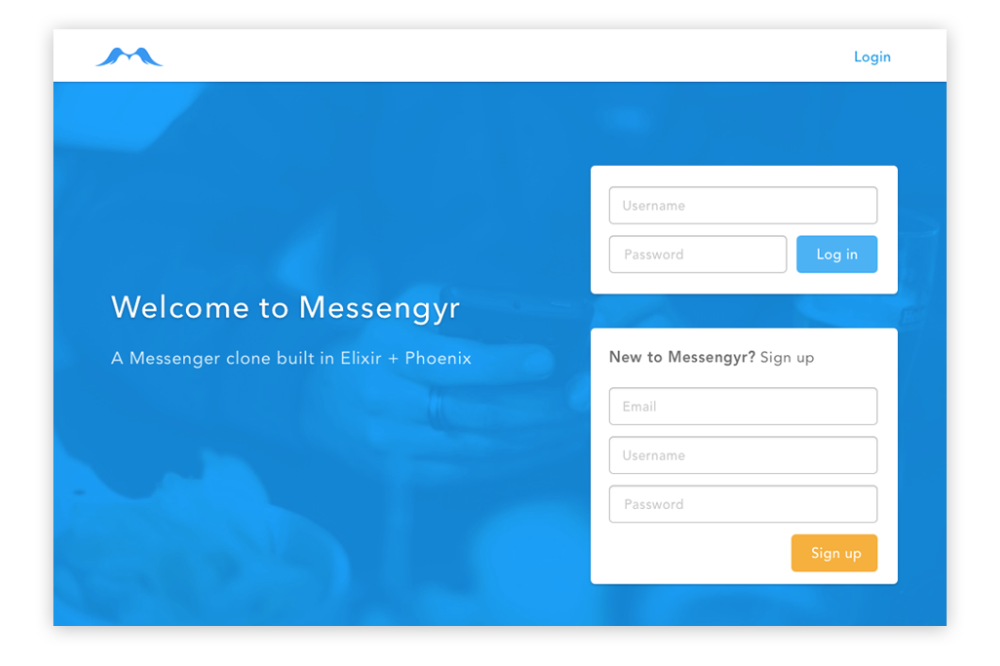 The landing page
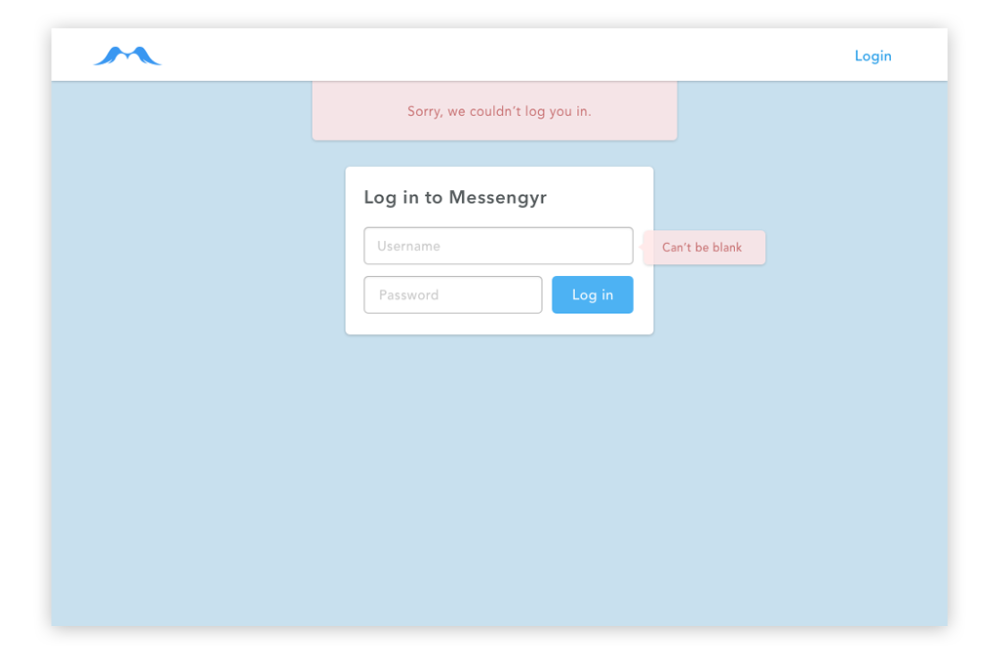 The "Login"-page ("Signup" uses the same design)
If you ever run into a problem or your app stops working while following the course, you can either compare your code with the one I have on my GitHub repo (I have organised it so that it has one commit per chapter), or leave a comment right here (hover over some text or code and click the little comment-icon on the right side).
Creating the routes
Let's jump back into our router.ex-file and generate our routes based on the mockup. The /-scope should currently look like this:
# lib/messengyr_web/router.ex

scope "/", MessengyrWeb do
  pipe_through :browser # Use the default browser stack

  get "/", PageController, :index
  get "/test", PageController, :say_hello
end
We will now delete our /test-route, and instead add the /login and /signup-routes:
# lib/messengyr_web/router.ex
scope "/", Messengyr.Web do
pipe_through :browser # Use the default browser stack
get "/", PageController, :index
# Add these 2 lines:
get "/signup", PageController, :signup
get "/login", PageController, :login
end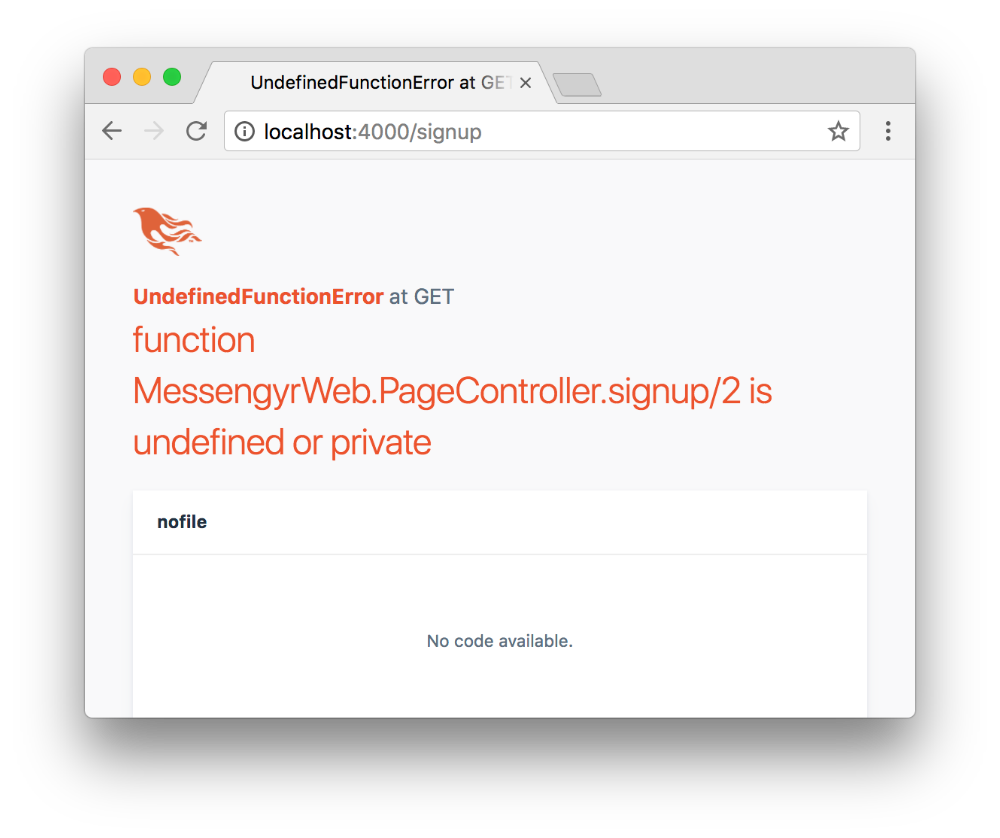 If you try to go to one of the new routes in your browser, you'll obviously be greeted with an error message. Time to fix the controller!
Head into the page_controller.ex-file. You can delete the say_hello/2-function that we defined earlier. Instead, we'll make sure that we define the three functions that we're referencing from our router: index, login and signup:
# lib/messengyr_web/controllers/page_controller.ex

defmodule MessengyrWeb.PageController do
  use MessengyrWeb, :controller

  def index(conn, _params) do
    render conn
  end

  def login(conn, _params) do
    render conn
  end

  def signup(conn, _params) do
    render conn
  end

end
Note that we previously returned render conn, "index.html" in our index/2-function, however, you can actually remove that "index.html"-string. If you omit the second parameter, Phoenix will automatically look for a template with the same name as your function anyway (so the index/2-function is connected to index.html.eex).
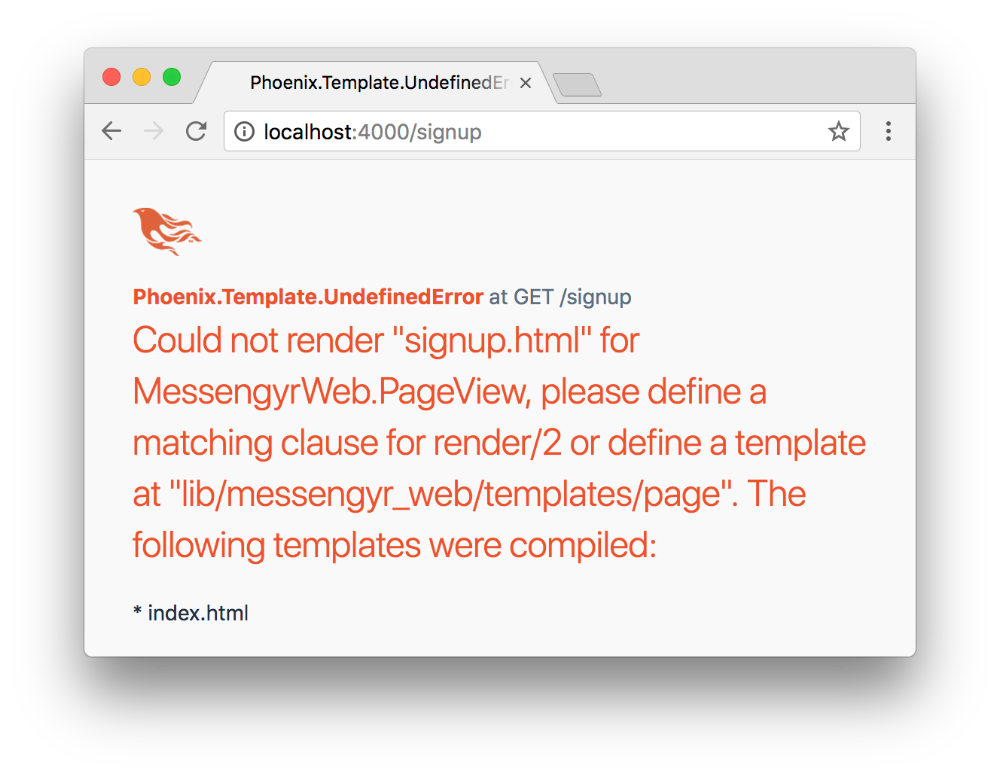 Getting closer. Now we just need our templates.
Create two new files in the messengyr_web/templates/page-folder: login.html.eex and signup.html.eex. We'll keep the contents very simple and similar to each other:
<!-- lib/messengyr_web/templates/page/login.html.eex -->

<div class="card login">

  <h1>Log in to Messenger</h1>

  <form>
    <input placeholder="Username">
    <input placeholder="Password">

    <button type="submit" class="login">Log in</button>
  </form>

</div>
<!-- lib/messengyr_web/templates/page/signup.html.eex -->
<div class="card login">
<h1>Sign up for Messenger</h1>
<form>
<input placeholder="Email">
<input placeholder="Username">
<input placeholder="Password">
<button type="submit" class="signup">Sign up</button>
</form>
</div> There we go! Similarly, if you go to /signup, you should see the "Signup" page.
We'll also update our index page, so that you can log in and sign up from there directly:
<!-- lib/messengyr_web/templates/page/index.html.eex -->
<div class="tagline">
<h1>Welcome to Messengyr!</h1>
<h2>A messenger clone built in Elixir + Phoenix</h2>
</div>
<div class="action-boxes">
<div class="card login">
<form>
<input placeholder="Username">
<input placeholder="Password">
<button type="submit" class="login">Log in</button>
</form>
</div>
<div class="card signup">
<h5>
<strong>
New to Messengyr?
</strong>
Sign up!
</h5>
<form>
<input placeholder="Email">
<input placeholder="Username">
<input placeholder="Password">
<button type="submit" class="signup">Sign up</button>
</form>
</div>
</div>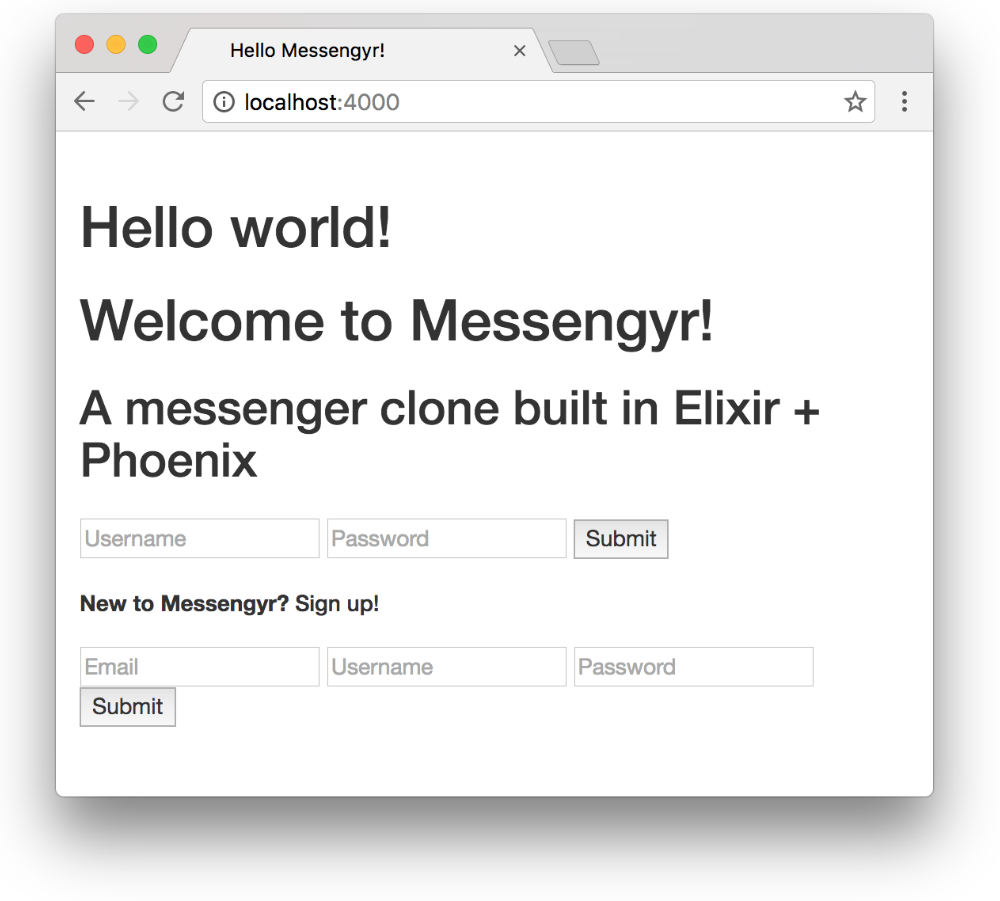 It's not pretty yet, but that's okay!
You can also delete the my_name/0-function in page_view.ex while you're at it, since we're not using it anymore.
Styling the pages
Let's make the page pretty! First, download this zip-file to get all the image assets that we're going to use. Unzip it and place the resulting images-folder in assets/static so that it overwrites the images-folder that's currently there.
Download images.zip
Next, we're going to make some changes to our layout-template, so open messengyr_web/templates/layout/app.html.eex. We're adding a special class to the body-tag so that we can style pages differently depending on the route we're on (thanks to @conn.path_info), and we also want to add a **header **that's visible on every page instead of the h1-tag. Your final body-tag and its content should look like this:
<!-- lib/messengyr_web/templates/layout/app.html.eex -->

<!-- Add a class to the body: -->
<body class=<%= @conn.path_info %>>
  <div class="container">

    <!-- Add this header: -->
    <header>

      <%= link "", class: "logo", to: Routes.page_path(@conn, :index) %>

      <%= link "Log in", to: Routes.page_path(@conn, :login) %>

    </header>

   	<!-- The rest should be the same: -->
    <p class="alert alert-info" role="alert"><%= get_flash(@conn, :info) %></p>
    <p class="alert alert-danger" role="alert"><%= get_flash(@conn, :error) %></p>

    <main role="main">
      <%= render @view_module, @view_template, assigns %>
    </main>

  </div> <!-- /container -->
  <script src="<%= Routes.static_path(@conn, "/js/app.js") %>"></script>
</body>
Note that we're using the special link-helper in our header so that we can easily link to other pages within the app. The first parameter is the **text **that we want to show inside the a-tag (for the login-link, it's just "Log in"), and in the :to-option you first specify the path type (Routes.page_path will look up our page_controller), and then the route as an atom (e.g. :login).
This link-helper might at first seem tedious compared to just using a normal a href="/login", but the upside is that your app becomes more "aware" of your intentions . If you accidentally delete a route that you've linked to in your template for example, you'll get an error message instead of keeping a link leading to a blank page.
Next, we remove the CSS-file located at assets/css/phoenix.css. These are some predefined styles that Phoenix uses (mostly to show its default landing page) with the Bootstrap library. Since we don't need that, there's no point in keeping it, as it might conflict with our own styling. You might have to restart your Phoenix server (CTRL + C, mix phx.server) after deleting it to see the changes.
You should now be able to navigate from one page to the other when clicking on "Log in":
This still looks really ugly though. Time to apply some CSS! In order to make our CSS code more manageable, we'll use the SASS preprocessor. Run this command in a terminal window, inside your assets directory, to install the sass-brunch package from NPM:
npm install sass-brunch --save-devIf you open your package.json from the assets folder, you should now see sass-brunch among your other devDependencies. Great! Now simply change the name of the file at assets/css/app.css to app.scss, and you're ready to use SASS!
Since this isn't a CSS-tutorial, I won't go into detail about how the styling works here, simply copy the following code and paste it in your app.scss-file:
// assets/css/app.scss

$main-color: #0082DB;

html {
  height: 100%;
}

body {
  margin: 0;
  font-family: Avenir, "Helvetica Neue", Helvetica, Arial, sans-serif;
  background-color: #C7DFEF;
  position: absolute;
  top: 0;
  bottom: 0;
  right: 0;
  left: 0;

  &[class=""] {
    background-color: $main-color;
    background-image: url("/images/photo-bg.jpg");
    background-size: cover;
    background-position: center center;
  }
}

*:focus {
  outline: none;
}

button {
  cursor: pointer;
  &[type="submit"] {
    border-radius: 5px;
    font-size: 15px;
    width: 100%;
    box-sizing: border-box;
    margin: 4px 0;
    background-color: #3EAFF9;
    color: white;
    border: none;
    padding: 13px 20px;
    &:hover {
      background-color: #3ba2e6;
    }

    &.signup {
      background-color: #F8B20A;
      &:hover {
        background-color: #e8a503;
      }
    }
  }
}

a {
  text-decoration: none;
  color: $main-color;
  &:hover {
    text-decoration: underline;
  }
}

.landing-bg {
  min-height: 100%;
  background-color: $main-color;
  background-image: url("/images/photo-bg.jpg");
  background-size: cover;
  background-position: center center;
}

.container {
  max-width: 1000px;
  margin: 0 auto;
}

main {
  margin-top: 60px;

  > .card {
    margin-top: 170px;
  }
}

.card {
  background: #FFFFFF;
  box-shadow: 0px 1px 3px 0px rgba(0,0,0,0.22);
  border-radius: 5px;
  display: block;
  padding: 20px 25px;
}

.tagline {
  display: inline-block;
  margin-top: 185px;
  color: white;
  letter-spacing: 1.16px;
  text-shadow: 0px 1px 3px rgba(0,0,0,0.24);

  h1 {
    font-weight: 400;
    font-size: 35px;
  }

  h2 {
    font-weight: 400;
    font-size: 20px;
  }
}

.action-boxes {
  width: 352px;
  float: right;
  margin-top: 40px;

  .card {
    margin: 20px 0;
  }
}

.card {
  max-width: 400px;
  margin: 0 auto;

  h1 {
    font-size: 21px;
    color: #585E60;
    letter-spacing: 0.7px;
    margin-top: 6px;
  }

  h5 {
    font-size: 17px;
    color: #707070;
    letter-spacing: 0.56px;
    font-weight: 500;
    margin: 15px 0;
    margin-top: 4px;
  }

  form {
    position: relative;

    span.help-block {
      position: absolute;
      margin-top: -43px;
      left: 100%;
      margin-left: 13px;
      width: auto;
      white-space: nowrap;
      background: rgba(255,229,229,0.9);
      box-shadow: 0px 1px 3px 0px rgba(0,0,0,0.18);
      border-radius: 5px;
      padding: 8px 20px;
      color: #C35A5A;
    }
  }
}

input {
  border: 1px solid rgba(0,0,0,0.23);
  box-shadow: inset 0px 1px 3px 0px rgba(0,0,0,0.13);
  border-radius: 5px;
  font-size: 15px;
  padding: 9px 14px;
  width: 100%;
  box-sizing: border-box;
  margin: 4px 0;

  &:focus {
    box-shadow: 0px 0px 2px rgb(6, 102, 162);
    border: 1px solid rgba(0, 131, 213, 0.67);
  }
}

.alert {
  top: 52px;
  width: 417px;
  margin: 0 auto;
  position: absolute;
  left: 50%;
  transform: translateX(-50%);
  text-align: center;
  height: 80px;
  line-height: 80px;
  background: rgba(255,229,229,0.84);
  box-shadow: 0px 1px 3px 0px rgba(0,0,0,0.18);
  border-radius: 5px;
  color: #C35A5A;
  padding-top: 10px;
  &:empty {
    display: none;
  }

  &.alert-info {
    background: rgba(191, 232, 176, 0.82);
    color: #317931;
  }
}
Now, just wait for the page to reload and... tada!
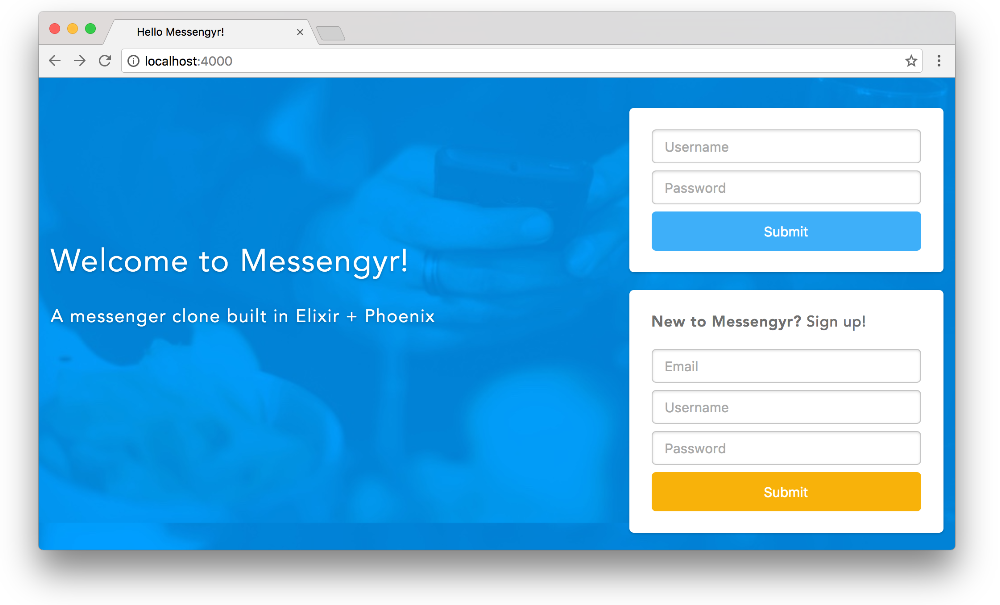 That looks much better already!
The plugin will automatically concatenate all the SASS-files that you add to this folder, so let's create a new header.scss file there as well, with the following content:
// assets/css/header.scss
header {
background: white;
box-shadow: 0px 1px 3px 0px rgba(0,0,0,0.19);
height: 60px;
position: fixed;
top: 0;
left: 0;
right: 0;
z-index: 100;
.logo {
background-image: url("/images/logo.svg");
width: 80px;
height: 21px;
margin: 20px;
position: absolute;
}
a {
float: right;
margin: 20px;
}
.profile-container {
float: right;
margin-top: 4px;
margin-right: 18px;
img {
width: 35px;
height: 35px;
border-radius: 50%;
vertical-align: middle;
margin-right: 10px;
}
p {
font-size: 16px;
color: #7A7A7A;
display: inline-block;
}
}
}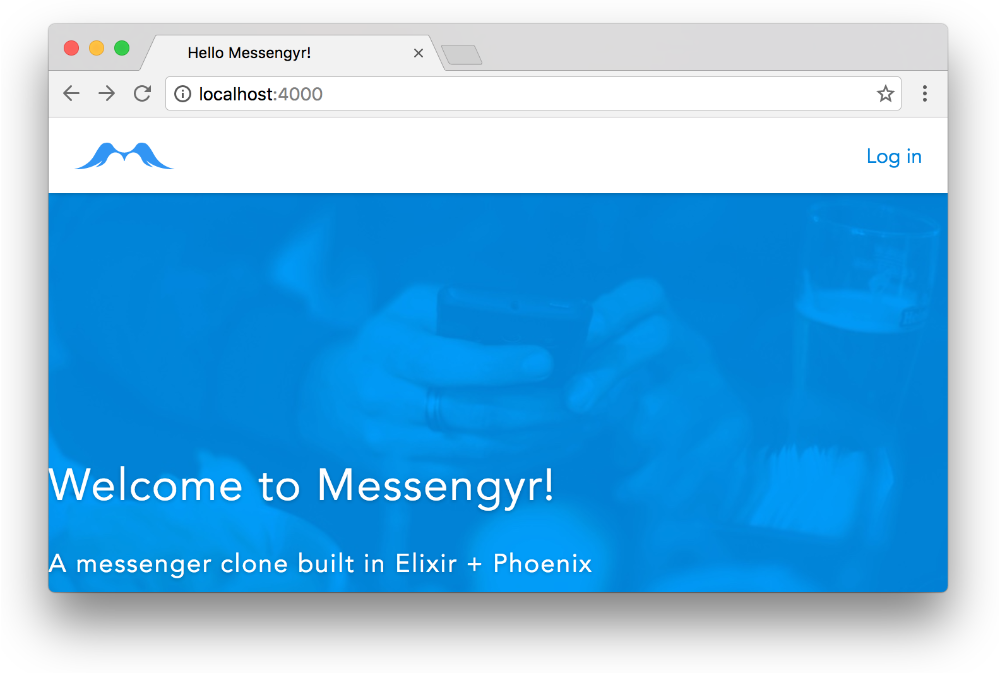 And now our header is there too. Great! If Phoenix doesn't pick up the header.scss file for some reason, try restarting the server.
All your three pages should now have some basic markup and styling and we're ready to focus more on the functionality! In the next chapter, we'll go through databases with Ecto!