Before we deploy our app to production, I wanted to cover the process of creating your own token, since it's become so common to do in the Ethereum ecosystem.
As you probably know, the ICO ("Initial Coin Offering") industry has been booming lately, and it's completely reinventing the way new startups kickstart themselves. In fact, go have a look at Wikipedia's list of highest crowdfunding projects, and you'll notice that blockchain projects absolutely dominate the list.
Even though many of these token projects are often unrealistic and sometimes straight-up scams, it's a very interesting way to take advantage of some of Ethereum's biggest benefits.
By creating an ICO, you'll also learn how to handle money sent to to your contracts, which should come in handy if you want to create some kind of paid decentralised service in the future.
Therefore, for the sake of this chapter, let's imagine that our Tweether DApp uses its own coin -- the Tweether Token. We will create two contracts -- one for the token itself and one for the token sale (the ICO).
Using an ERC20 library
Ethereum uses a standard called ERC20 to make it easy for developers to create their own tokens. In brief, ERC20 defines a set of rules that your token contract must adhere to in order to be compatible with most Ethereum wallets.
While you can create this contract from scratch using the guidelines given by the standard interface, there are multiple libraries that already do this really well.
OpenZeppelin is a company that has open-sourced some great token contract libraries, which are used by many other reputable projects in the space. Let's inherit from some of OpenZeppelin's contracts so that we don't have to reinvent the wheel again!
Make sure you're still in your Tweether project folder and run:
npm install zeppelin-solidity --saveThis will download all of OpenZeppelin's libraries in your node_modules folder, and importing them into Solidity is just as easy as importing a node module in a JavaScript file.
Some words of caution before we start coding: although the simplicity of just using other people's libraries everywhere might seem attractive, it's extremely important to review their code first! This is especially important in the Ethereum ecosystem, where libraries have the possibility to actively move money around and defraud your users. In short -- if you don't fully understand what a library contract is doing, you shouldn't use it!
Now that that's out of the way, create a new folder called token in your contracts folder, and create a file called TweetherToken.sol. We're now going to import OpenZeppelin's StandardToken contract and inherit from it:
// contracts/token/TweetherToken.sol

pragma solidity ^0.5.10;

import "zeppelin-solidity/contracts/token/ERC20/StandardToken.sol";

contract TweetherToken is StandardToken {

}
Next, we simply need to define three parameters for our token: its name, its symbol and the **number of decimals **it has.
The name and symbol can be anything you want -- since there's no central registry for tokens, you don't even have to worry about them being unique! In this example, we'll choose the name TweetherToken with TWE as the symbol.
When it comes to the number of decimals, many developers choose to use the same amount as the ether currency (18). However, for simplicity's sake, we will put 0 here, so that 1 TWE is the minimum amount that you can own.
// contracts/token/TweetherToken.sol

pragma solidity ^0.5.10;

import "zeppelin-solidity/contracts/token/ERC20/StandardToken.sol";

contract TweetherToken is StandardToken {
  string public name = "TweetherToken";
  string public symbol = "TWE";
  uint8 public decimals = 0;
}
That was easy, huh?
Setting our token supply
For our ERC20 token to be complete, we need to specify how many tokens there are and how they get distributed. While most of the distribution job is going to be up to our ICO contract, the token contract still need to set the initial supply before handing over the reigns.
This is the part where you also get to decide how many of your tokens should be given to the founders, the development team, your strategic partners... etc.
 An example of token distribution, from Civic's ICO page.
In our case we'll keep things simple, so we'll issue 1 million tokens where 75% of the supply goes to the crowdsale and 25% is kept for the founders (that's us)!
 TweetherToken's very simple distribution model is guaranteed to make you a millionaire!
It's worth noting that the creation of ERC20 tokens is in no way determined by proof-of-work like ether and bitcoin. Instead, they are created by completely arbitrary rules set by your contract, and you could in theory create new tokens or reset everyone's balances at any time you want (although keep in mind that people probably wouldn't want to invest in a token that permitted something like that).
Now that we know that, let's start by specifying the amounts given to the founder and to the ICO as state variables (remember that it has to add up to a million):
// contracts/token/TweetherToken.sol

// ...

contract TweetherToken is StandardToken {
  string public name = "TweetherToken";
  string public symbol = "TWE";
  uint8 public decimals = 0;

  // Add these 2 lines:

  uint256 public FOR_ICO = 750000;
  uint256 public FOR_FOUNDER = 250000;
}
Then, we create a **constructor function **where we set the initial values of two variables: totalSupply_ (note the underscore) and balances. These are inherited from OpenZeppelin's StandardToken library and keep track of your token's total supply as well as what addresses own what amount of tokens.
// contracts/token/TweetherToken.sol

// ...

contract TweetherToken is StandardToken {
  // ...

  function TweetherToken() public {
    totalSupply_ = FOR_FOUNDER + FOR_ICO;
    balances[msg.sender] = totalSupply_;
  }

}
As you can see, we initially give all the tokens to the deployment address (msg.sender), since we have to give them to someone. This means that, after deploying the token, the founders will actually control 100% of the supply. Don't get too excited though, it won't stay like that for long.
To test what we've done so far, let's create a new migration file called 6_deploy_token.js:
// migrations/6_deploy_token.js

const TweetherToken = artifacts.require("TweetherToken")

module.exports = (deployer) => {
  deployer.deploy(TweetherToken)
}
...and a new integration test file dedicated to our token. Notice that, thanks to the fact that our token library inherit from StandardToken, we can call a function called balanceOf to see how many tokens a specific address has.
// test/integration/token.js
const TweetherToken = artifacts.require("TweetherToken")
contract("token", (accounts) => {
it("distributes token supply", async () => {
const token = await TweetherToken.deployed()
// accounts[0] is the same address that created the TweetherToken:
const founderBalance = await token.balanceOf.call(accounts[0])
// Make sure it holds all of the supply:
assert.equal(founderBalance.toString(), "1000000")
})
})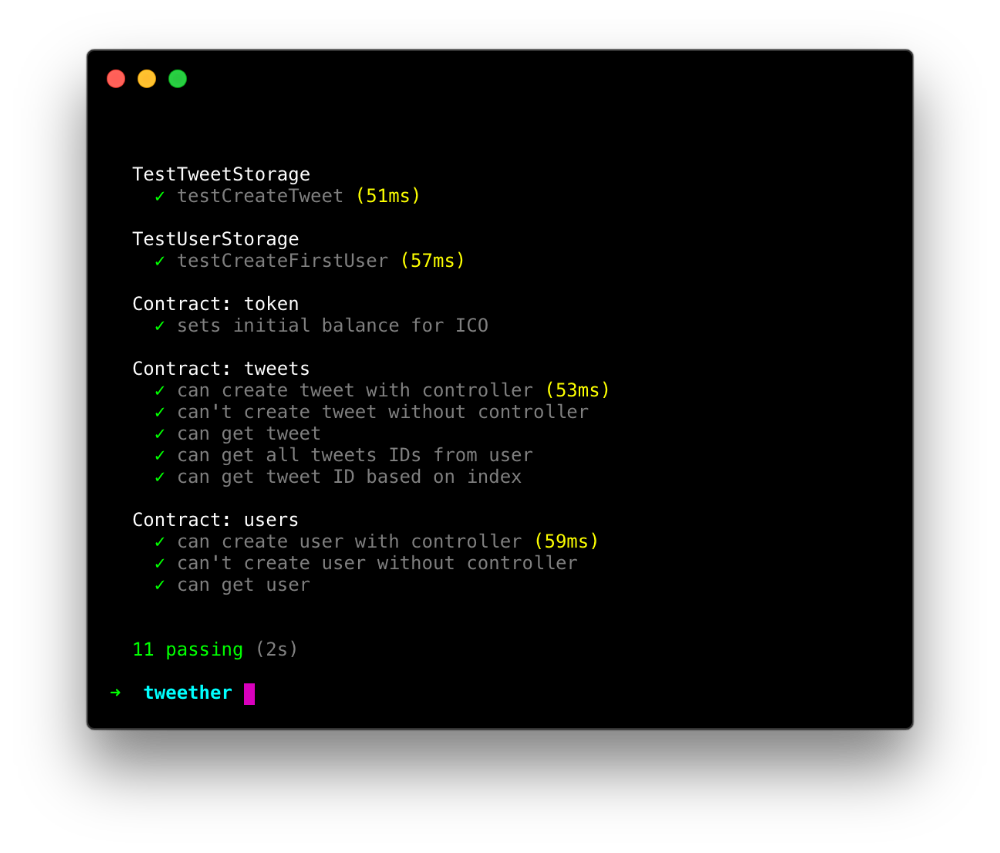 And it works!
Creating our token sale
As we mentioned earlier, there's no point in having a token if everything is owned by you anyway. The next step is to create an ICO contract where people can send in ethers and get Tweether tokens in return!
We'll start by creating an empty contract for our ICO:
// contracts/token/TweetherICO.sol

pragma solidity ^0.5.10;

contract TweetherICO {

}
The first thing we want to do is fix the distribution of tokens. Right after the ICO contract is deployed, we want the token contract to send 75% of our token supply to it. For that, we'll create a new function in our token contract called fundICO.
// contracts/token/TweetherToken.sol

// ...

import "../helpers/Owned.sol"; // <-- Add this line

contract TweetherToken is StandardToken, Owned { // <-- Add "Owned"
  // ...

  // Add this function:
  function fundICO(address _icoAddr) onlyOwner public {
    transfer(_icoAddr, FOR_ICO);
  }
}
As you can see, we're again using our Owned library so that the fundICO function can only be accessed by the contract owner. It then uses the inherited transfer function to send exactly 750000 (the number given by FOR_ICO) of the sender's tokens to the given address (_icoAddr).
Now we simply need to deploy our ICO contract and call that function for the transfer to take place. For that, we'll create a new migration file:
// migrations/7_deploy_ico.js

const TweetherToken = artifacts.require("TweetherToken")
const TweetherICO = artifacts.require("TweetherICO")

module.exports = (deployer) => {

  deployer.deploy(TweetherICO)
  .then(() => {
    return TweetherToken.deployed()
  })
  .then(token => {
    return token.fundICO(TweetherICO.address)
  })

}
This should now have distributed the tokens for us so that 75% of them are in the TweetherICO contract, while 25% remain in our personal "owner" account.
If you try to run the previous test again, you'll see that it fails, which is a good thing!
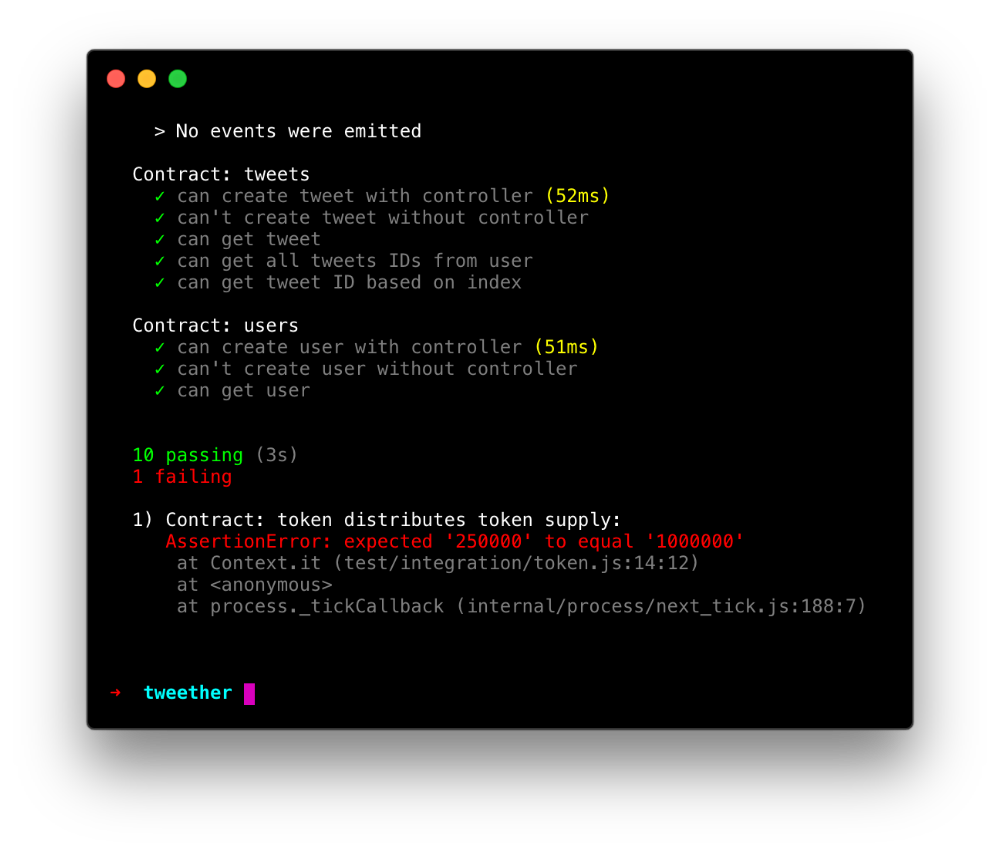 As expected, the owner address no longer has a million tokens, but "only" 250 000.
Let's update the test so that it reflects our new distribution, and checks the number of tokens in both our owner account and the ICO contract:
// test/integration/token.js

const TweetherToken = artifacts.require("TweetherToken")
const TweetherICO = artifacts.require("TweetherICO")

contract("token", (accounts) => {

  it("distributes token supply", async () => {
    const token = await TweetherToken.deployed()
    const ico = await TweetherICO.deployed()

    const icoBalance = await token.balanceOf.call(ico.address)
    const founderBalance = await token.balanceOf.call(accounts[0])

    assert.equal(icoBalance.toString(), "750000")
    assert.equal(founderBalance.toString(), "250000")
  })

})
Yay!
Yay!
Now that the distribution is working as expected, let's move on to the actual sale process. In order for our ICO contract to send its tokens to other addresses, it needs to be able to access the token contract's transfer function. We'll therefore import the TweetherToken contract into the ICO contract and save the deployed instance as a state variable, so that we can access it later.
// contracts/token/TweetherICO.sol

// ...

import "./TweetherToken.sol";

contract TweetherICO {

  TweetherToken token;

  function TweetherICO(address _tokenAddr) public {
    token = TweetherToken(_tokenAddr);
  }

}
Our constructor now expects to get the token contract's address as a parameter, so we need to update our latest migration file:
// migrations/7_deploy_ico.js

const TweetherToken = artifacts.require("TweetherToken")
const TweetherICO = artifacts.require("TweetherICO")

module.exports = (deployer) => {

  deployer.deploy(TweetherICO, TweetherToken.address) // Edit this line!
  .then(() => {

    // ...

  })

}
Now the question is: how does our ICO contract know what to do when users send ethers to its address?
For that, we need to use what's known as a fallback function -- that is, a function without a name, which is called if no other function is specified. Since we expect to receive ethers on this address, we also need to add the built-in payable modifier:
// contracts/token/TweetherICO.sol

// ...

contract TweetherICO {

  // ...

  // Add a fallback function:
  function () public payable {

  }

}
In this function, we now want to:
-
Get the amount of money the user has sent (in Wei).
-
Convert that money to a certain amount of Tweether tokens, based on a rate that we set.
-
Send the Tweether tokens to the user's address.
The amount of wei (ether's smallest denomination, in case you had forgotten) sent in the transaction can easily be retrieved using msg.value inside the function. The next step is then to convert this amount to Tweether tokens. For that, we first need to set a conversion rate, which we will make into a public state variable so that everyone can easily verify it. Let's say that 1 ETH gives you 1000 TWE tokens:
// contracts/token/TweetherICO.sol

// ...

contract TweetherICO {

  TweetherToken token;

  uint256 public RATE = 1000; // 1 ETH = 1000 TWE

  // ...

}
Now, in order to convert wei to TWE, we need to first convert the wei to ethers and then multiply the result with 1000.
While performing basic operations with Solidity's own operators works fine, many ICO contracts choose to use OpenZeppelin's SafeMath library in order to protect themselves from potential integer overflows. This becomes extra important when dealing with money of course, so let's follow the same best practice:
// contracts/token/TweetherICO.sol

pragma solidity ^0.5.10;

import "zeppelin-solidity/contracts/math/SafeMath.sol"; // <-- Add this line
import "./TweetherToken.sol";

contract TweetherICO {
  using SafeMath for uint256; // And this!

  // ...

}
Alright, now we can safely create an internal function called _getTokenAmount which will handle the conversion from wei to TWE for us:
// contracts/token/TweetherICO.sol

// ...

contract TweetherICO {

  // ...

  // Add this function:
  function _getTokenAmount(uint256 _weiAmount) internal view returns (uint256) {
    return _weiAmount.div(10 ** 18).mul(RATE);
  }

}
Finally, we call this function in our fallback function, followed by the token contract's transfer function to send a certain amount of tokens to their rightful new owner!
// contracts/token/TweetherICO.sol

// ...

contract TweetherICO {

  // ...

  function () public payable {
    uint256 _amount = _getTokenAmount(msg.value);

    token.transfer(msg.sender, _amount);
  }

  // ...

}
Looks good! Now we just need to test it.
In our test, we will simply send a transaction of 1 ETH from a random account to the ICO contract. After the transaction, we should expect the account to have received 1000 TWE, while the ICO contract's balance should have been reduced to 749 000 TWE.
// test/integration/token.js
// ...
const web3 = require("web3")
const {
utils: { toWei },
} = web3
contract("token", (accounts) => {
// ...
it("can buy tokens", async () => {
const token = await TweetherToken.deployed()
const ico = await TweetherICO.deployed()
const userAddr = accounts[1] // A random account that we control
const wei = toWei("1", "ether") // We need to specify the value in wei
await ico.sendTransaction({
from: userAddr,
value: wei,
})
const userBalance = await token.balanceOf.call(userAddr);
assert.equal(userBalance.toString(), "1000")
const icoBalance = await token.balanceOf.call(ico.address);
assert.equal(icoBalance.toString(), "749000")
})
})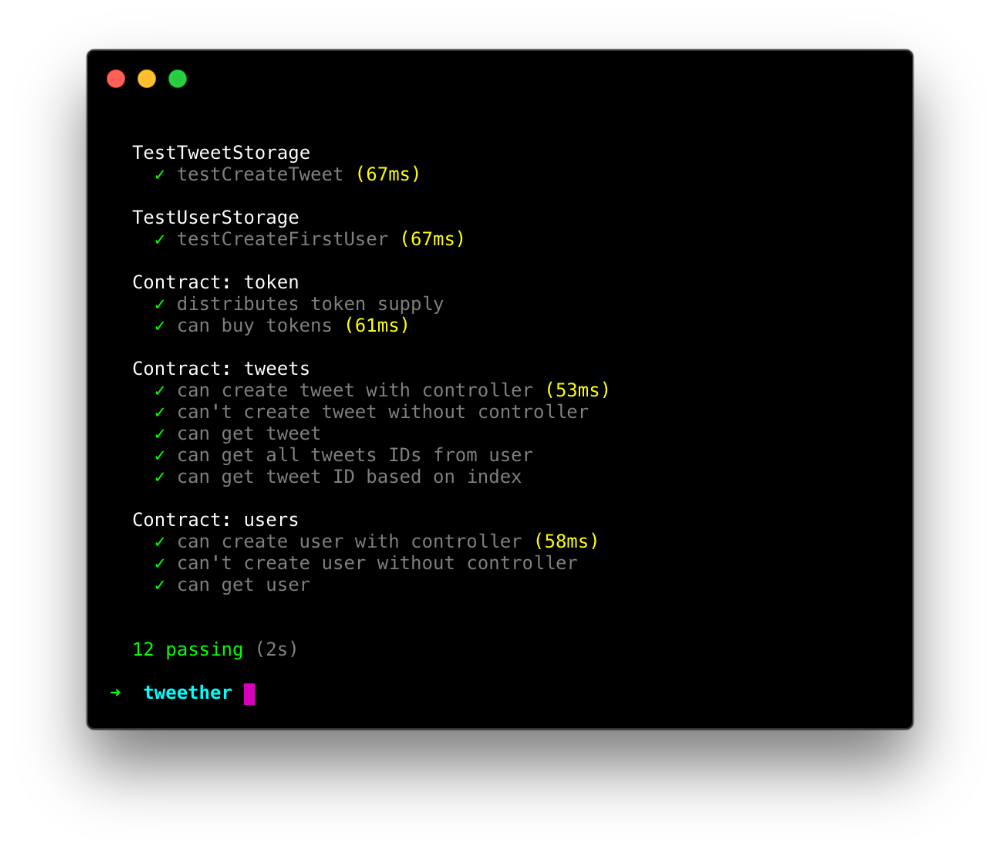 Lo and behold, our test passed!
Trying it with MetaMask
While it's always good to test your code, it's often more satisfying to see the results of your work wrapped in a nice UI. Let's see how we can deploy our ICO and get some Tweether tokens into our MetaMask wallet!
We start by running our migrations on the development network so that the new token contracts are uploaded (make sure that you have your local testrpc instance running in the background again):
truffle migrateWhen it's done, take note of what address the ICO contract was uploaded to and copy it!
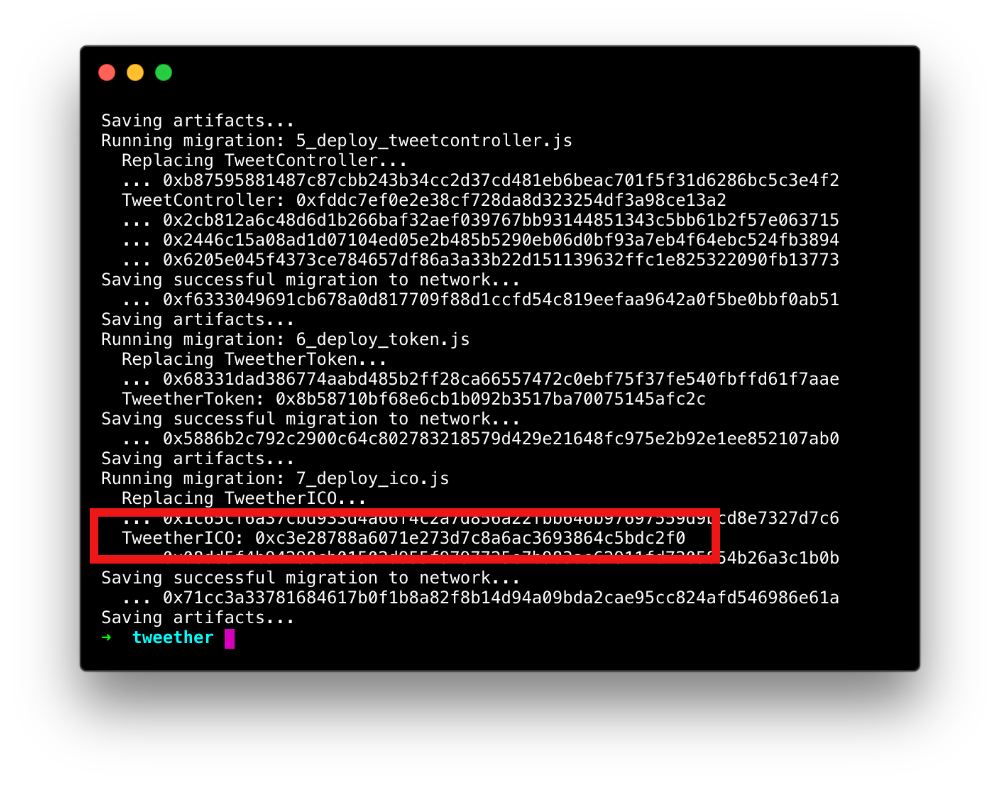
This is the address you'll want to copy.
Now head to MetaMask, and send a transaction of 1 ETH to that address. If your MetaMask wallet doesn't have any ethers, remember that you can run npm run fund-metamask to top it up!
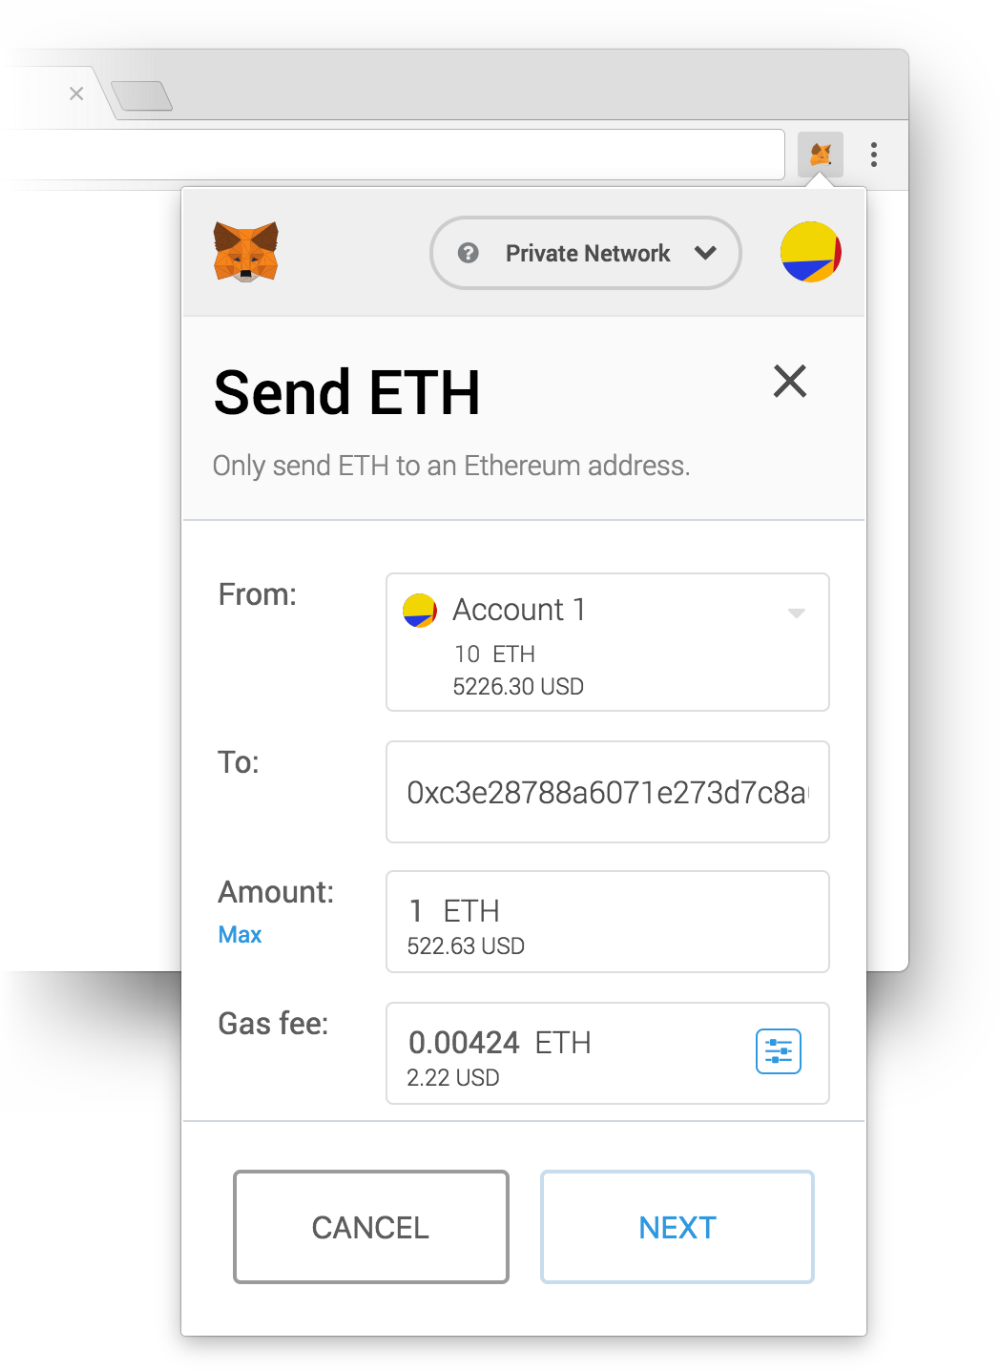 Sending a transaction of 1 ETH to the ICO contract.
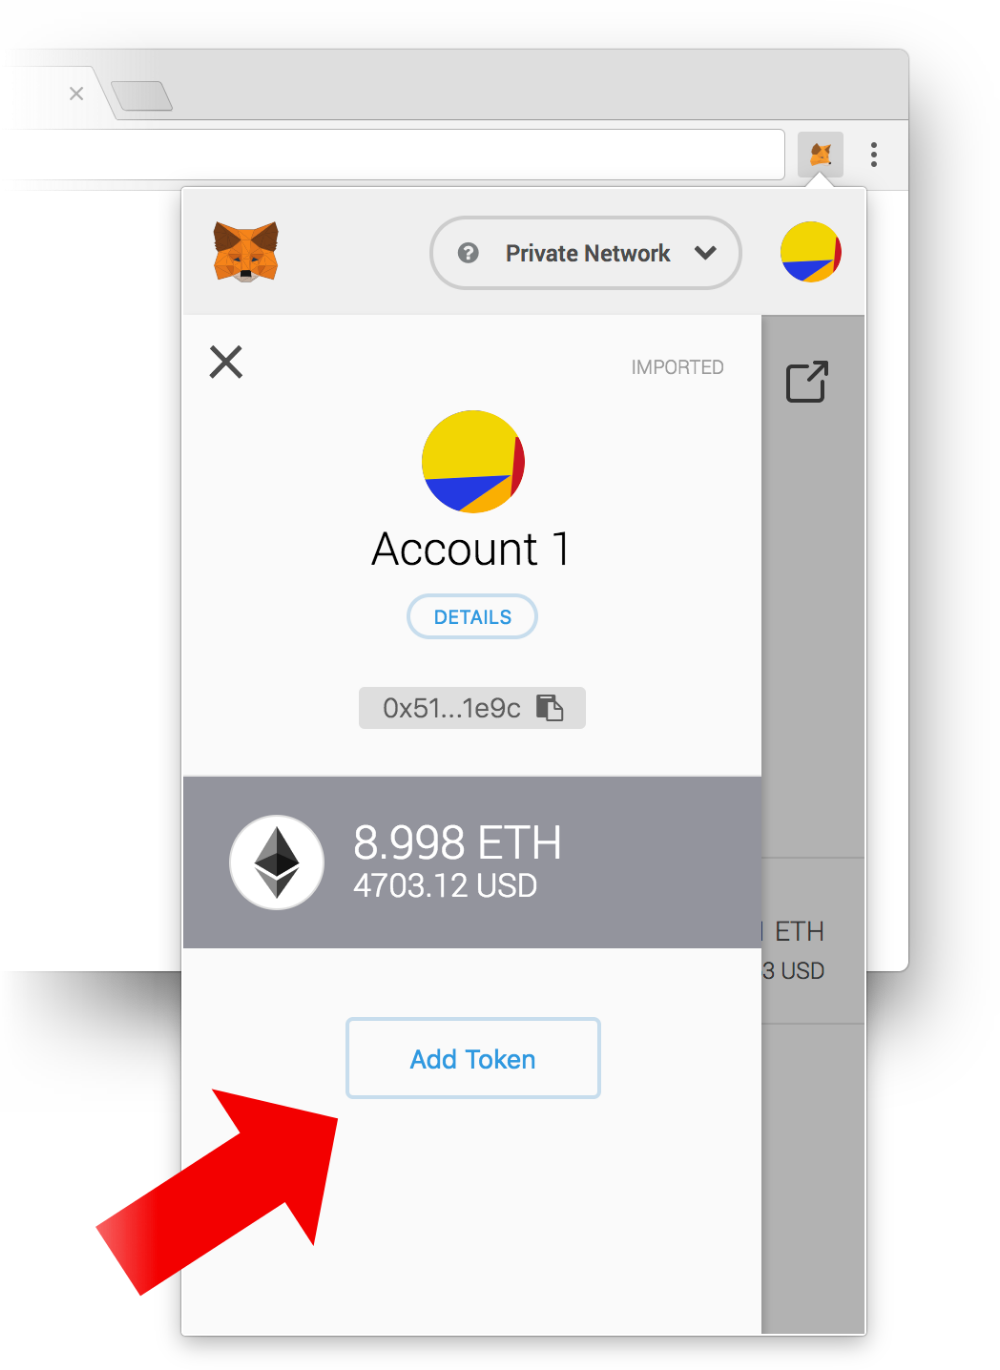
After the transaction has confirmed, you might be confused about why you can't see any tokens in your wallet. It turns out that you need to manually add the token address in MetaMask in order to "register" it -- after all, there are so many tokens out there, there's no way MetaMask could list them all by default!
To do this, open the side menu and click on the "Add token" button to get started:
Once you're on the token page, click on "Add custom token" and paste in the token contract's address in the address field.
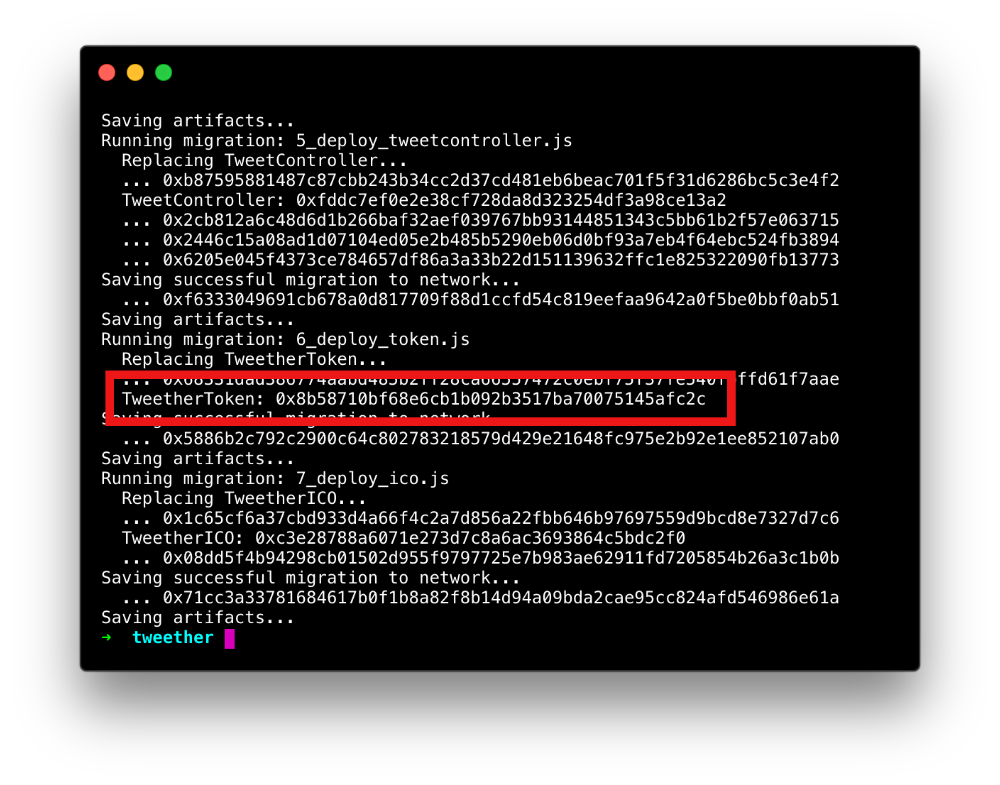 Copy your token contract's address...
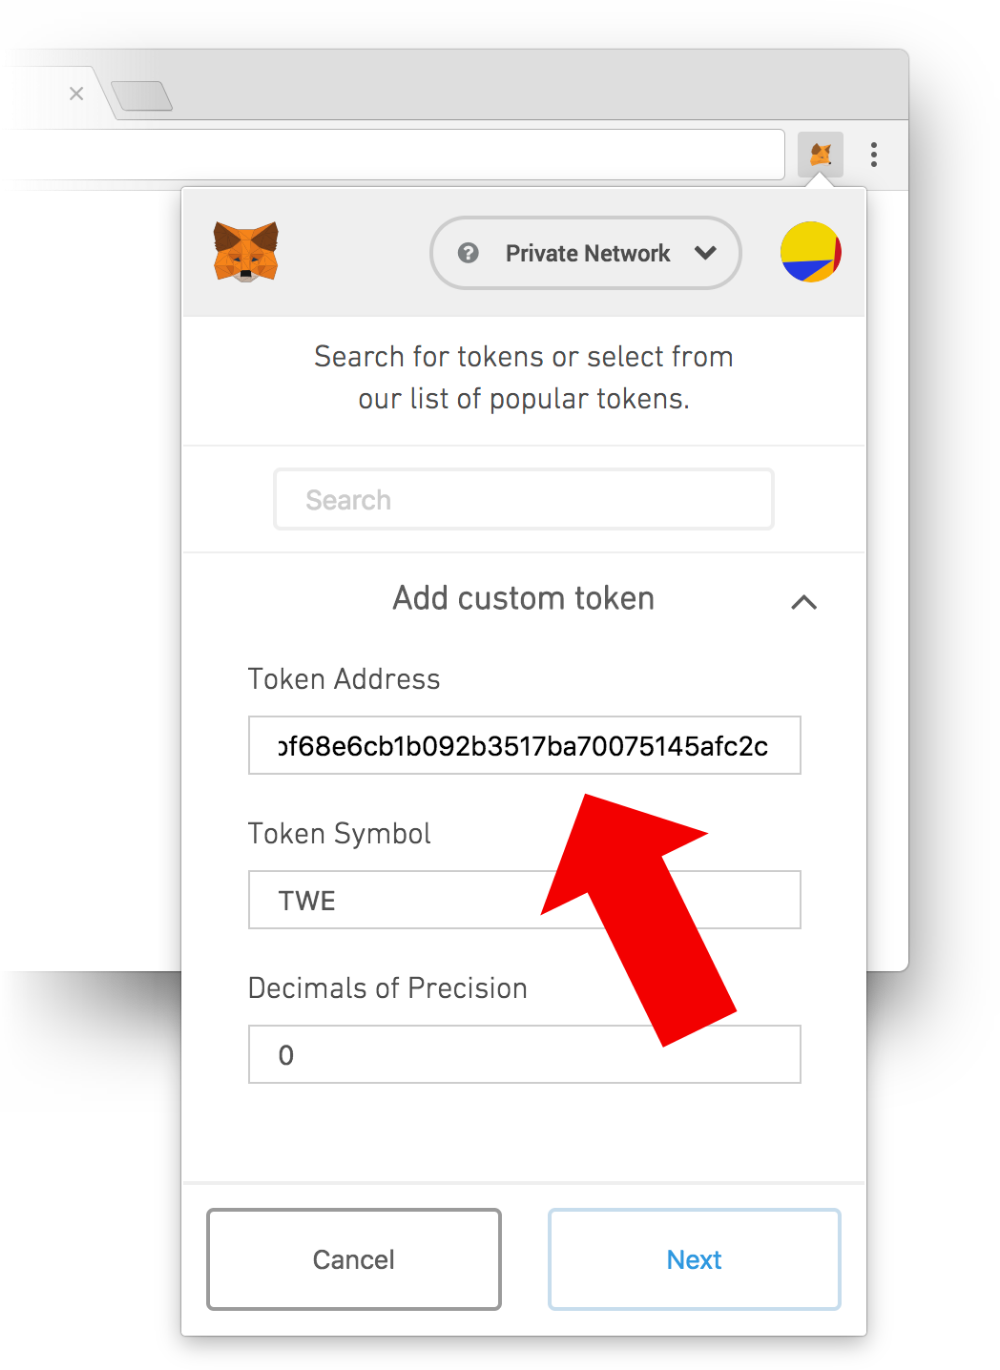 And paste it in! MetaMask should then autofill the "Token Symbol" and "Decimals" fields for you.
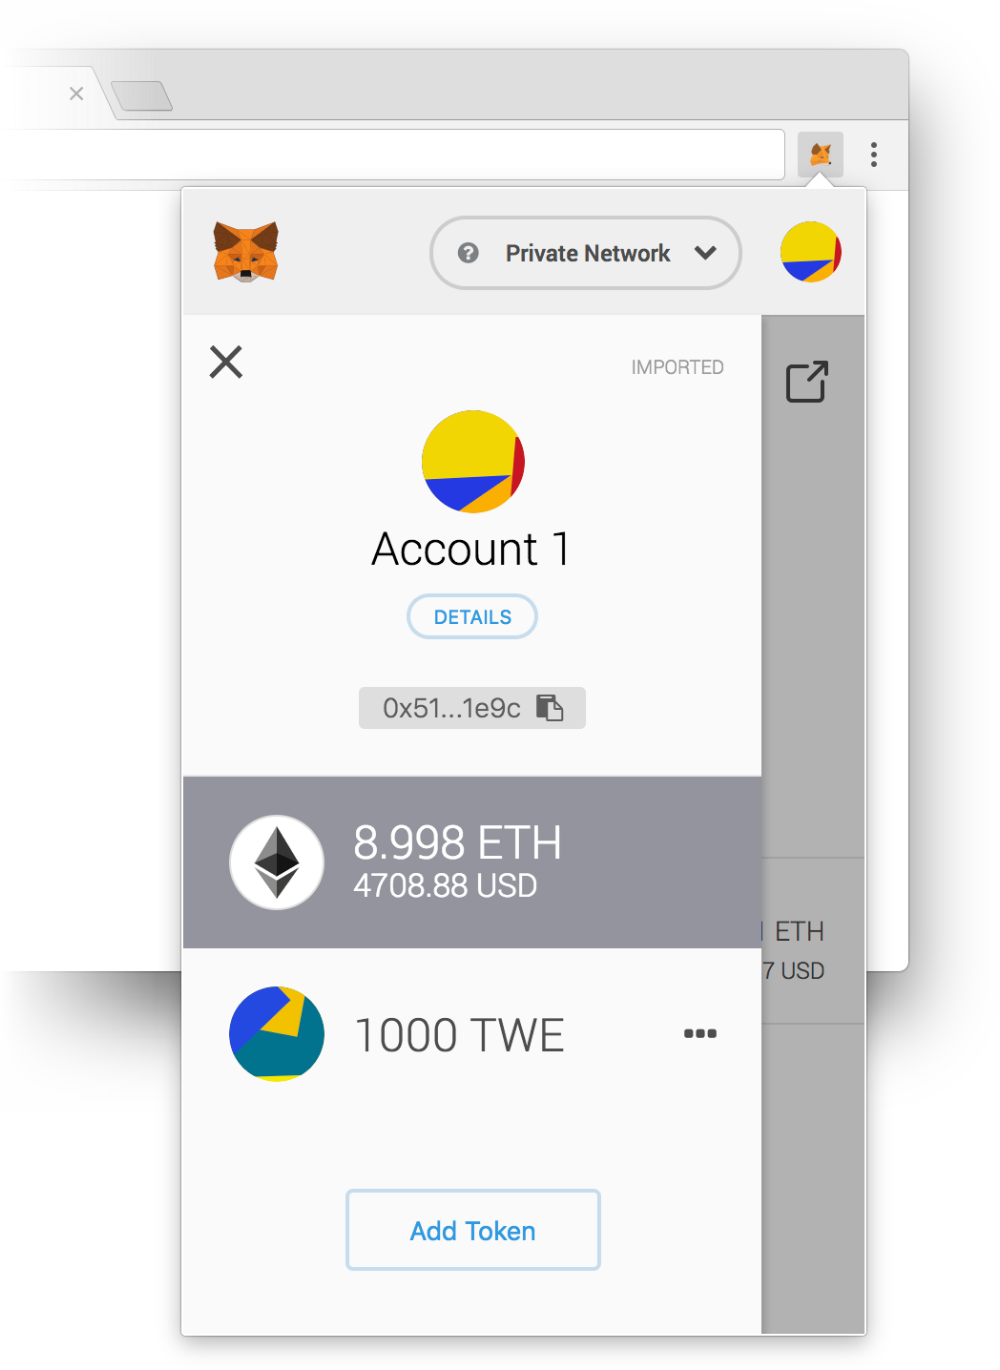
After confirming that you want to add the token, you should be able to see your TWE balance right next to your ETH balance in the wallet. How cool!
Hopefully, this will have given you enough knowledge about how ERC20 tokens and ICOs work for you to be able to build more advanced token sales in the future.